


Ⅰ. Introduction
Ⅱ. Case Report
1. Patient Information and Clinical Examination
2. Surgical Procedure
3. Immediate Temporization
4. Second Interim Prosthesis
5. Final Impression Using a Customized Impression Coping
6. Definitive Prosthesis and Delivery
7. Follow-up
Ⅲ. Discussion
Ⅳ. Conclusion
Ⅰ. Introduction
The timing of implant placement after extraction has been debated since the introduction of osseointegration and is commonly classified into categories ranging from immediate (type 1) to late (type 4) placement.1,2 Immediate placement can reduce the number of surgical procedures, shorten the treatment time, and help preserve peri-implant tissues.3
When combined with immediate temporization in the esthetic zone, an interim restoration can guide and maintain the peri-implant soft-tissue contours and emergence profile.4 However, the thin labial plate of the anterior maxilla is prone to post-extraction resorption;5therefore, simultaneous guided bone regeneration (GBR) of the implant–plate gap is recommended.6
In patients with parafunctional activities such as bruxism, implant-supported restorations may be subjected to excessive non-axial loading. Although bruxism is not considered an absolute contraindication to implant therapy, it has been associated with an increased risk of technical and biological complications, including prosthetic fracture, screw loosening, and marginal bone loss.7 Therefore, in patients with bruxism, occlusal designs based on the principles of implant protective occlusion (IPO) and nocturnal protection with an occlusal splint are recommended.8
This report describes the rehabilitation of a patient with bruxism whose maxillary anterior natural tooth-supported 3-unit fixed dental prosthesis (FDP) had two compromised abutment teeth: the right lateral incisor (#12), which developed secondary caries, and the left central incisor (#21), which showed clinical mobility, respectively. The patient was managed with immediate implant placement, immediate temporization, and a definitive restoration fabricated using customized impression copings derived from the existing interim restoration. This report presents the clinical workflow, prosthodontic considerations, and short-term follow-up outcomes.
Ⅱ. Case Report
1. Patient Information and Clinical Examination
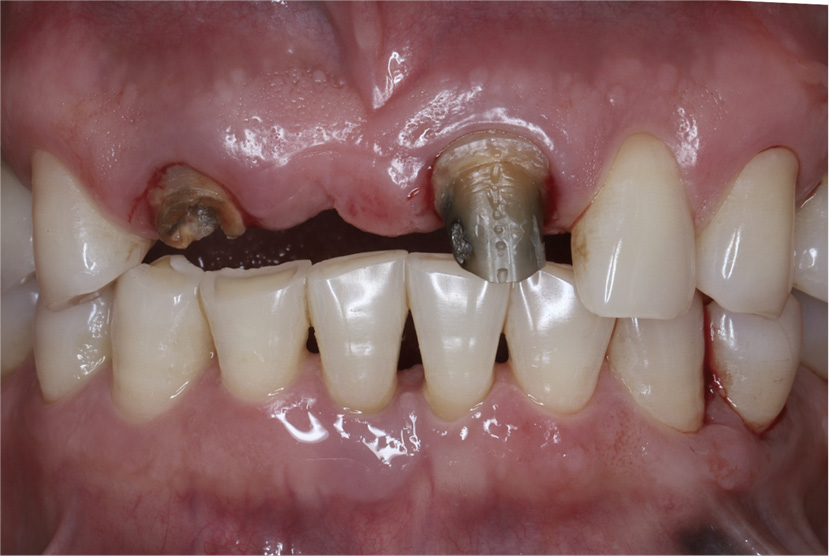
A 53-year-old man presented with a dislodged tooth-supported 3-unit FDP supported by the maxillary right lateral incisor (#12) and left central incisor (#21) (Fig. 1). The right lateral incisor presented as a retained root with extensive secondary caries, whereas the left central incisor exhibited clinical mobility. The gingival biotype was thick9, and the smile line was low. The patient had a long-standing history of nocturnal grinding10 and a deep overbite, but no signs of temporomandibular disorder were noted. Extraction of the maxillary right lateral incisor was unavoidable. Given the mobility of the left central incisor and the patient’s deep overbite, restoration with a single-tooth crown was considered high-risk. After discussion, extraction of both teeth and rehabilitation with an implant-supported 3-unit FDP were selected. The treatment plan comprised atraumatic extraction of #12 and #21, immediate implant placement with simultaneous GBR at both sites, immediate temporization with a screw-retained interim 3-unit FDP, definitive restoration with a monolithic zirconia 3-unit FDP after 6 months of soft-tissue conditioning, and nocturnal protection with an occlusal splint.
2. Surgical Procedure
Prosthetically driven implant positions were planned using cone-beam computed tomography, and a surgical guide was fabricated. Under local anesthesia, both teeth were atraumatically extracted (Fig. 2A). The sockets were debrided, and the labial plates were confirmed to be intact, both extraction sockets were classified as Elian Type I.11 Using the guide, a narrow-diameter implant was placed at #12 and a standard-diameter implant at #21 using a flapless approach (Shinhung Evertis; #12: Ø3.5×11.5 mm, #21: Ø4.5×11.5 mm; Shinhung, Seoul, Korea) (Fig. 2B). The implants were placed 3–4 mm apical to the planned gingival zenith and 1.5–2 mm palatal to the labial contour.12 The labial jumping gaps were grafted with deproteinized bovine bone mineral (Bio-Oss; Geistlich Pharma AG, Wolhusen, Switzerland) and covered with a collagen plug (Teruplug; Terumo, Tokyo, Japan), and healing abutments were connected (Fig. 2C).
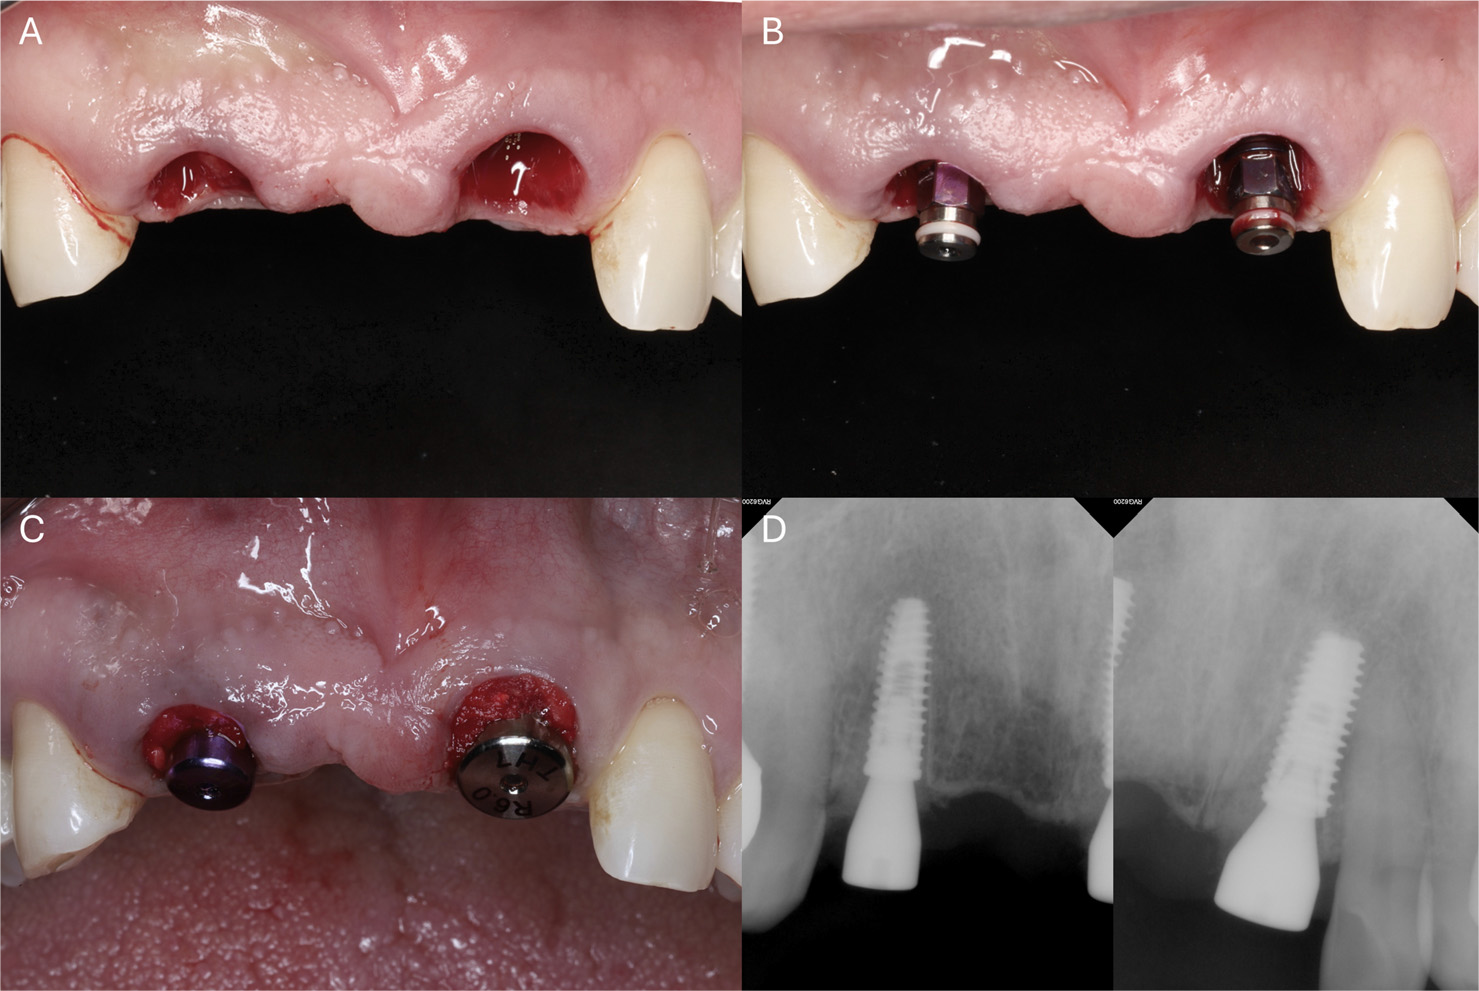
Insertion torque was 30 Ncm for #12 and 50 Ncm for #21. Given the narrow diameter of the implant at #12, both insertion torque values were considered sufficient for immediate temporization. Periapical radiography confirmed implant positions (Fig. 2D).
3. Immediate Temporization
Immediately after placement, the implants, adjacent and opposing teeth, and occlusion were scanned (Medit i900; Medit, Seoul, Korea). A 3-unit interim FDP milled from polymethyl methacrylate (PMMA; VIPI Block; VIPI, Pirassununga, Brazil) was bonded to non-hex link abutments (Geo Multibase; GeoMedi, Uiwang, Korea) and delivered the following day (Fig. 3A). Following the IPO principle,13 the prosthesis was kept out of occlusal contact in maximum intercuspation and during all excursive movements, with anterior guidance maintained on the natural dentition to minimize non-axial loading. The screw access emerged labially through the straight channel; this position was considered acceptable because the restoration was kept out of occlusion. The access opening was sealed with polytetrafluoroethylene (PTFE) tape and composite resin (Fig. 3B).
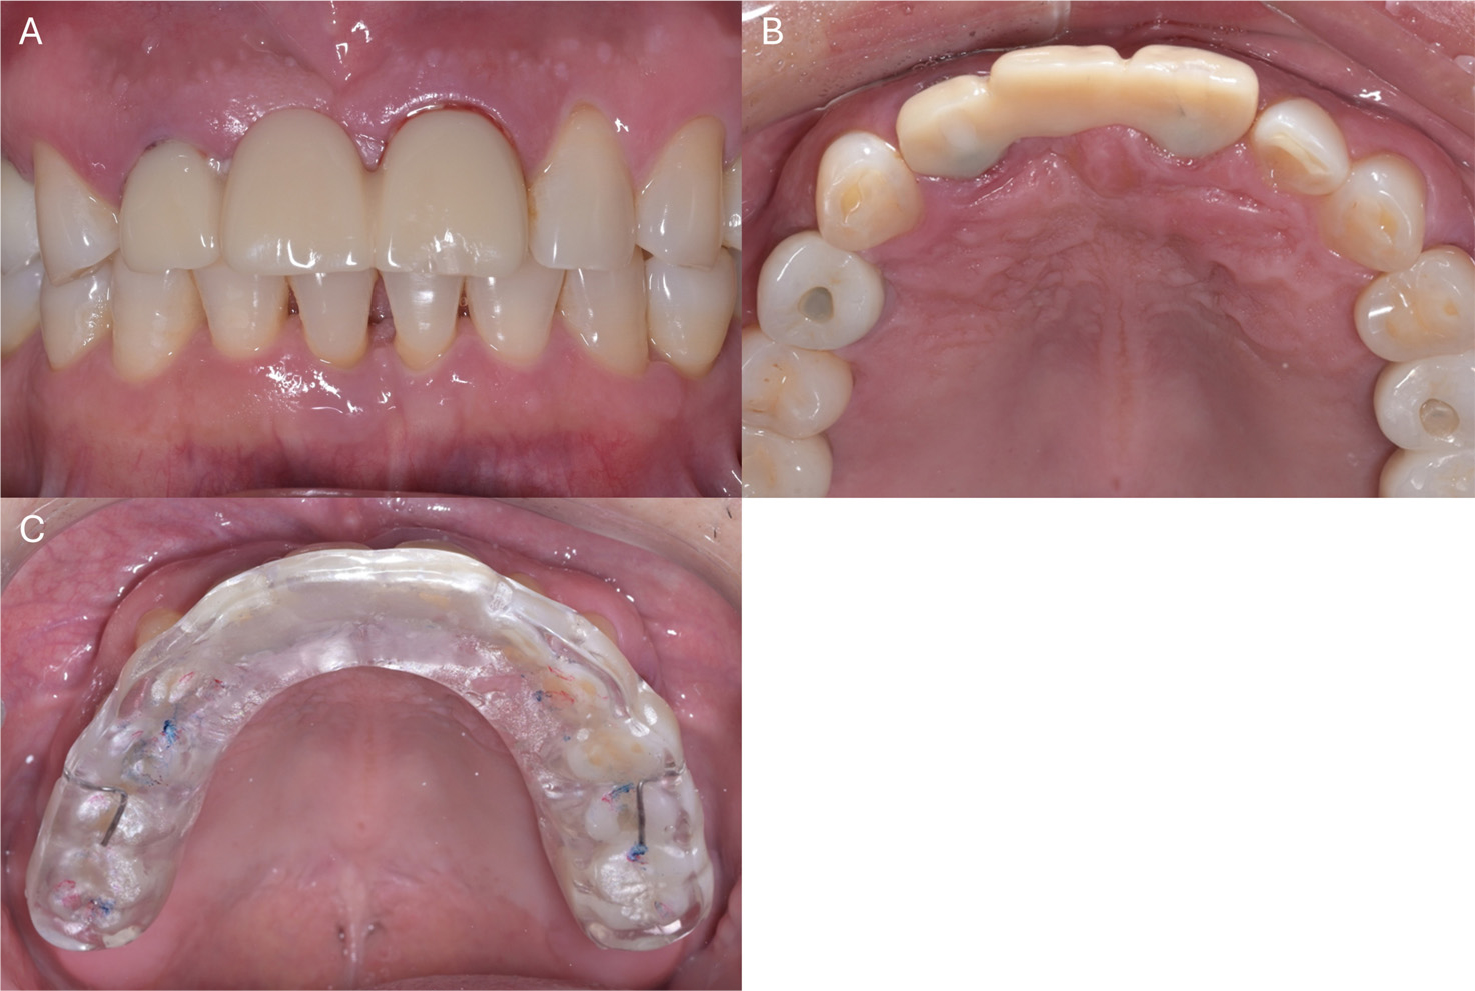
Fig. 3.
Immediate temporization and occlusal stabilization splint. (A) Frontal view of the screw-retained interim 3-unit fixed dental prosthesis after intraoral delivery, (B) Occlusal view after sealing the screw access holes with polytetrafluoroethylene tape and light-curing composite resin, (C) Maxillary full-arch hard occlusal stabilization splint with bilateral buccal retention clasps and relief over the implant prosthesis area.
A maxillary full-arch hard-stabilization splint was inserted for nocturnal protection (Fig. 3C). The splint was fabricated on a working cast with bilateral posterior buccal clasps for retention and guidance of insertion paths. Wax relief was applied over the implant-supported prosthesis so that the finished intaglio surface cleared the restoration. This design ensured that the splint was supported entirely by natural dentition and transmitted no load to the implants. It provided even bilateral posterior contacts and a flat occlusal surface that allowed unrestricted excursive movements. The patient was instructed to wear the splint nightly, follow a soft diet, avoid anterior mastication, and rinse with 0.12% chlorhexidine.
4. Second Interim Prosthesis
At 6 months, osseointegration was confirmed clinically and radiographically. A second PMMA interim restoration was then made with three modifications: (i) an engaging (hex-type) connection replaced the non-engaging link abutment to index implant geometry for customized coping and provide antirotational stability; (ii) the emergence profile was actively developed toward a critical/subcritical contour, and (iii) an angled screw channel redirected the screw-access opening palatally.
After removal of the first interim restoration, the developed soft tissue contour was scanned (Medit i900) and the second interim FDP, with a refined emergence profile (Fig. 4A), was used for gingival molding (Fig. 4B and 4C). With osseointegration established, the IPO principles applied to the first interim restoration were largely maintained. The primary load was directed to the natural teeth, and the lateral excursions were guided by the natural canines. However, during protrusion, shallow, flat, and partial contact was permitted on the implant-supported incisors to limit non-axial loading while providing functional guidance.
5. Final Impression Using a Customized Impression Coping
Accurate transfer of the developed contour is essential because a stock coping records only a round platform profile and does not reproduce the sculpted soft-tissue contour.14 A customized impression coping was made from the second interim restoration.15 Implant analogs were connected to the restoration, and a polyether putty index was used to record its transmucosal contour (Fig. 5A). A stock open-tray coping was seated in the index and customized with pattern resin (GC Pattern Resin LS; GC, Tokyo, Japan) to reproduce the contour from the implant platform to the gingival margin (Fig. 5B). Splinting improves multi-implant impression accuracy,16 but a laboratory-splinted rigid unit may not seat passively. The two customized copings were sectioned centrally, seated separately, verified, and reconnected intraorally with pattern resin (Fig. 5C) to reproduce the interimplant relationship without distortion.17
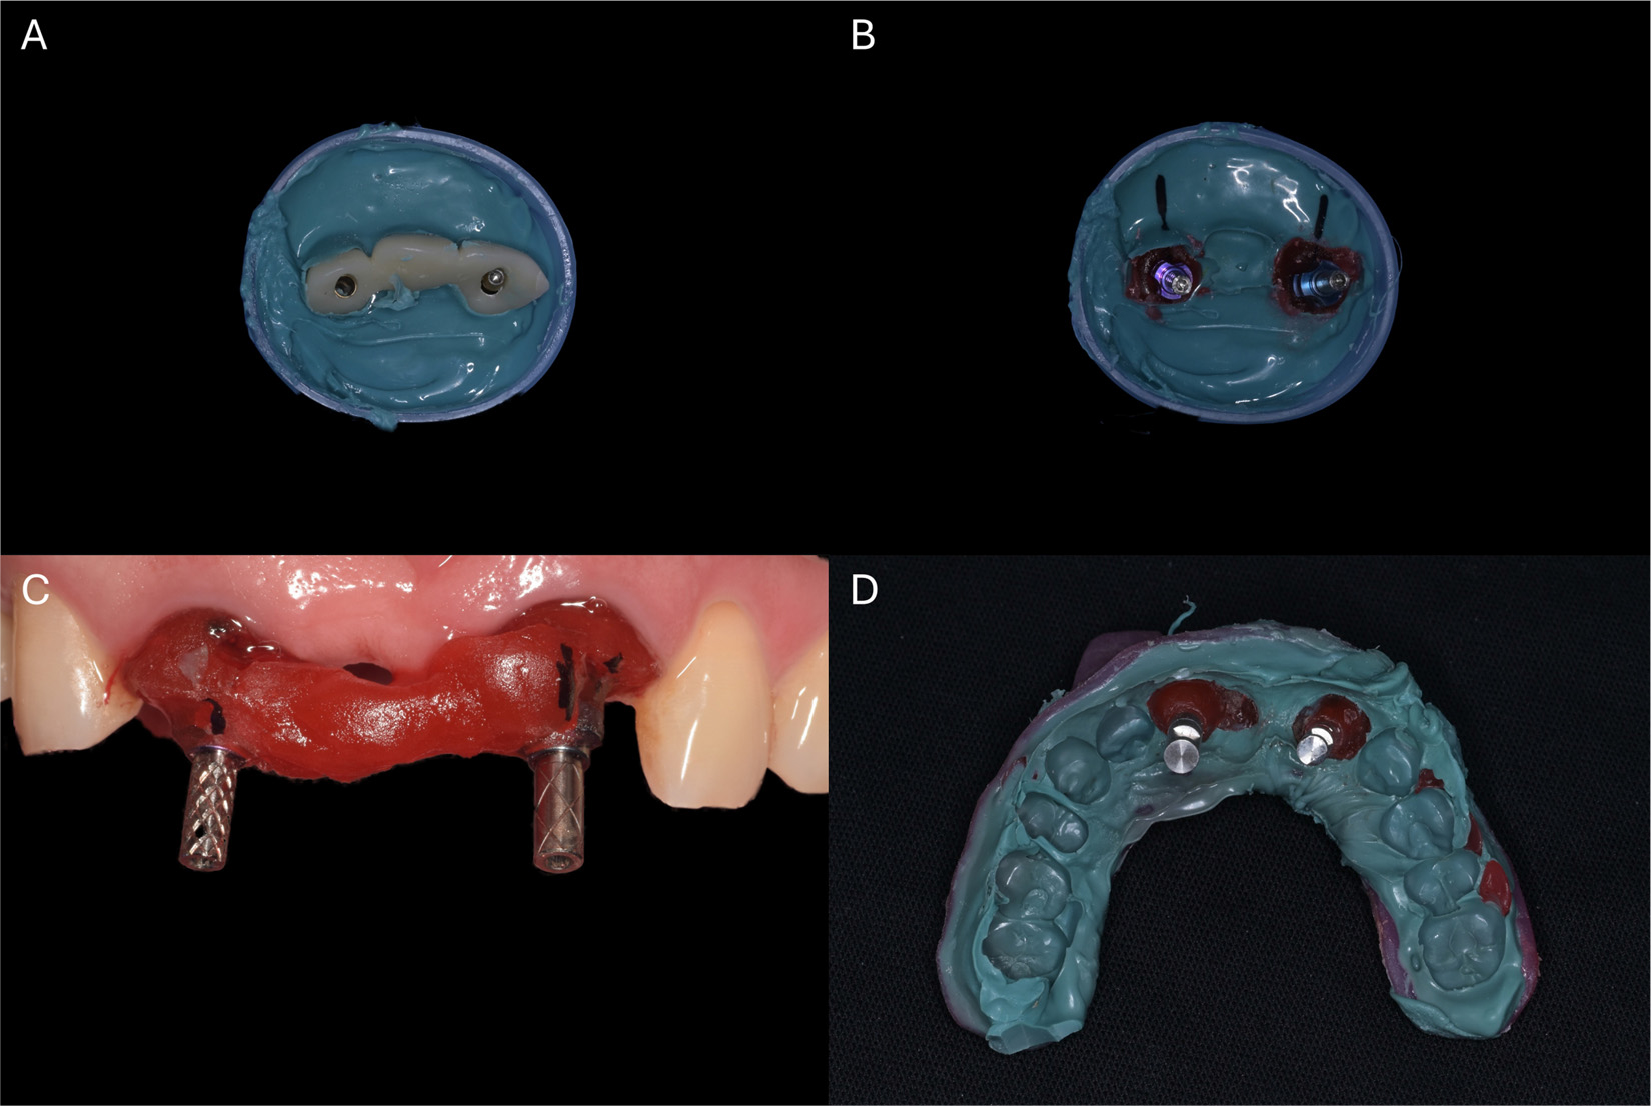
Fig. 5.
Customized impression coping and final impressions. (A) Polyether putty index recording the transmucosal contour of the second interim restoration with the implant analogs in place, (B) Stock impression copings are positioned within the putty index, with transmucosal portions customized using pattern resin, (C) Customized impression copings are seated intraorally and reconnected with pattern resin to complete the splinting, (D) Final impression with splinted customized impression copings.
A final open-tray impression was made with polyether material (Impregum; 3M ESPE, Seefeld, Germany) (Fig. 5D), after which the second interim restoration was reinserted to preserve the soft-tissue contour. A working cast with a soft-tissue replica was fabricated. A study cast with the second interim restoration in place, a facebow transfer, and a bite registration (O-Bite; DMG, Hamburg, Germany) enabled transfer of the contour and occlusion to a semi-adjustable articulator.
6. Definitive Prosthesis and Delivery
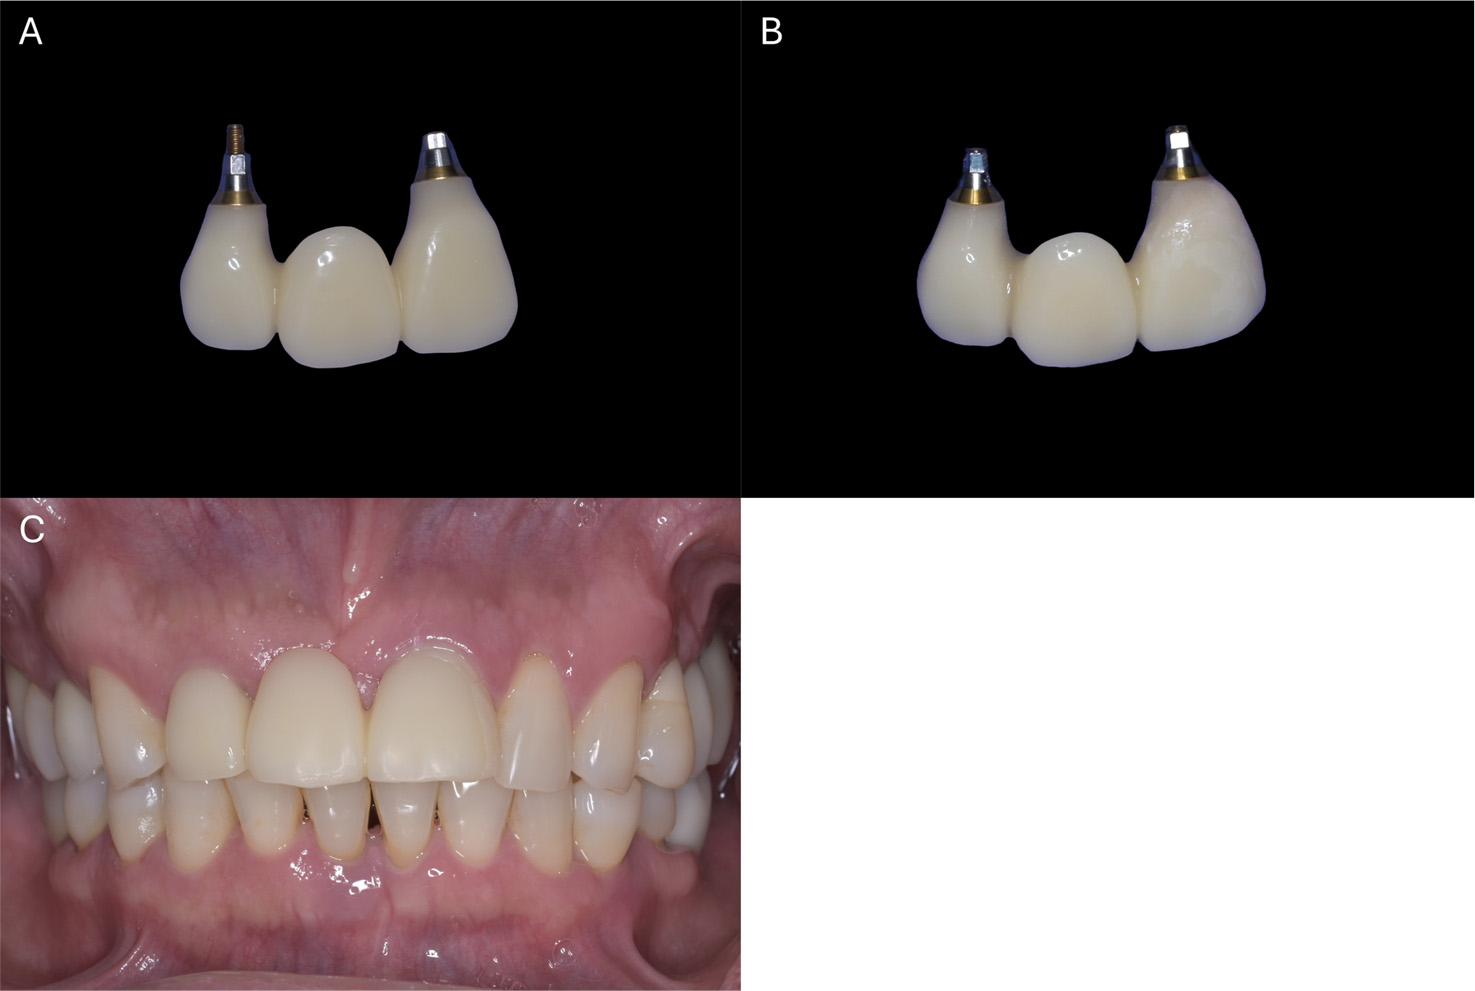
A monolithic zirconia 3-unit FDP was designed on the master cast, referencing the contour and occlusion verified in the second interim restoration. A screw-and-cement-retained prosthesis supported by customized hex-type titanium abutments was selected to provide retrievability and an individualized emergence profile. During the computer-aided design (CAD) process (Exocad DentalCAD; Exocad, Darmstadt, Germany), the study cast of the second interim restoration was superimposed to transfer the existing occlusal information, ensuring that the definitive prosthesis maintained the same occlusal scheme. As the straight screw access at #21 emerged through the incisal edge, an angled screw channel was used to redirect the screw-access opening palatally. The abutments and framework were milled separately, and the restoration was fabricated from multilayer zirconia (Bright Multilayer Block; Dentium, Seoul, Korea) and stained and glazed to shade A3 (Fig. 6A).
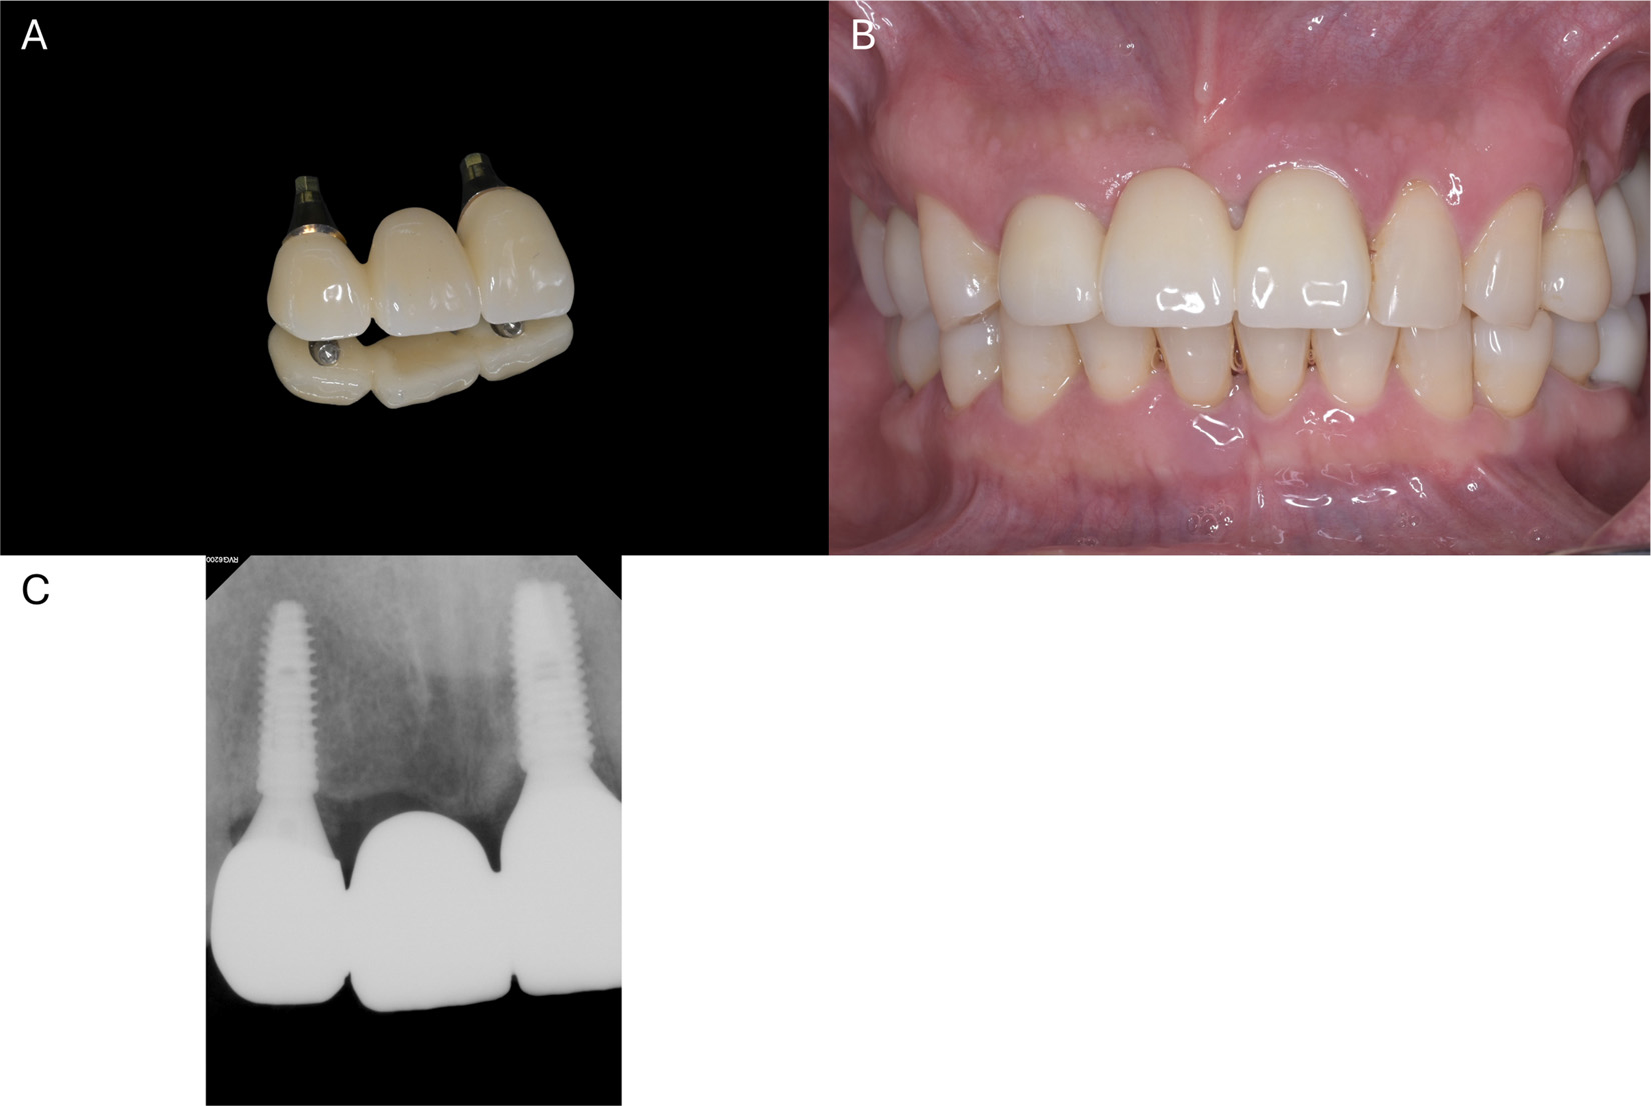
The customized abutments were tightened, and the definitive FDP was tried in to evaluate fit, contacts, profile, and shade. Resin-modified glass-ionomer cement (Vitremer; 3M ESPE, St. Paul, USA) was applied, and the restoration was seated intraorally. The abutment screws were then loosened, allowing retrieval of the abutment–prosthesis assembly. Excess cement was removed extraorally, and the cervical area was polished, thereby minimizing residual-cement risk.18 The assembly was repositioned and secured with the abutment screws (Fig. 6B). Because the two implants were nearly parallel, the abutment-prosthesis assembly followed a single insertion path and seated passively without binding. Complete seating and adaptation were confirmed radiographically (Fig. 6C). The screw-access openings were sealed with PTFE tape and composite resin. Nightly splint use and regular follow-up visits were reinforced.
7. Follow-up
The patient was followed up at 1 week and at 1 and 2 months. At the 2-month follow-up, the peri-implant mucosa was healthy and harmonious with the adjacent dentition, the developed emergence profile was preserved, and marginal bone levels were stable, with accurate implant–abutment adaptation. No prosthetic complications occurred, and the patient reported esthetic and functional satisfaction and good splint compliance. Long-term follow-up was planned.
Ⅲ. Discussion
Immediate placement and temporization require careful case selection.3 In this case, despite the relatively low torque of the narrow-diameter #12 (30 Ncm), the expected load distribution provided by the splinted 3-unit FDP justified immediate temporization.
While individual techniques, such as staged temporization and IPO, are well documented, reports describing their integration into a cohesive, biomechanically protective workflow for patients with bruxism in the esthetic zone remain scarce. The primary contribution of this case is a coordinated, phase-by-phase load management strategy designed to shield the implants against parafunctional overload. Rather than relying on a single protective measure, biomechanical risks were mitigated through an IPO-based occlusal scheme that redirected excursive forces to the natural dentition,13,19 together with early occlusal splint protection using a hard splint over the implant prosthesis.
Furthermore, the staged temporization progressively shaped the peri-implant soft-tissue contour and allowed verification of the emergence profile.20 This approach may be biomechanically and biologically more favorable than developing the soft tissue profile in a single step, as it allows the early peri-implant tissue to stabilize before active molding.
Because this was a single case, prospective studies with larger sample sizes are necessary to evaluate and validate this workflow. Future studies should also incorporate standardized evaluation tools, such as the Pink Esthetic Score and quantitative marginal bone measurements, to supplement qualitative assessments.
Ⅳ. Conclusion
Integrating staged soft-tissue management with careful biomechanical load control is essential for the esthetic rehabilitation of patients with parafunctional habits. This case demonstrates that early occlusal splint therapy combined with implant-protective occlusion can safely manage parafunctional forces, allowing for predictable emergence profile development and favorable short-term outcomes in the anterior maxilla.