

Ⅰ. Introduction
Ⅱ. Materials and Methods
Ⅲ. Results
Ⅳ. Discussion
1. Indications for lateral approach of maxillary sinus augmentation
2. Surgical procedure of the lateral approach for sinus augmentation
Ⅴ. Conclusion
Ⅰ. Introduction
Since sinus lift surgery was first introduced by Tatum et al., it has been widely used as an effective method to obtain sufficient bone height for implant placement in cases where bone resorption or pneumatization has occurred following the loss of maxillary posterior teeth.1 The maxillary sinus is a pyramid-shaped space within the maxilla, with an average volume of 11.3 cm³, making it the largest of the paranasal sinuses.2 This space, lined with the Schneiderian membrane approximately 0.30 mm thick, is elevated by dentists to create a submembranous space for bone formation, thereby ensuring sufficient bone support for implant placement.3
Maxillary sinus augmentation procedures are broadly classified into lateral and the crestal approaches, with the lateral approach requiring a higher level of clinical experience because of its relative complexity. However, it offers the advantage of direct visualization of the Schneiderian membrane, allowing precise assessment of its condition and enabling a greater volume of bone grafting as needed. This study aimed to systematically examine the step-by-step surgical technique of the lateral approach for sinus lift and to explore the critical factors at each stage to achieve successful bone grafting.
Ⅱ. Materials and Methods
This study included 31 patients who underwent lateral maxillary sinus augmentation performed by a single dentist at our institution between January 2024 and March 2025. All the patients achieved successful bone graft outcomes without any signs of bone resorption or other indicators of failure. Preoperative and postoperative radiographs and intraoperative clinical photographs were obtained for all patients. The surgical procedures performed were compared with those described in previously published studies.
Ⅲ. Results
There were no significant differences in the design of the incision and lateral windows compared with the method used in this study. However, regarding lateral window grinding, other studies introduced techniques such as grinding and infracture in addition to the removal and repositioning methods used in this study. Whereas some studies have emphasized the use of specialized kits for lateral sinus membrane elevation to ensure safety and procedural convenience, this study demonstrated that sufficient safety and convenience can be achieved using a conventional 45° Freer elevator alone. Furthermore, during graft material application and window repositioning, fibrin glue was used in this study to enhance graft handling and barrier effects. In contrast, other studies reported successful bone graft outcomes using barrier membranes instead of fibrin glue.
Ⅳ. Discussion
1. Indications for lateral approach of maxillary sinus augmentation
After tooth extraction in the maxillary posterior region, alveolar bone resorption and maxillary sinus pneumatization lead to a deficiency in the vertical bone volume required for implant placement. If the residual bone height is 10 mm or greater and an adequate bone width is present after tooth loss, sinus augmentation is not necessary. However, in most cases, the maxillary posterior region has insufficient residual bone height for implant placement following tooth loss. Liang et al. analyzed panoramic X-rays of 180 edentulous maxillary posterior regions in patients aged 60 to 90 years and found that the average residual alveolar bone height was 5.85 mm.4 This finding suggests that sinus augmentation should be considered in most cases to facilitate implant placement in the edentulous maxillary posterior region.
Several studies have investigated the indications for sinus augmentation in edentulous maxillary posterior regions with insufficient vertical bone height. In 1987, Misch first classified bone grafting methods for implant placement based on the residual alveolar bone height in the maxillary posterior region, stating that a lateral approach sinus augmentation is necessary when the residual bone height is less than 10 mm (Table 1).5In 2008, Wang and Katranji introduced the ABC classification, which categorizes residual alveolar bone height into three classes and three subcategories based on the assumption of placing a minimally sized posterior implant (4 mm in diameter and 10 mm in length), thereby determining the appropriate sinus augmentation approach and whether simultaneous implant placement is feasible (Table 2).6 Recently, classification attempts have been made to determine whether to use the lateral or crestal approach based not only on the residual alveolar bone volume but also on factors such as the presence of sinus diseases, including sinusitis, and the integrity of the Schneiderian membrane (Table 3).7
Table 1.
Recommendation for maxillary posterior implant by Misch
Table 2.
ABC classification and recommended treatment option for maxillary sinus augmentation
| Class | Residual Bone Height (RBH) | Procedure | Implant placement |
| A | 10 mm ≤ RBH | Implant placement | Simultaneous placement |
| B | 6 mm ≤ RBH ≤ 9 mm | Osteotome | Simultaneous placement |
| B-h | 6 mm ≤ RBH ≤ 9 mm | Osteotome and ridge expansion GBR*/onlay graft | Simultaneous placement Delayed placement |
| B-v | 6 mm ≤ RBH ≤9 mm | GBR followed by osteotome | Delayed placement |
| B-c | 6 mm ≤ RBH ≤9 mm | GBR and/or onlay graft followed by osteotome | Delayed placement |
| C | RBH ≤ 5 mm | Lateral wall sinus elevation |
Simultaneous placement with implant stability Delayed placement without implant stability |
| C-h | RBH ≤ 5 mm | Lateral wall sinus elevation and GBR/onlay graft | Delayed placement |
| C-v | RBH ≤ 5 mm |
Lateral wall sinus elevation and GBR, followed by onlay graft if indicated | Delayed placement |
| C-c | RBH ≤ 5 mm |
Lateral wall sinus elevation and GBR, followed by onlay graft if indicated | Delayed placement |
Table 3.
Decision tree for maxillary sinus augmentation by Lyu M et al.
| Residual Bone Height (RBH) | Other condition | Procedure |
| 6 mm ≤ RBH | Transcrestal approach | |
| 4 mm ≤ RBH < 6 mm | Transcrestal approach | |
| 4 mm ≤ RBH < 6 mm | Sinus disease | Lateral approach |
| 2 mm ≤ RBH < 4 mm | Lateral approach | |
| 2 mm ≤ RBH < 4 mm | Lateral wall thickness > 2 mm | Transcrestal approach |
| RBH < 2 mm | SFT | Transcrestal approach |
| RBH < 2 mm | SUT | Lateral approach |
Whether to perform simultaneous implant placement with sinus augmentation is also a consideration for dentists aiming to reduce treatment time and cost for patients, and several studies have investigated this aspect. Misch reported that when the residual alveolar bone height is less than 5 mm, delayed implant placement is required.5 Zitzmann and Scharer reported that simultaneous implant placement is possible when the residual alveolar bone height is between 4 and 6 mm, but delayed implant placement is required when the residual bone height is less than 4 mm.8 However, recent reports have suggested that simultaneous implant placement is possible even with a smaller amount of residual alveolar bone. Research has demonstrated that even in severely resorbed maxillary posterior regions with less than 3 mm of residual alveolar bone, sinus augmentation and immediate implant placement can be successfully performed with a favorable survival rate.9 Furthermore, research has demonstrated that even with a minimal residual bone height of 1 to 2mm, implants placed simultaneously with sinus augmentation showed high survival rates over a long-term follow-up period of 9 years.10
These classifications of indications for maxillary sinus augmentation and simultaneous implant placement help clinicians select appropriate surgical protocols and plan the treatment phases.
2. Surgical procedure of the lateral approach for sinus augmentation
An overview of the lateral approach to maxillary sinus augmentation is presented in Fig. 1.
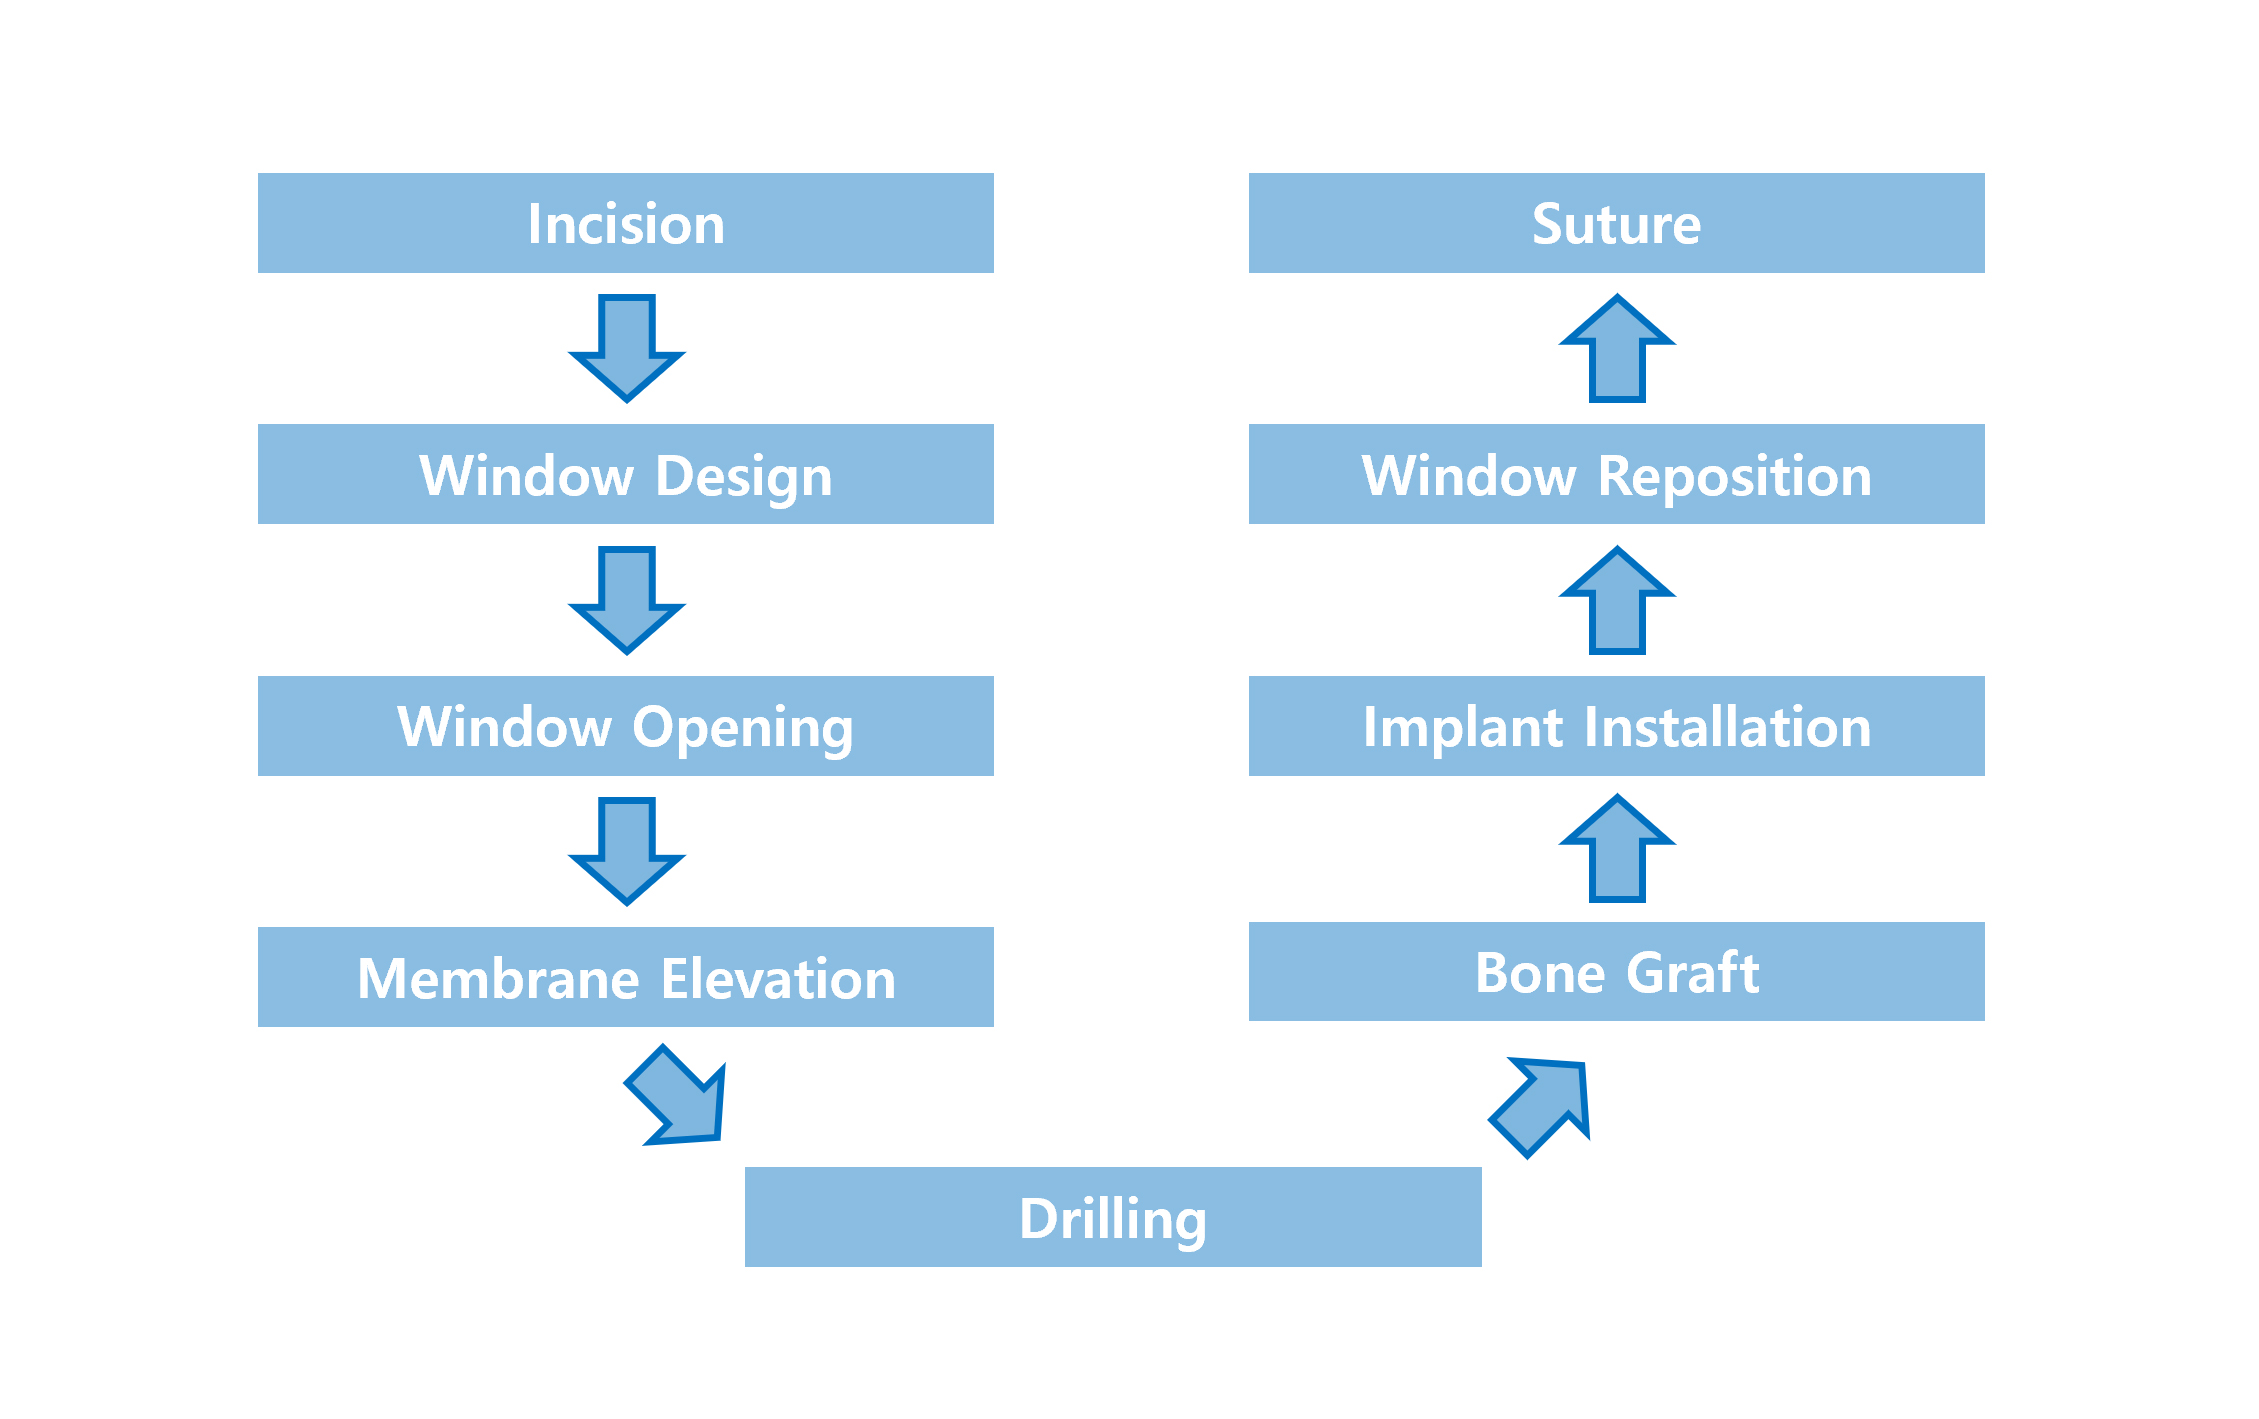
a. Incision line design
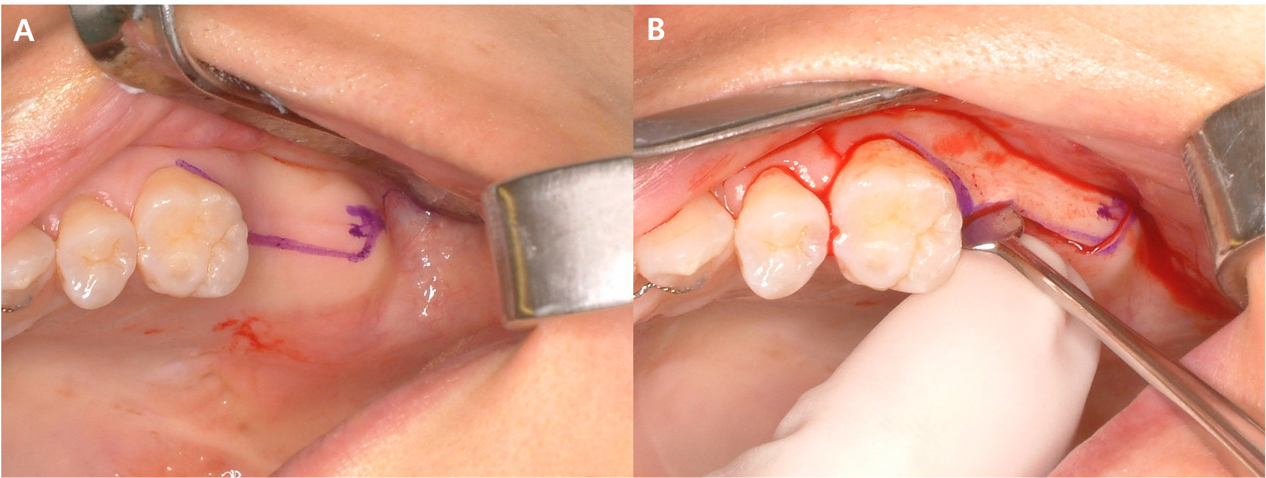
The incision should be large enough to provide adequate visibility of the maxillary sinus wall. An incision that is too small may result in limited visibility of the lateral sinus wall during surgery, making instrument manipulation challenging during membrane elevation and increasing the risk of membrane perforation. A midline incision was made in the edentulous area, and vertical incisions are made at the mesial and distal line angles of the adjacent anterior and posterior teeth (Fig. 2). If a midcrestal incision is made slightly palatally, it allows for easier identification of the palatal boundary of the implant fixture during simultaneous implant placement. When making an incision in the posterior edentulous region, it is essential to avoid extending the incision line to the pterygomandibular raphe, because this could lead to postoperative limitations in mouth opening.11
b. Window design and opening
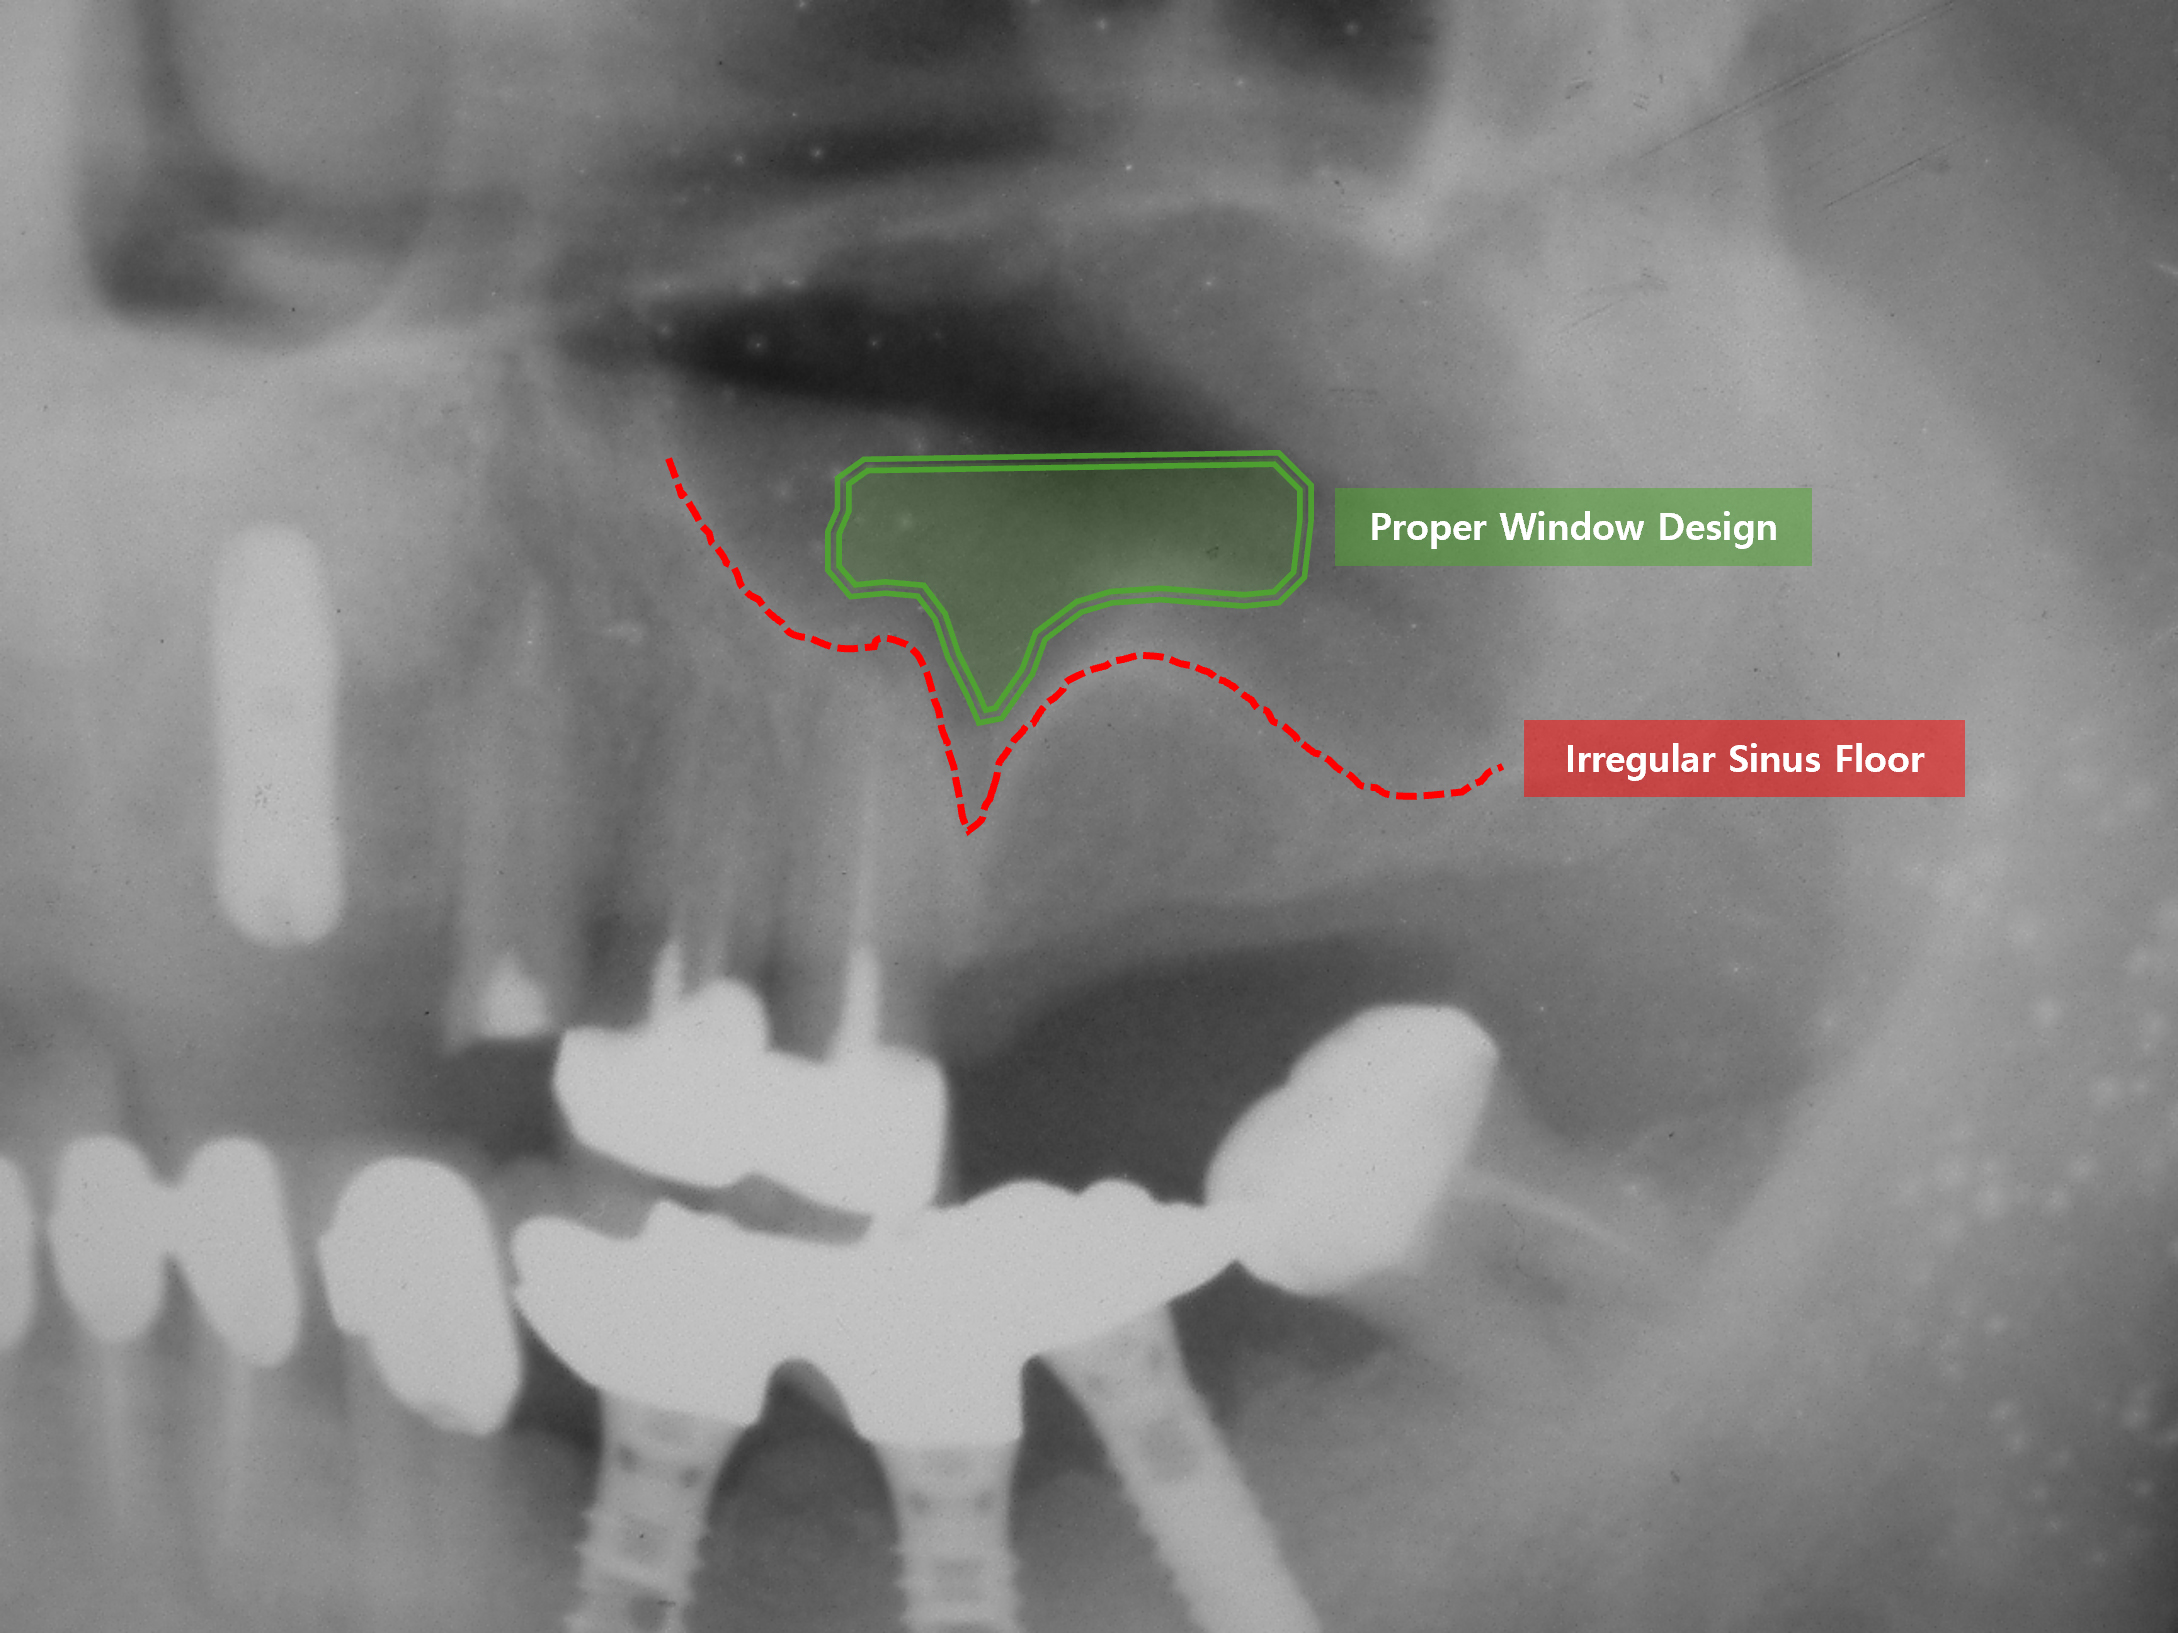
After making the incision, sufficient periosteal elevation in the buccal and superior directions exposes the lateral wall of the maxillary sinus. Periosteal elevation should be adequately performed to allow for proper design of the window. Once the lateral wall is exposed, a sterilized pencil is used to outline the window. At this stage, preoperative radiographic images should be referenced to mark the roots of adjacent teeth, maxillary sinus floor, and intended implant placement site before determining the window boundaries. The inferior border of the window should be set approximately 2 mm above the marked sinus floor and delineated using a pencil (Fig. 3). If an irregular sinus floor is observed on radiographic images, the inferior border of the window should be designed to follow this irregular contour for ease of membrane elevation (Fig. 4). The distal boundary of the window should be extended sufficiently to expose the superior aspect of the most posterior implant placement site. By contrast, the mesial boundary should be extended as far as possible without damaging the roots of the anterior teeth. This is because, after window removal, the mesial aspect becomes the most challenging area for membrane elevation owing to limited visibility, making it the most common site for membrane perforation.

Another consideration in sinus augmentation is the presence of maxillary sinus septa. A systematic review and meta-analysis of 8,923 maxillary sinuses reported that the prevalence of maxillary septa ranges from 9.5% to 55.5%, with an average septal height of 7.5 mm.12 When maxillary sinus septa are observed on radiographic images, they should be identified preoperatively and considered in the window design. Failure to consider these factors and perform appropriate management may increase the risk of maxillary sinus lateral wall fractures, cause difficulty in obtaining proper visibility within the sinus, and cause perforation of the Schneiderian membrane. Various techniques have been proposed for the management of the maxillary sinus septa. Boyne and James reported a method in which the septum is fractured and removed using a chisel.1 Meanwhile, Van der Bergh et al. suggested creating two separate windows divided by the septum, either elevating each separately or cutting through the septum to facilitate membrane elevation.13 Typically, designing the window such that the septum is positioned centrally within it provides better visibility and facilitates membrane elevation, making the subsequent removal of the septum more manageable (Fig. 5). If an undetected septum is observed after window formation, the window should be extended to ensure sufficient exposure of the septum, allowing proper visualization and thus proceeding with the surgery accordingly (Fig. 6).
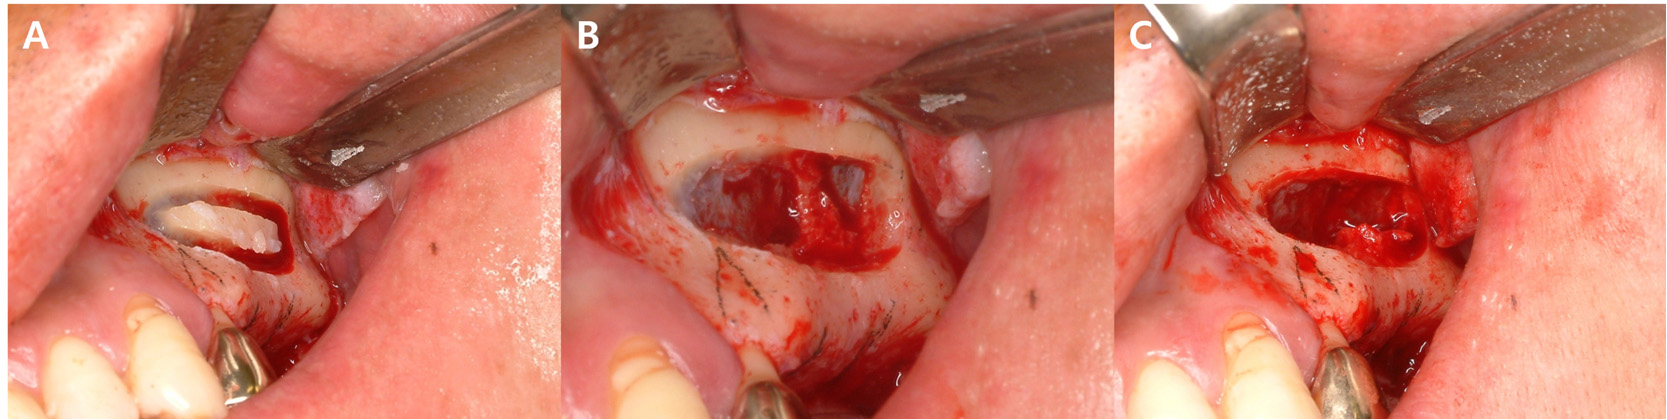
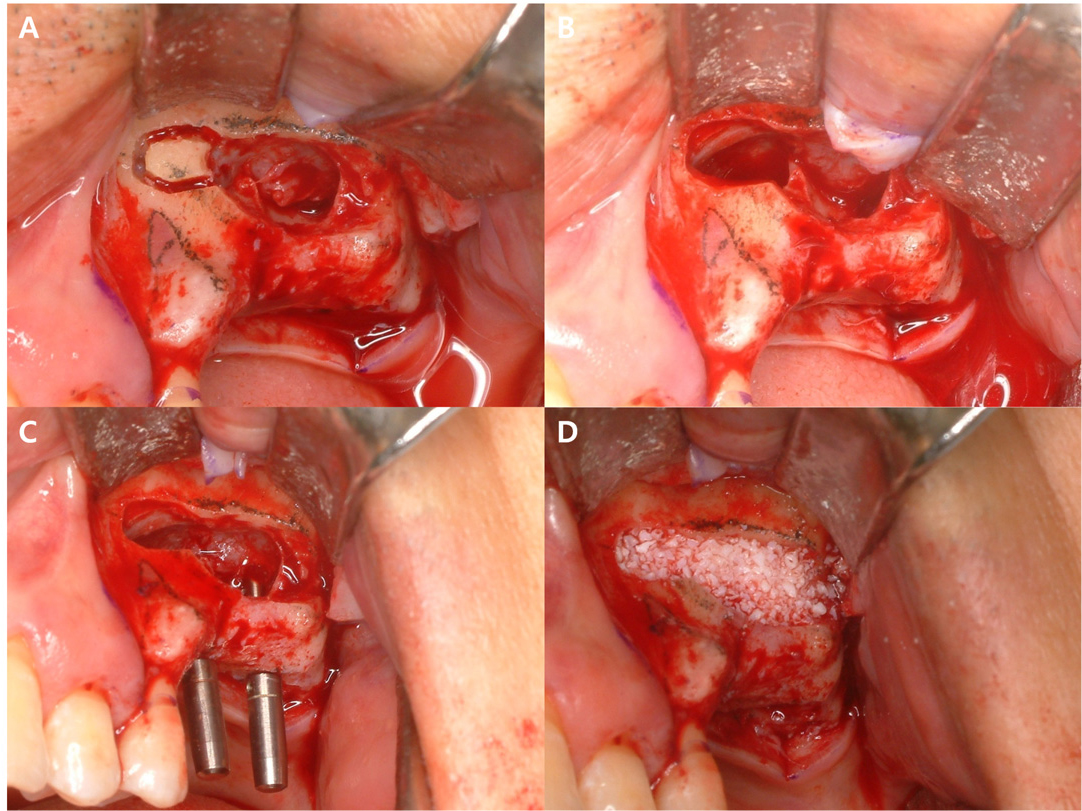
Once the window design complete, the window is separate from the Schneiderian membrane. Methods for managing the window include grinding, infracturing, and removal and repositioning. The grinding technique is used when a small window is sufficient for bone grafting and involves bone removal using a diamond bur to prevent membrane perforation. The infracture technique does not completely detach the window from the maxillary sinus. Instead, it is rotated inward to form the sinus floor. In recent years, the most widely adopted method has been removal and repositioning, in which the window is completely detached from the maxillary sinus, bone grafting is performed, and the window is repositioned. This is the approach introduced in this study (Fig. 7). Bone removal is performed along the pre-designed window outline using the smallest possible carbide round bur(US no.2) while ensuring adequate irrigation. Once the Schneiderian membrane becomes visible below the prepared outline, a 2/4 Molt elevator or a similar instrument is inserted between the window and the membrane, and a gentle twisting motion is applied to detach the window from the membrane (Fig. 8). The separated window is soaked in saline solution to prevent it from drying until repositioning.
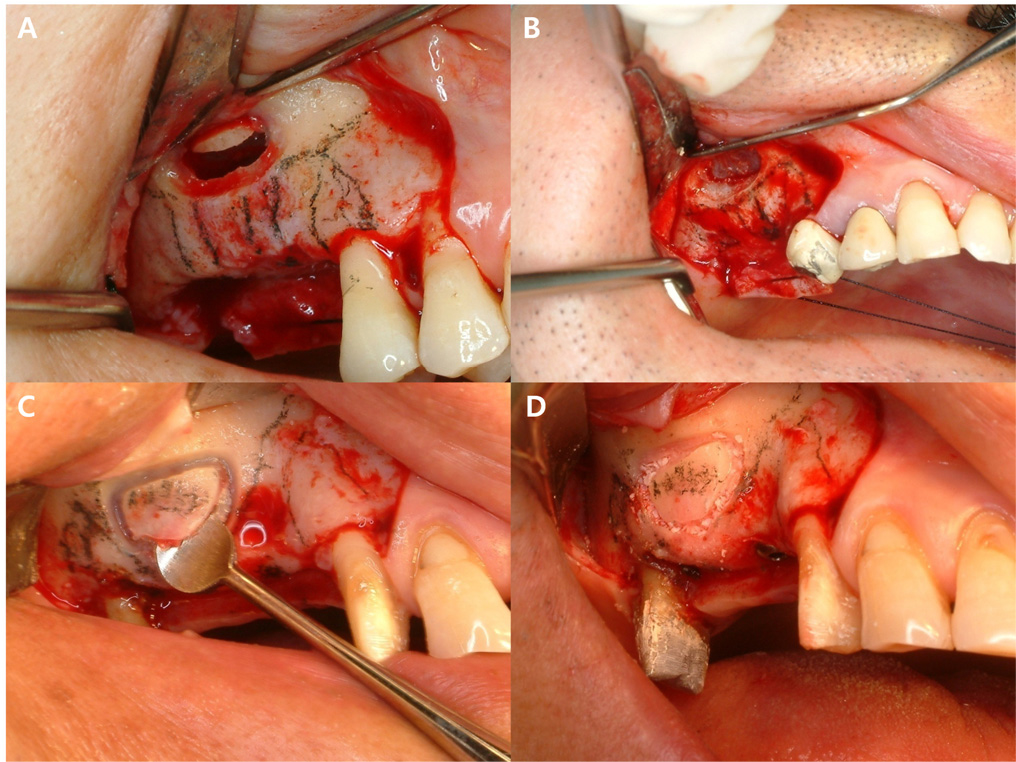
Fig. 7.
(A) Infracture technique: The window is rotated inward, functioning like a hinge, (B) Grinding technique, (C) Removal and repositioning technique: Separating the window after bone removal, (D) Removal and repositioning technique: Repositioning the window after completing the bone grafting procedure.
With the widespread adoption of lateral maxillary sinus augmentation, Hiossen’s Lateral Approach Sinus Kit (LAS Kit; Hiossen Implant, Englewood Cliffs, USA), which was exclusively designed for the lateral sinus approach, has been introduced. This kit includes instruments such as dome drills, core drills, and multi-angled tools that facilitate safe and convenient sinus membrane elevation during the lateral approach. According to a study that compared the surgery duration when using the LAS Kit versus the conventional technique, the LAS Kit resulted in an average surgery duration of 19.43 ± 2.88 minutes, whereas that of the conventional technique was 28.29 ± 2.21 minutes. The study reported that the LAS Kit not only allowed for faster procedures but also achieved similar surgical outcomes as those of the conventional technique.14
c. Membrane elevation
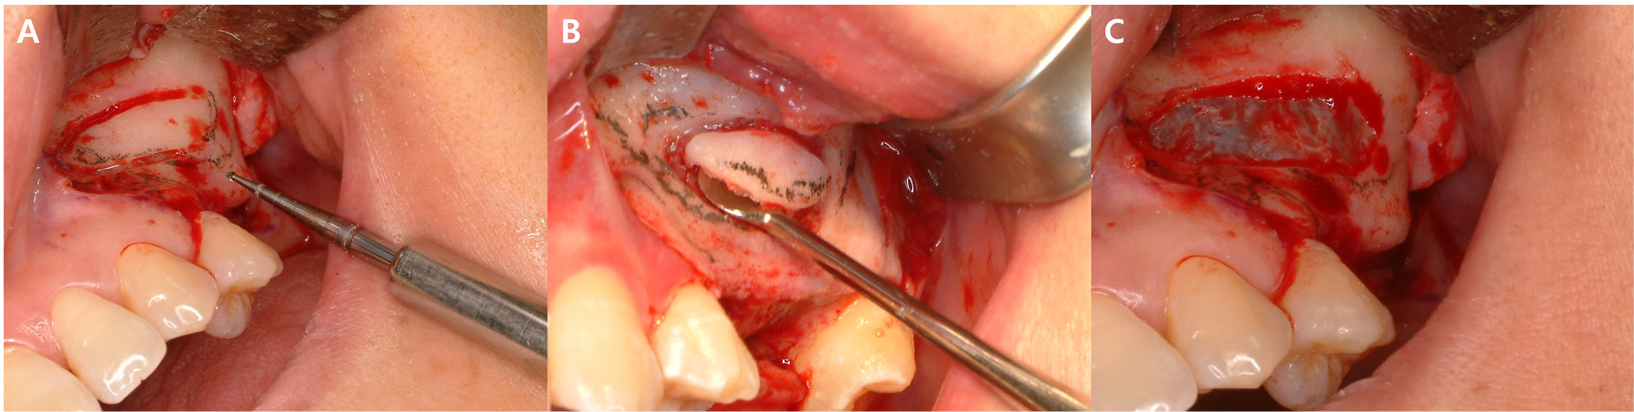
The LAS Kit includes various instruments designed specifically for the sinus membrane. These tools are intended to be safe and convenient for lateral sinus augmentation. However, excessive use of instruments may complicate the procedural workflow. Nevertheless, safe lateral sinus augmentation can be achieved using these kits. In routine cases, a single 45° Freer elevator is sufficient to ensure procedural efficiency and safe membrane elevation (Fig. 9). If certain areas cannot be accessed with a 45° elevator, it is likely that the window design was not executed correctly, and the design should be re-evaluated. Membrane elevation should begin from the distal aspect of the window, followed by the inferior, mesial, and superior directions, sequentially, ensuring an adequate width to create sufficient space for implant placement.
If the Schneiderian membrane is perforated during membrane elevation, it is advisable to repair the membrane using the Loma Linda technique before proceeding with bone grafting.15 An absorbable collagen membrane is inserted into the sinus and positioned to cover the perforated Schneiderian membrane. The edges of the collagen membrane are folded to align with the superior margin of the window. Bone grafting is then performed carefully to ensure that the collagen membrane does not retract (Fig. 10).
d. Drilling and bone grafting
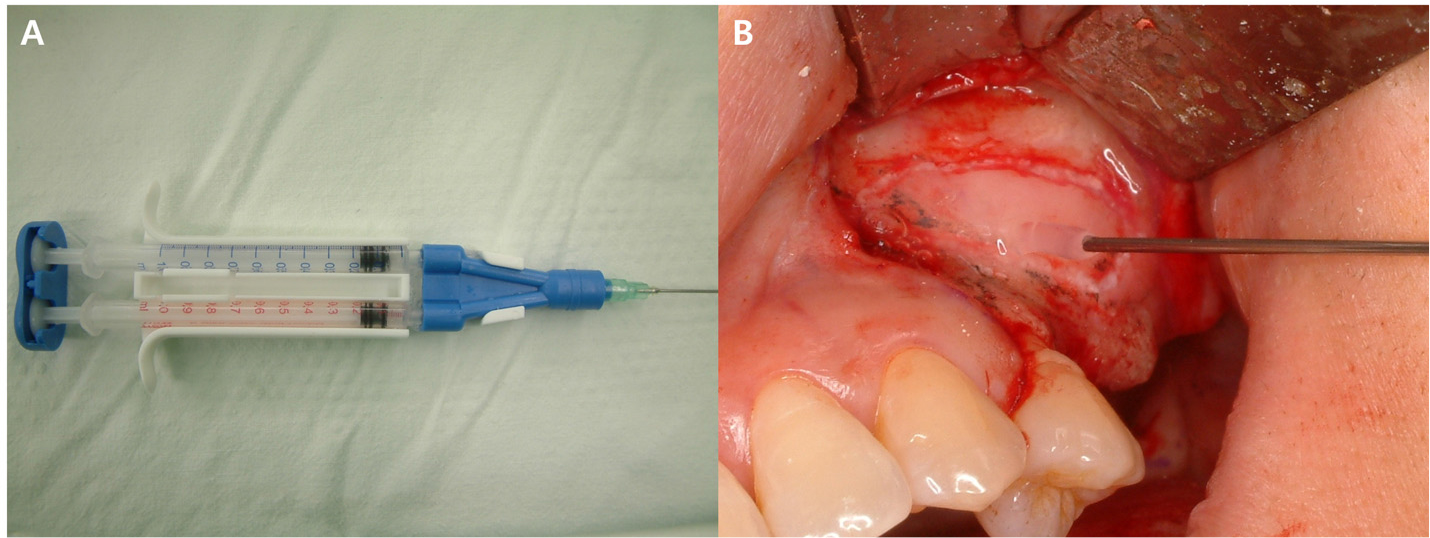
After adequate elevation of the maxillary sinus, drilling is performed at the designated implant placement site. After drilling, the bone graft material is inserted into the sinus through the lateral window. When applying the bone graft material through the window, sufficient pressure should be applied to ensure that the graft reaches the superior aspect of the intended implant placement site. If adequate pressure is not applied, the graft material may remain concentrated around the window and may fail to reach the upper portion of the implant site. The use of fibrin glue can be beneficial, because its viscosity allows the graft material to be manipulated as a cohesive mass, making it easier to apply within the sinus (Fig. 10C).16 Additionally, since the Schneiderian membrane possesses sufficient elasticity, the risk of membrane perforation due to this technique is minimal.
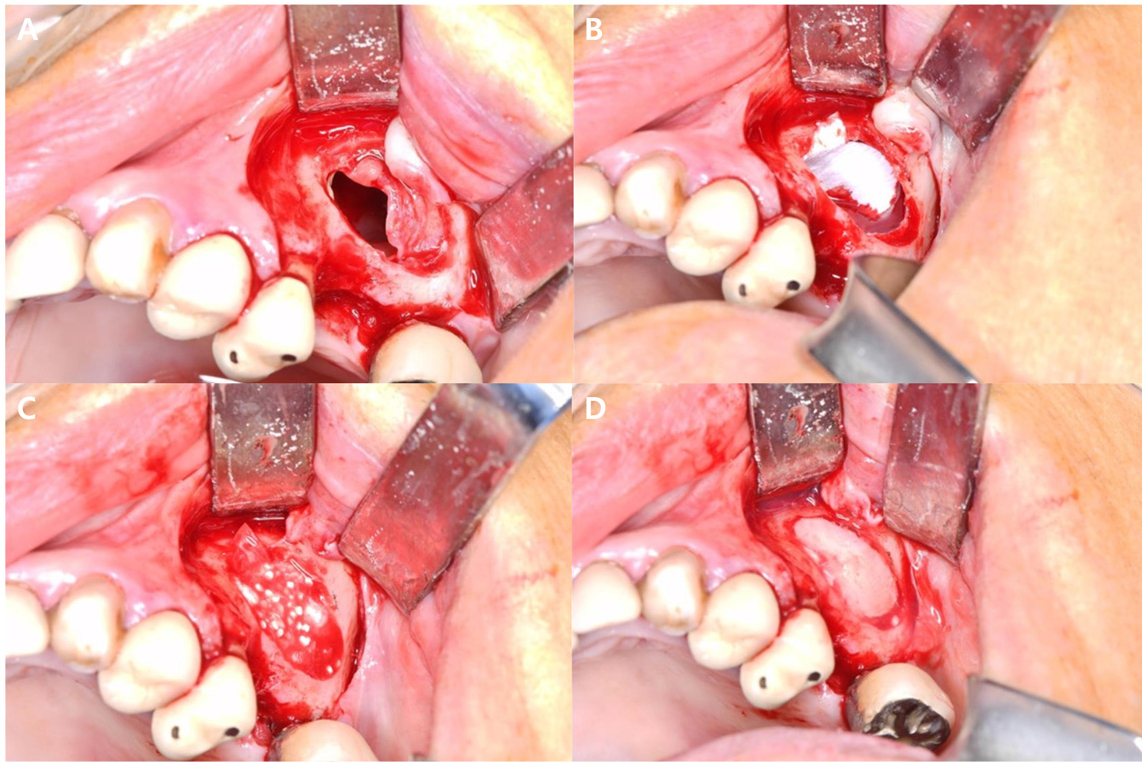
Fig. 10.
(A) Perforated Schneiderian membrane during elevation, (B) Perforation site covered with an absorbable collagen membrane, (C) Bone grafting performed using fibrin glue to consolidate the graft material into a single mass, (D) Window repositioning after completing the bone grafting procedure.
Among the bone graft materials used for sinus augmentation, autogenous bone is considered the most superior material and is regarded as the gold standard.17 However, its limitations in terms of harvest quantity and potential complications associated with its collection present significant drawbacks. To overcome these limitations, various studies have investigated allografts, xenografts, and synthetic bone substitutes. Recently there has been a growing consensus that autogenous bone is not essential for sinus augmentation. A meta-analysis comparing the stability of augmented bone volume in maxillary sinus augmentation demonstrated that combining autogenous bone with non-resorbable xenografts significantly reduced the rate of volume reduction compared to using autogenous bone alone; furthermore, no significant differences in volume stability were observed between the use of autogenous bone alone and the use of allografts or synthetic materials, either individually or in combination.18 Another study reviewing the clinical outcomes of bone substitute materials in maxillary sinus augmentation reported that the implant survival rate using bone substitutes alone was 95.6%, comparable to that of autogenous bone, achieving a similarly high success rate, and although autogenous bone remains superior in terms of new bone formation, bone substitutes were found to be more advantageous in terms of volume stability and reducing surgical complications.19 Based on these findings, it can be inferred that bone substitutes provide comparable efficacy to autogenous bone in sinus augmentation and implant placement.
e. Window repositioning and suture
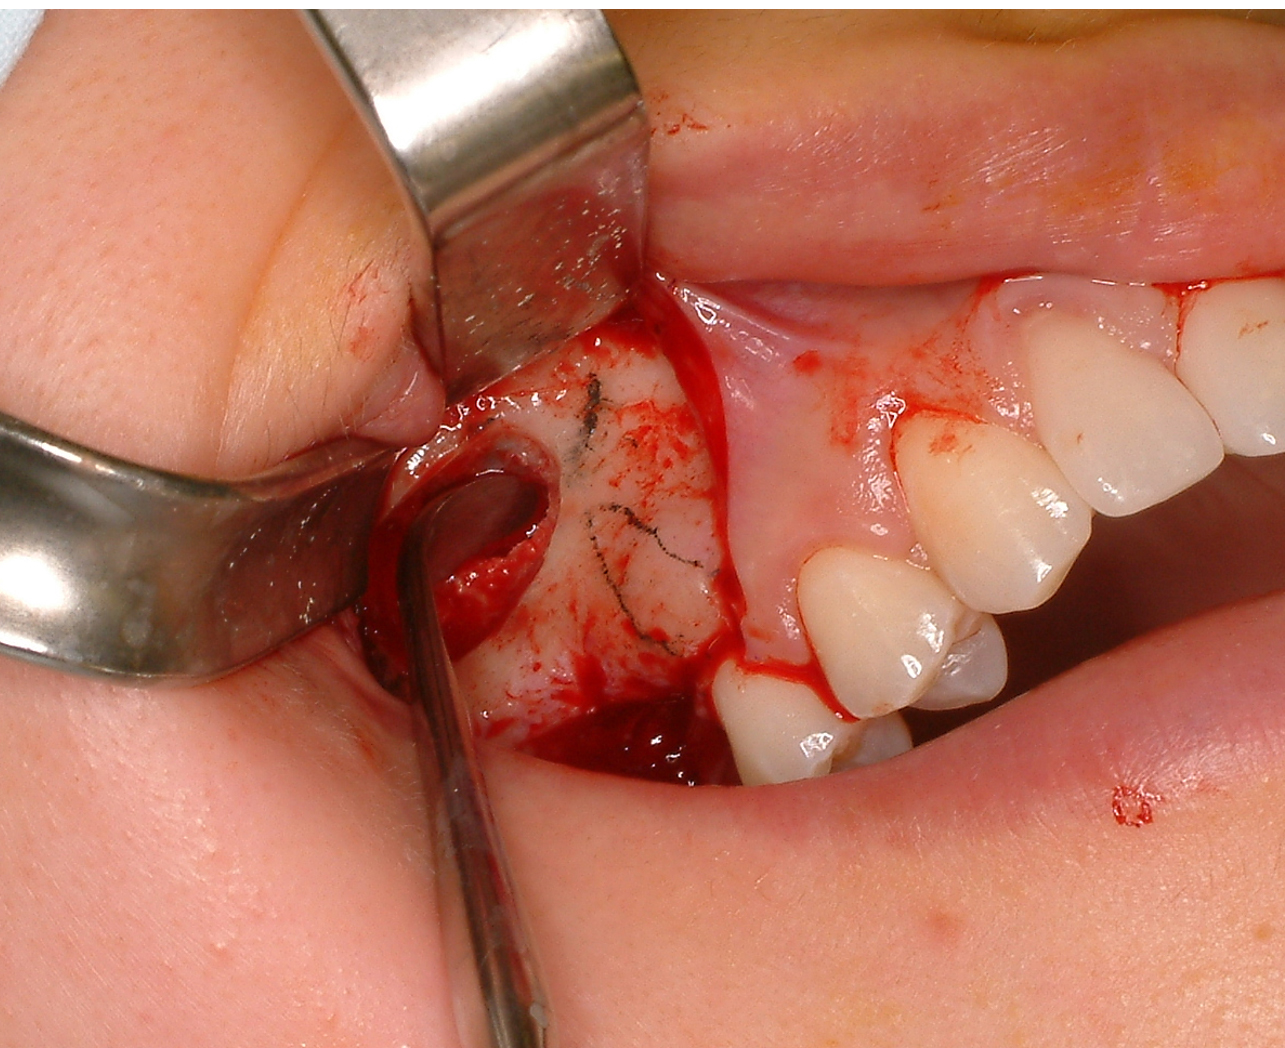
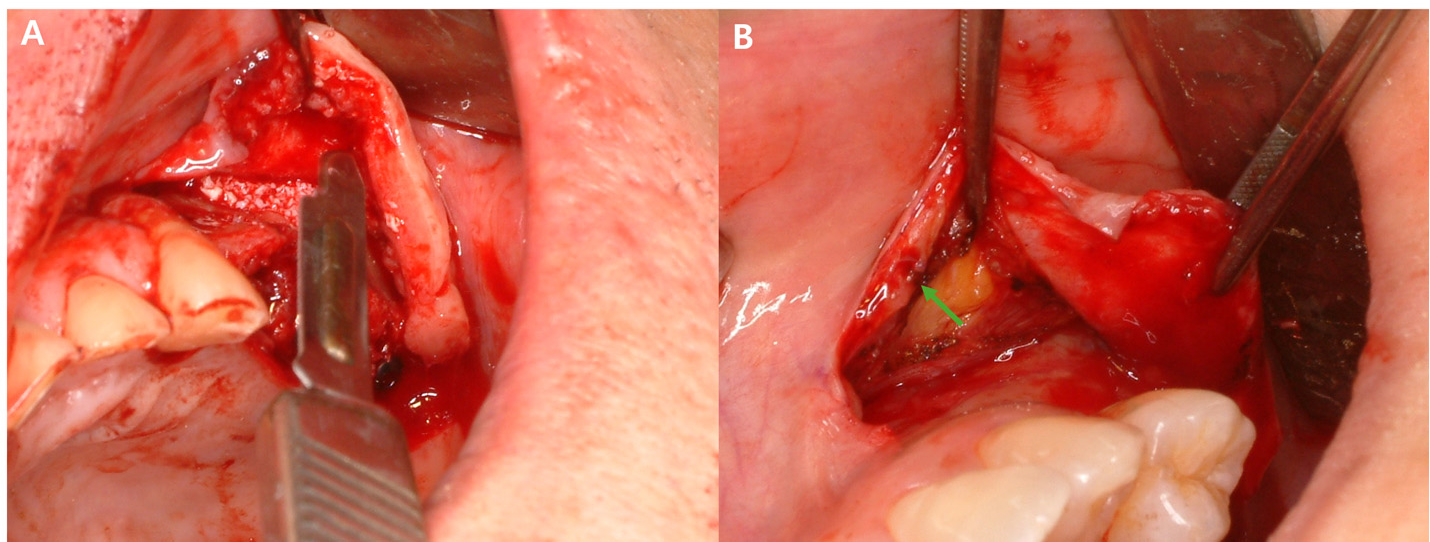
After completing bone grafting, the previously detached window should be repositioned. At this stage, a resorbable barrier membrane is often applied to prevent soft tissue infiltration into the grafted area. However, opinions vary among clinicians regarding the application of a membrane over the repositioned window. Several studies have investigated whether membrane placement over the repositioned window influences implant survival. Tarnow et al. reported a 100% survival rate in 28 implants where a membrane was applied, whereas the survival rate was 92.6% in 27 implants without membrane application.20 Tawil and Mawla reported a survival rate of 93.1% in 29 implants with membrane application and 78.1% in 32 implants without it, while Froum et al. found that membrane application significantly enhanced vital bone formation.21,22 These findings suggest that a membrane may play a protective role by preventing soft tissue infiltration during healing and minimizing graft material displacement. However, if the window is created using the smallest possible round bur during its separation from the maxillary sinus wall, minimal gaps will be present upon repositioning, providing similar protective effects and reducing the need for membrane application. However, if no window is available for repositioning due to the grinding technique or window fracture, membrane application becomes necessary. If fibrin glue is available, ITS application it around the gaps surrounding the window can further enhance its barrier effect for the grafted area (Fig. 11).
After window repositioning and implant placement, suture should be applied in a tension-free manner. In standard lateral approach sinus augmentation, tension-free closure is typically achieved without additional procedures. However, if lateral augmentation is performed beyond this window, a release incision may be necessary. In such cases, both the periosteum beneath the flap and the periosteal incision at the margins of the vertical incisions in the mesial and distal areas of the flap should be adequately released to allow sufficient flap advancement (Fig. 12).
Ⅴ. Conclusion
The lateral approach to sinus augmentation is crucial for securing sufficient bone height for implant placement in the posterior maxillary region, where bone resorption and maxillary sinus pneumatization occur following tooth loss. Successful lateral sinus augmentation requires meticulous execution at each step, including proper incision design, adequate window formation for optimal visibility, careful elevation of the Schneiderian membrane, selection and application of appropriate bone graft material, and tension-free suturing. When these conditions are met, lateral approach sinus augmentation is a predictable and effective technique for implant placement in the posterior maxillary region.
