

Ⅰ. Introduction
Ⅱ. Case Report
1. Phase I: Diagnosis and treatment planning
2. Phase II: Implant placement
3. Phase III: Gingival contouring with the second provisional restoration
4. Phase IV: Gingiva contour replication
5. Phase V: Definitive prosthesis
Ⅲ. Discussion
Ⅳ. Conclusion
Ⅰ. Introduction
The gingival architecture plays a crucial role in maintaining pink aesthetics governed by the soft tissues and the underlying alveolar bone.1 Defects in either the soft tissue or the underlying bone may result in poor anterior esthetics. Surgical methods such as gingival grafting, bone grafting, immediate implant placement, and correct implant placement using surgical guides have been suggested as methods to maintain the gingival architecture.2 However, despite the presence of the optimal gingival condition, anterior implant restoration still often shows a lack of aesthetics after the prosthetic phase.
Several factors may affect the anterior aesthetics in the prosthetic phase.3 For example, the discrepancy between the soft-tissue profile and stock impression coping may cause soft-tissue information changes in the impression.4 Such errors can affect the emergence profile of definitive restorations. Under the assumption that implant placement is performed on a sound tissue base, achieving an optimal emergence profile depends on the healing abutment selection, implant type, and prosthetic modulation.5
Peri-implant soft-tissue contouring with provisional restoration is a prosthodontic approach for emergence profile modulation.6, 7,8 several methods have been proposed in previous studies, ranging from removable restoration with ovate-pontic to gingival shape replication using customized impression copings.7, 9 The principles of these methods rely on proper gingival contouring with temporary restorations and proper gingival contour replication during the impression process.
This case report describes gingival contouring in a mandibular anterior one-piece mini-implant. To the best of our knowledge, no previous studies have performed gingival molding of one-piece implants. Thus, gingival contouring methods were modified in our case.
Ⅱ. Case Report
1. Phase I: Diagnosis and treatment planning
A 23-year-old woman was referred to the Department of Prosthodontics at the Dental Hospital of Seoul National University. The patient had recently completed orthodontic treatment, and a single prolonged retained primary mandibular right central incisor was scheduled for extraction. The patient had no relevant medical history. Intraoral examination revealed a prolonged retention of the primary mandibular right central incisor. The tooth showed a third-degree mobility. Severe root resorption of the retained tooth was visible on radiographic examination (Fig. 1).

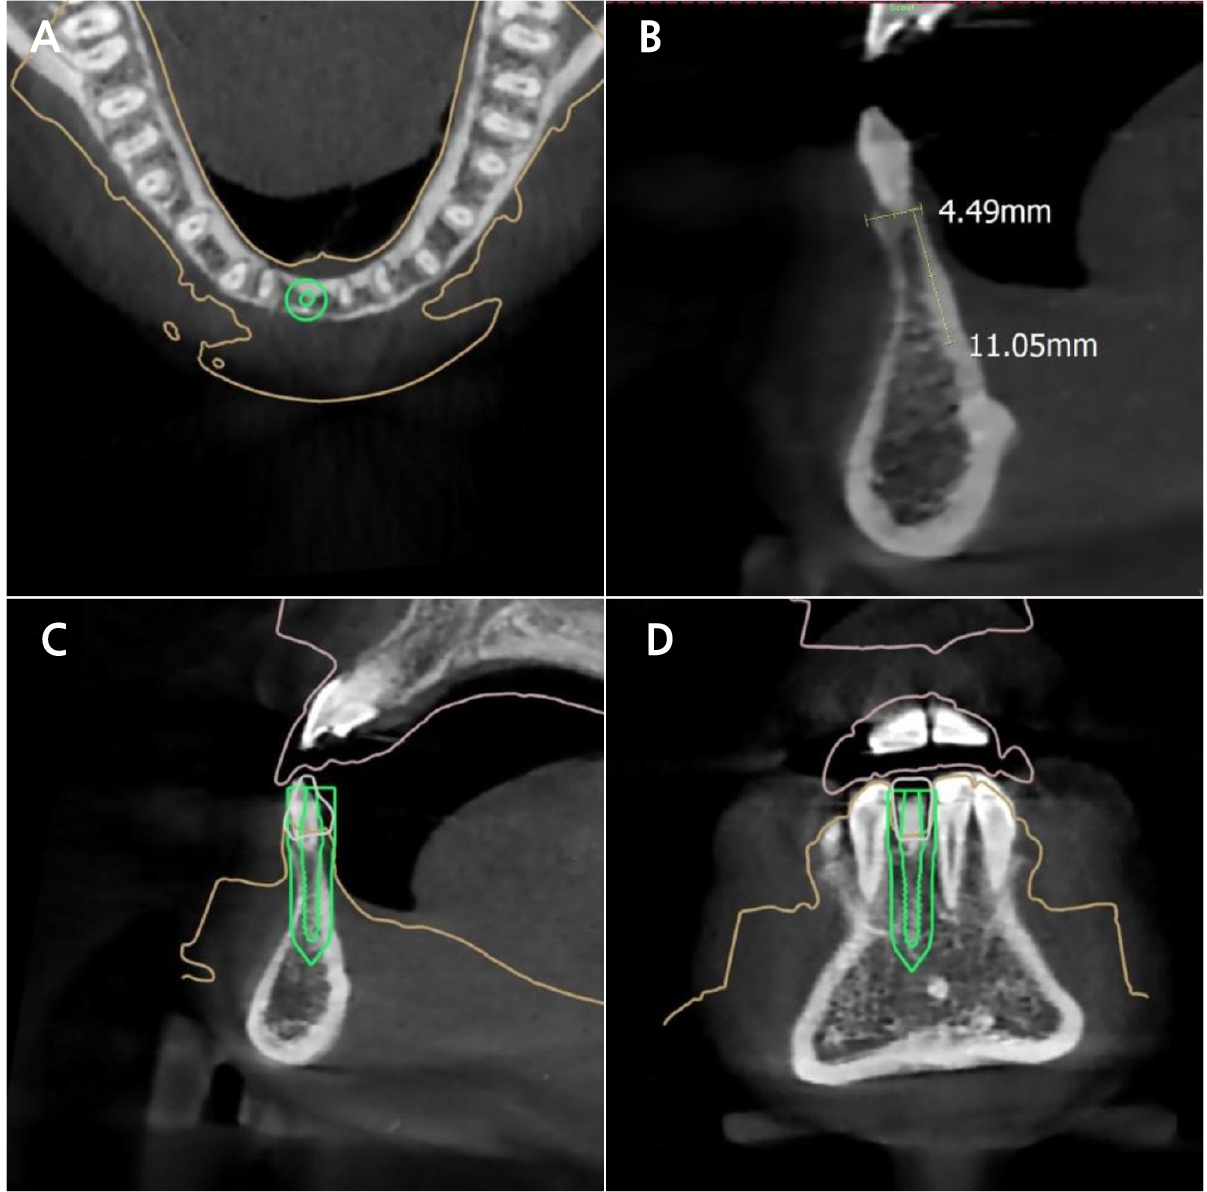
Cone-beam computed tomography imaging was performed to evaluate bone width. The site of interest showed a narrow width, which is incapable of regular-diameter implants. Therefore, a one-piece mini-implant (MS Narrow Ridge; Osstem, Busan, Korea) with a diameter of 2.0 mm, length of 10 mm, and gingival height of 4 mm was planned for placement (Fig. 2). A computer-designed surgical guide was manufactured by an implant company (OneGuide; Osstem, Busan, Korea).
2. Phase II: Implant placement
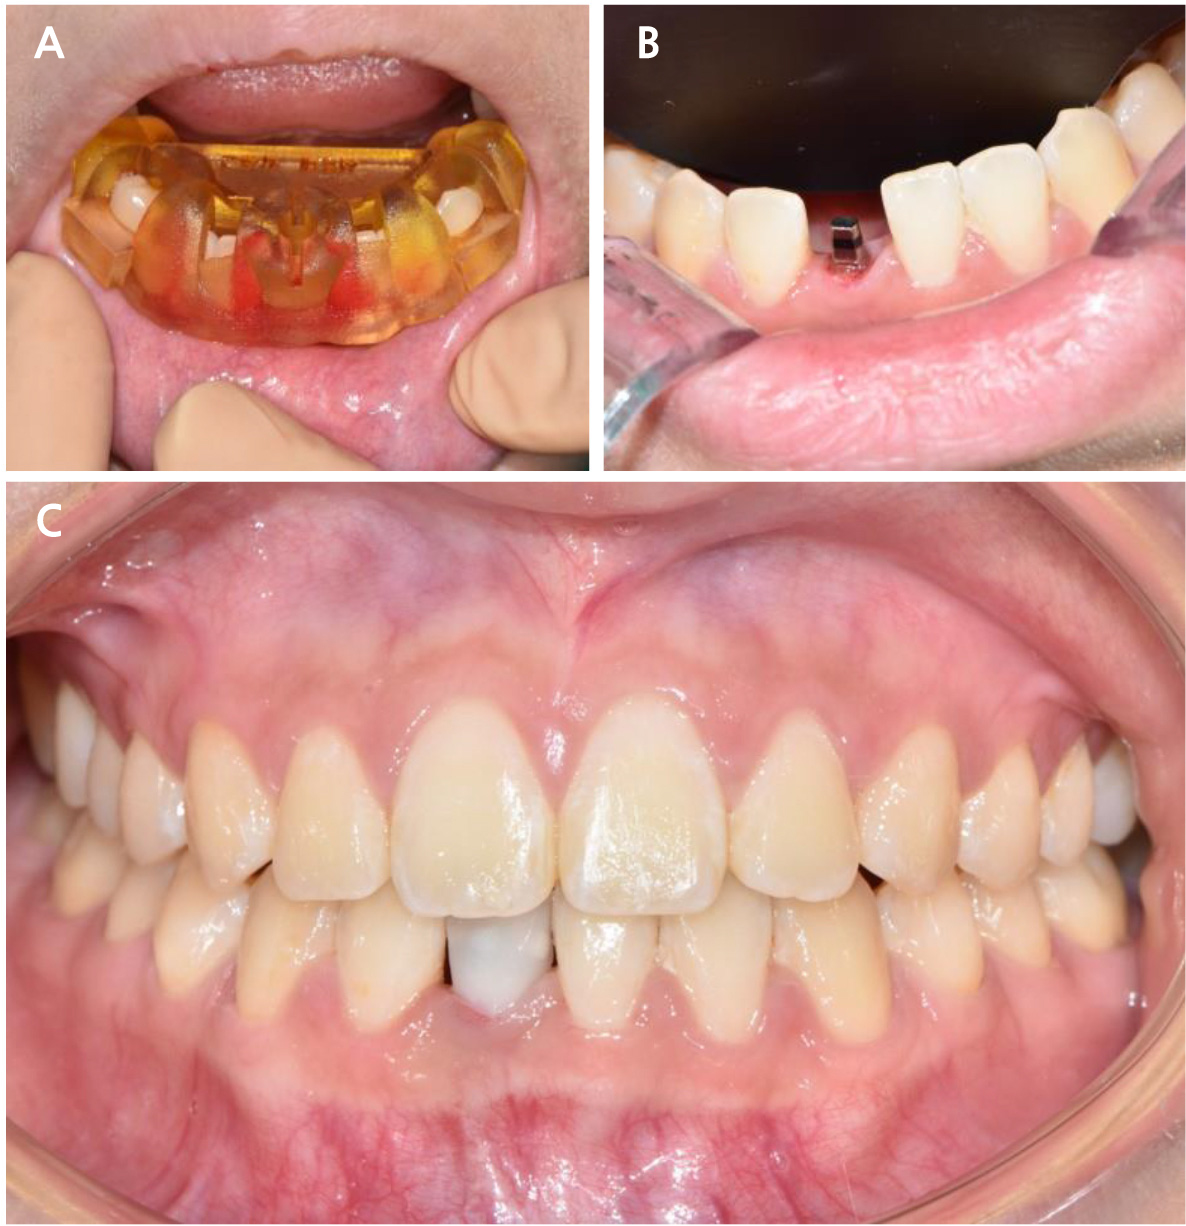
The primary mandibular right central incisor was extracted on the day of implant placement. A surgical guide was used to secure the osteotomy site. Osteotomy was completed using a 1.8-mm-diameter pilot drill. The mini-implant was inserted using a torque of 40 Ncm. All procedures were performed using the corresponding surgical kit provided by the surgical guide manufacturer (OneMS Kit; Osstem, Busan, Korea). The implant was immediately loaded with the provisional restorations. The occlusion of the provisional crown was adjusted to show a 1 mm short incisal contact in the maximum intercuspal position, with no eccentric contact (Fig. 3).
3. Phase III: Gingival contouring with the second provisional restoration
At 6 months post-healing, an irreversible hydrocolloid impression of the lower arch was obtained using an impression cap (Fig. 4A). A laboratory analog was adapted, and a working model was fabricated (Fig. 4B). To produce adequate gingival pressure, the model was prepped 1–2 mm below the gingival line using a No. 4 round bur and laboratory scalpel blade (Fig. 4C, 4D). A second provisional restoration was fabricated on the temporary cap (Fig. 4E, 4F, and 4G).
On the day of gingival contouring, a second provisional restoration was placed on the implant with manual pressure. Gingival bleaching was observed during the initial adaptation. This effect diminished after 15 min of pressure. The temporary restoration was then cemented using temporary cement (Temp-bond NE; Kerr Italia SPA, Scafati, Italy) (Fig. 4H).
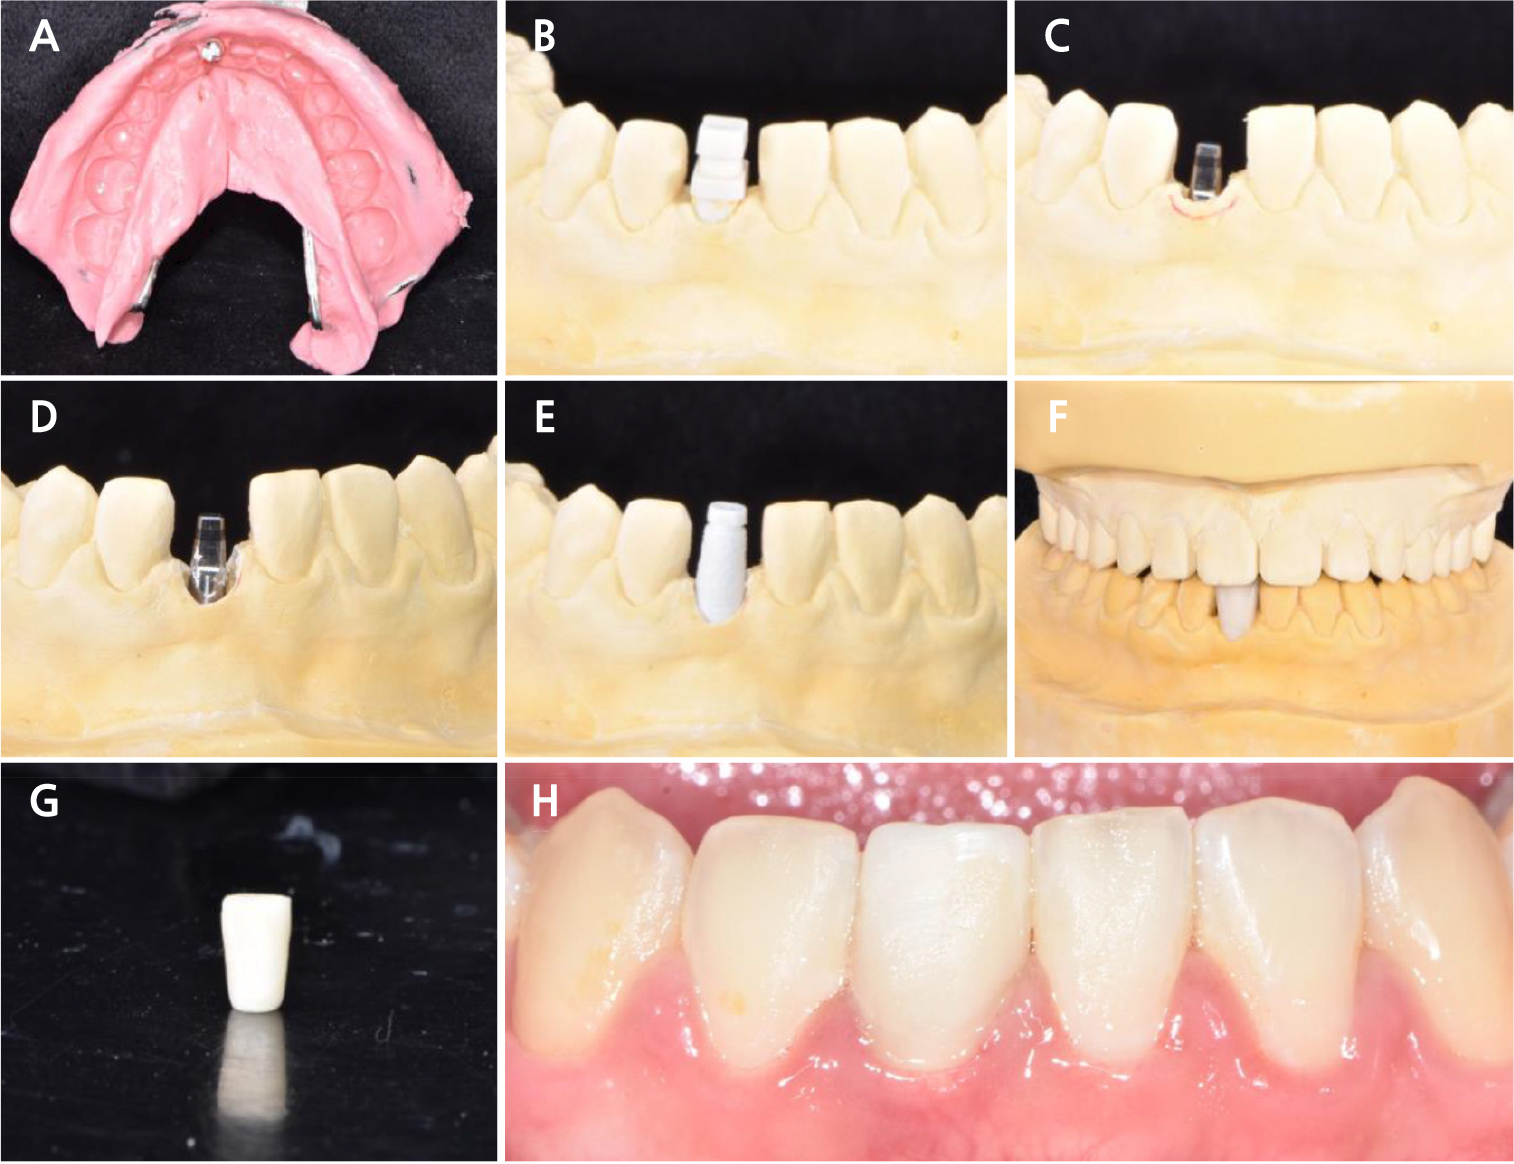
Fig. 4.
Second provisional restoration fabrication and delivery. (A) Irreversible hydrocolloid impression with impression cap, (B) Cast fabrication, (C) 2mm reduction line marked with red marker, (D) Model preparation with No.4 Round bur and laboratory scalpel blade (E) Temporary cap adaptation, (F) PMMA second provisional restoration fabrication, (G) Second provisional crown, (H) Second provisional restoration delivery and soft tissue recontouring.
4. Phase IV: Gingiva contour replication
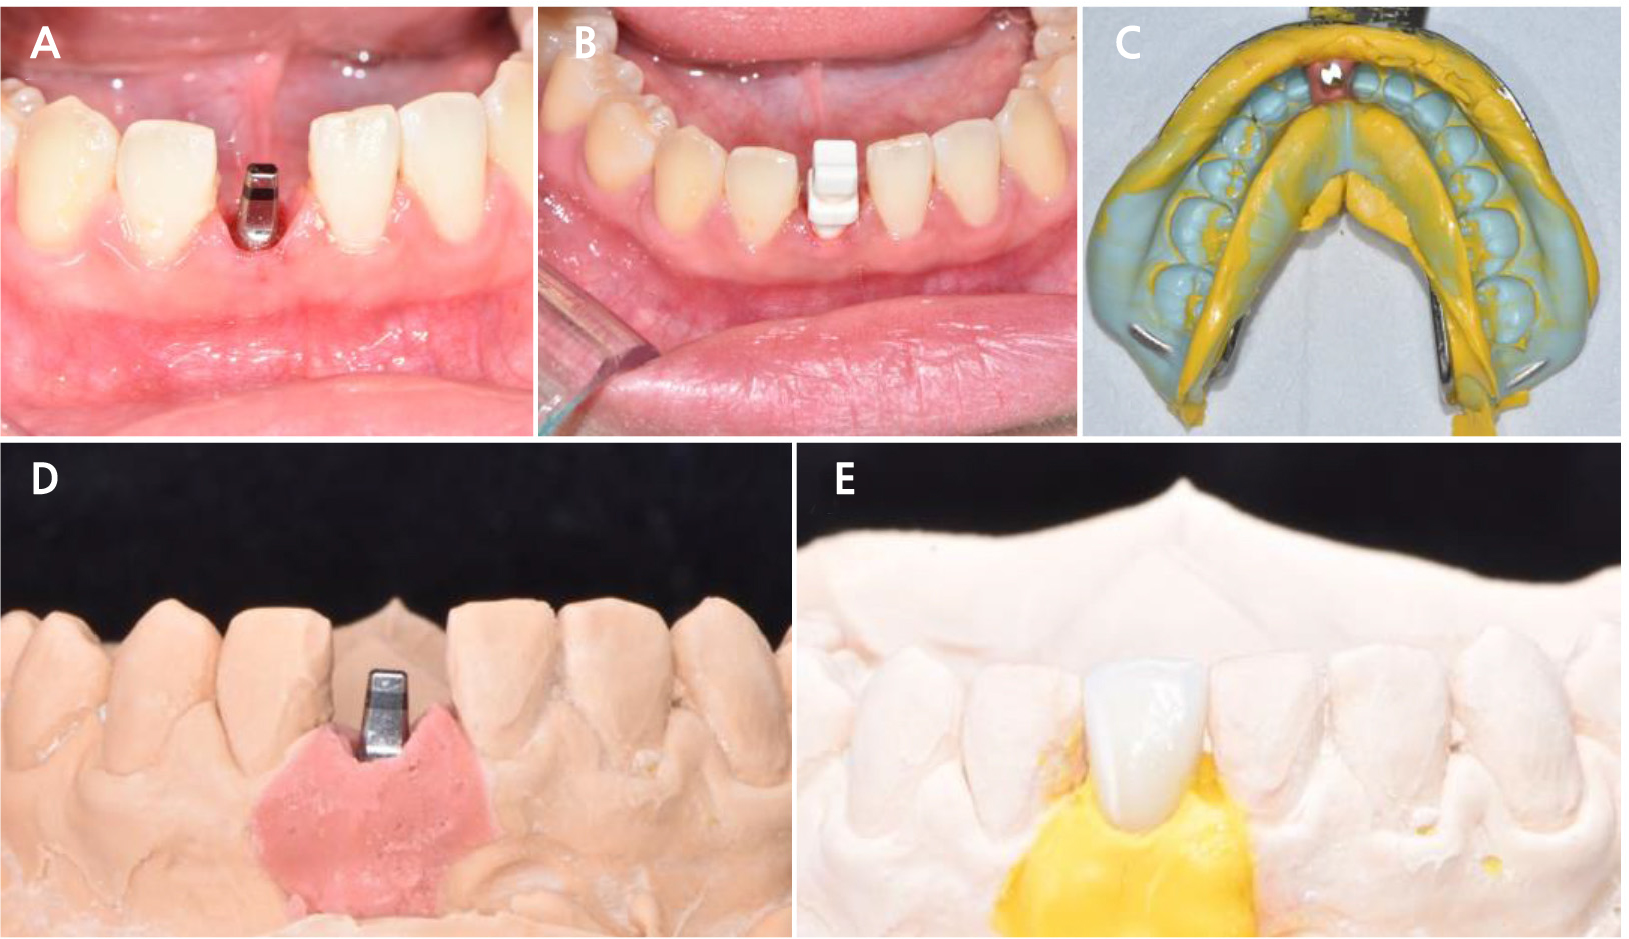
One month after the second provisional delivery, the patient returned to the final impression. A significant improvement in the anterior gingival esthetics was observed (Fig. 5A). An impression cap was adapted to the fixture, and the final impression was taken with putty (Exafine putty type; GC Corporation, Tokyo, Japan) and light-body polyvinyl siloxane (PVS) impression material (Honigum Light; DMG, Hamburg, Germany) using a one-step impression technique. A silicone separator (Gi-Mask Universal Separator; Coltène) was sprayed onto the final impression, and a soft-tissue replica was fabricated around the analog with a light-body PVS material (Examixfine Injection type; GC Corporation) (Fig. 5B, 5C).
After bite registration, face bow transfer, and mounting, the gingival replica was removed from the working cast and the second provisional restoration was adapted to the model. The cervical portion of the provisional restoration was replicated with light-body PVS material (Honigum Light; DMG) (Fig. 5D, 5E). Porcelain-fused zirconia restoration was fabricated using this model.
5. Phase V: Definitive prosthesis
Minimal occlusal adjustments were made on the day of the final delivery. The definitive restoration was cemented using methacrylate cement (Premier Implant Cement; Premier® Dental Products Company, Plymouth Meeting, PA, USA) (Fig. 6). The patient was satisfied with these results.
Ⅲ. Discussion
In this study, gingival re-contouring was performed with a second temporary restoration. The gingival portion was replicated onto the final working model using light-body PVS material. An improvement in anterior esthetics was observed in the definitive restoration delivery phase.
Various techniques have been used to achieve optimal gingival contouring.10, 11 However, to the best of our knowledge, our case was the first to undergo gingival contouring using a one-piece mini-implant. Some factors should be considered for one-piece mini-implant gingival contouring. Owing to its structure, a one-piece implant cannot be submerged under the bone; thus, immediate loading is required for provisional restoration.12 A gingival molding procedure can be considered in this immediate loading phase. However, as the gingival molding process of temporary restoration requires multiple attachments and detachments of the temporary cap, it may cause a harmful force on the fixture. Thus, we decided to perform molding after a healing period of six months.
Another consideration is the lack of a platform structure for one-piece implants. The endo-osseous and transgingival portions of the one-piece implant were connected mechanically. Hence, the position of the transgingival portion in relation to the underlying bone was determined solely during the placement stage.13 Therefore, a computer-designed stereolithographic surgical guide was used in our case. Additionally, because the transmucosal portion of a one-piece implant is unchangeable, it is important to harmonize the emergence profile of the restoration and the transmucosal portion of the implant. To ensure such results, we fabricated a working cast using a laboratory analog with a detachable gingival mask.
The final impression procedure was also different from that of other two-piece endo-osseous implants. Because fixture-level impressions do not exist in one-piece implants, it is not possible to replicate the gingival contour with customized impression copings. In our case, the gingival contour was preserved by replicating the cervical portion of the second provisional restoration in the final working model. This process was performed in a similar fashion to previous studies.9, 11, 14
The method described in this case report allows for the development and maintenance of soft tissue contours of one-piece mini-implants. This method will help improve patient satisfaction and anterior esthetics in patients undergoing narrow ridge restoration of the aesthetic zone.
