

Ⅰ. Introduction
Ⅱ. Case Report
1. Virtual patient creation
2. First provisional restoration
3. Second provisional restoration
4. Fabrication of the final prosthesis
Ⅲ. Discussion
Ⅳ. Conclusion
Ⅰ. Introduction
Full-mouth rehabilitation using fixed tooth-supported or implant-supported prostheses is complex. It is challenging for clinicians owing to the many complicated prosthetic concepts such as adjustment of the proper vertical dimension, acquisition of centric relation (CR), verification with a provisional prosthesis, and cross-mounting.
The procedure of full-mouth rehabilitation may be slightly different for each clinician but usually proceeds as follows. First, during diagnosis, the maxillary study cast is mounted on the mechanical articulator using facebow transfer. The mandibular study cast is then mounted at the maximum intercuspated bite position. The vertical dimension increase on the articulator is determined, and an anterior bite jig (Lucia jig) is created. After the anterior bite jig is placed in the patient’s mouth, their CR bite is recorded. After removal of the casts from the articulator, a diagnostic wax-up is performed. The second step is the first provisional restoration, where a putty index for a diagnostic mock-up is prepared on a diagnostic wax-up. After mouth preparation, the first provisional restoration is fabricated and delivered directly using the putty index. The third step is the second provisional restoration with an accurate simulation of the preparation margin. The second provisional restoration is performed after consideration of the patient’s occlusion. The desired patient occlusion is achieved after a sufficient period of verification. The fourth step is the fabrication of the final prosthesis, before which cross-mounting is performed to verify the provisional prosthesis design. The maxillary and mandibular provisional casts are mounted on an articulator using face-bow transfer and bite registration. A customized anterior guide table is prepared, and the adapted anterior guide of the provisional prosthesis is transferred to the articulator. The mandibular master cast is mounted on an articulator with bite registration to the maxillary provisional cast. Then, the maxillary master cast is mounted on the articulator with bite registration to the mandibular master cast. The final prosthesis is fabricated by simulating a provisional prosthesis design and delivered to the patient. In the absence of any discomfort after temporary setting, the final cementation is performed.1
By utilizing various recently introduced digital methods, difficult full-mouth rehabilitation can be performed more effectively and with less complexity. Digital materials and methods that can be used include 3D printing, face scans, CBCT, and jaw motion along with CAD-CAM and intraoral scans, which are widely used. The digital method involves the following steps: first, for virtual patient creation and diagnosis, a virtual patient is created using CAD software by integrating the patient’s initial intraoral and facial scans and jaw motion data; this can then be elevated using the acquired CR path information when necessary for a vertical dimension elevation. Subsequently, 3D diagnostic teeth are arranged. Second, for the first provisional restoration, based on the 3D diagnosis of tooth arrangement, PMMA milling is performed to create a temporary shell. A positioning jig can be 3D printed to place a provisional shell in one position. Third, for the second provisional restoration, final impressions of the maxilla and mandible are made (intraoral scan or traditional impression making using impression materials). The master model is aligned using the intraoral scan and occlusal data from the first provisional restoration. Using the jaw motion and intraoral scan from the first provisional restoration, the second provisional restoration is fabricated and delivered simulating the first provisional restoration. Fourth, for the final prosthesis restoration, after sufficient verification, the final prosthesis is fabricated through zirconia milling and sintering through a process similar to that for the second provisional restoration and delivered.
This study aimed to report a case of successful full-mouth rehabilitation using the digital method described above in a patient with multiple worn and fractured teeth.
Ⅱ. Case Report
A 56-year-old man presented with multiple tooth fractures, porcelain fractures in old implant restorations, and ill-fitting crown margins. He presented to the hospital for functional and esthetic restoration improvement. The patient had no systemic disease. According to the patient’s statement, implants were placed bilaterally in the maxillary posterior region and in the mandibular right molar region several years ago at a local clinic. Implants were restored using a porcelain fused to gold (PFG) crown. The maxillary anterior was restored using PFG crowns, and the mandibular left molars were restored using gold crowns.
Oral examination of the patient revealed that several restorations showed porcelain fractures and ill-fitting margins, and the mandibular anterior region demonstrated a deep bite owing to severe abrasion by the opposing maxillary prosthesis. Tooth #12 showed a mobility of 2°, and radiographic examination revealed progressive loss of periodontal support (Fig. 1).
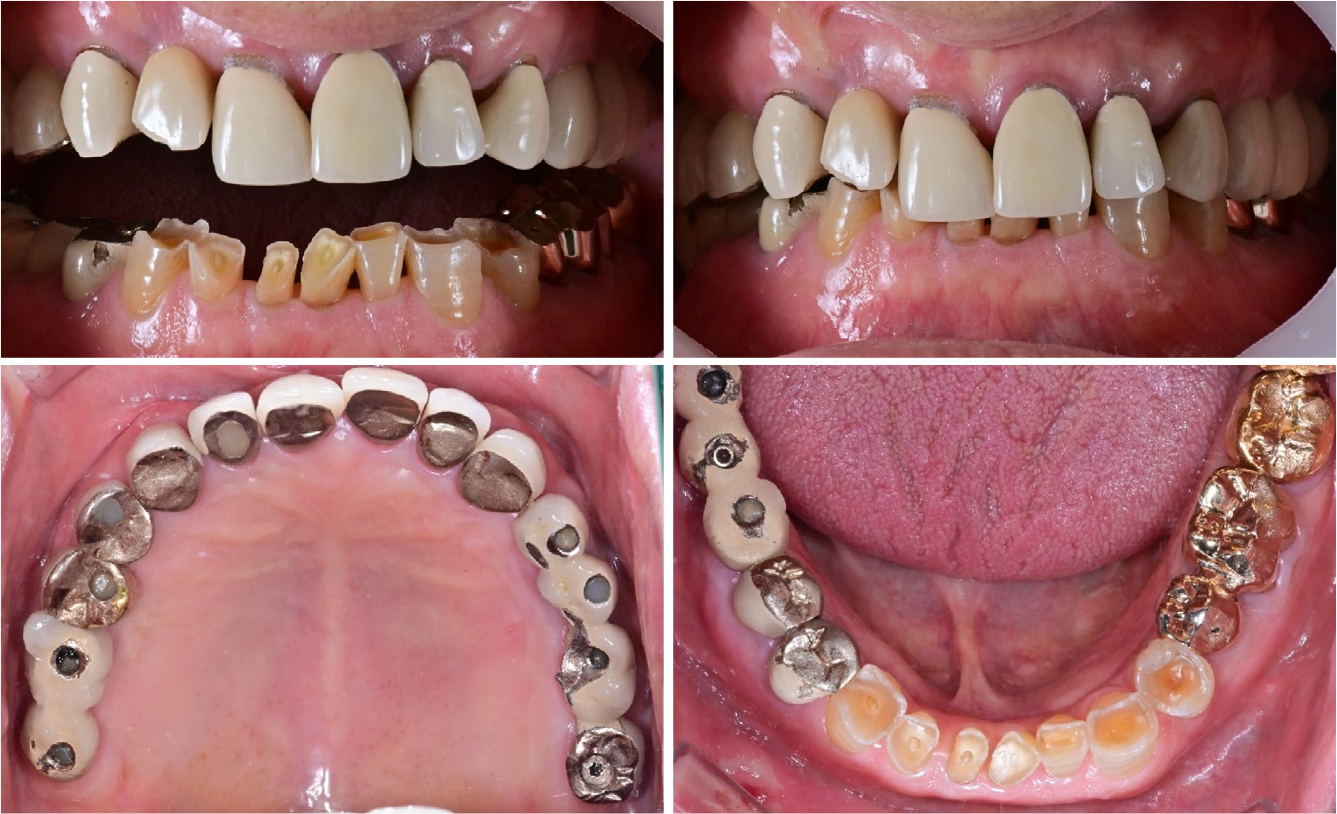
The patient desired improvement of overall oral function and esthetics through replacement of the existing prosthesis and restoration of the mandibular anterior. Therefore, extraction and implant placement of tooth #12, along with the removal of the existing prosthesis and full-mouth fixed prosthesis, were planned.
Full-mouth prosthetic restorations have been performed by combining various digital methods. The procedure for full-mouth rehabilitation using the digital method, as in this case, was as follows:
1. Virtual patient creation
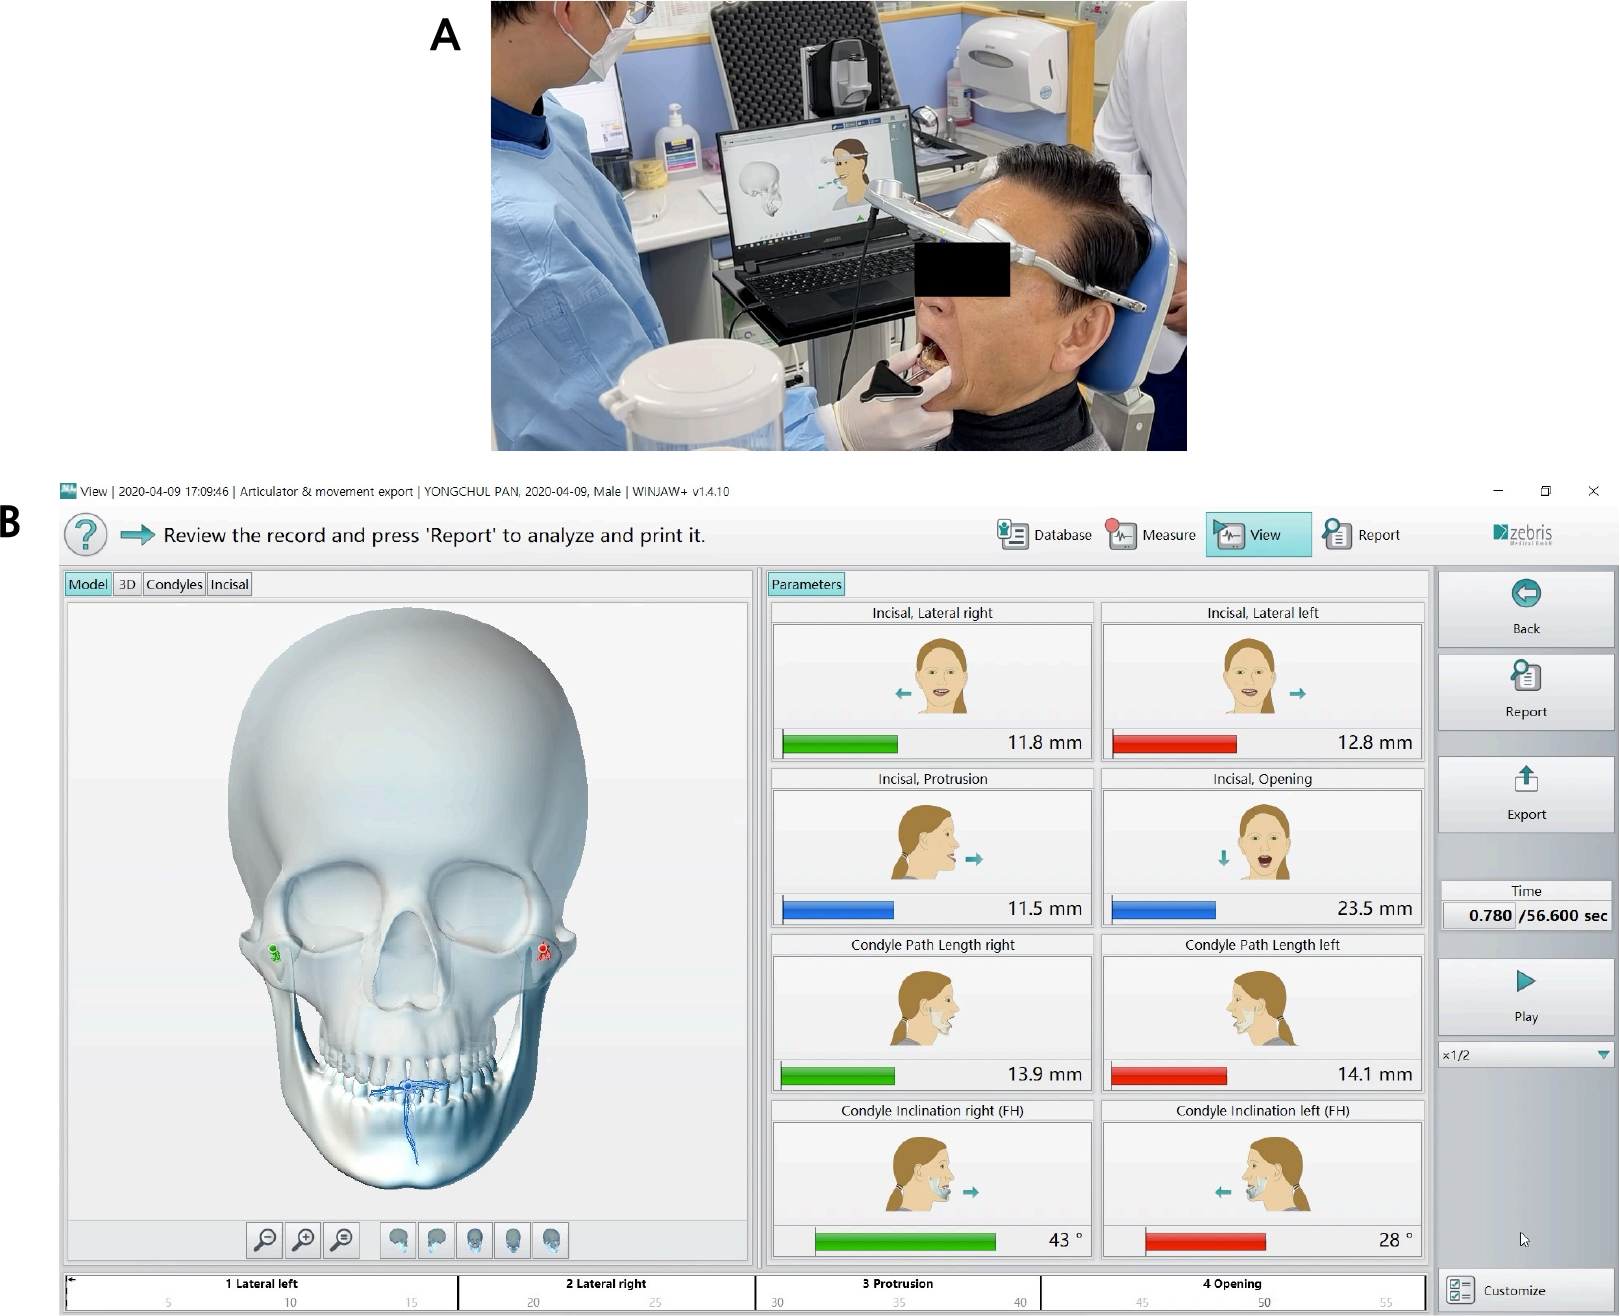
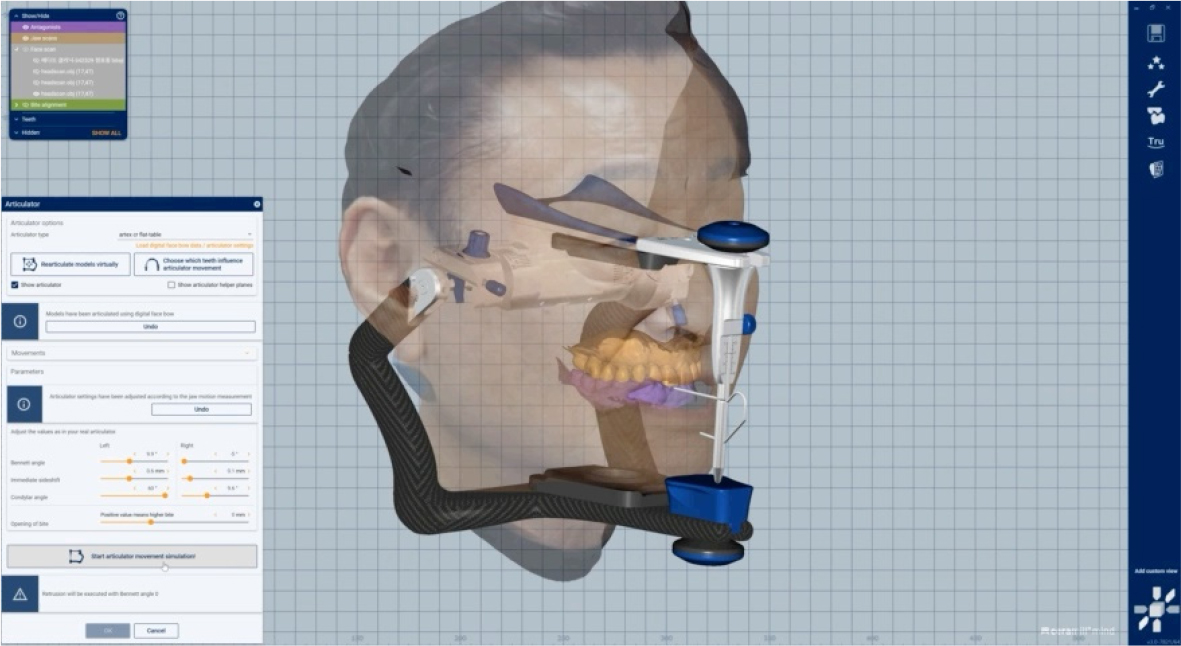
At the initial patient visit, intraoral and facial scan data were acquired using an intraoral scanner (Medit i700; Medit, Seoul, Korea) and facial scanner (Arc-7; Bellus3D Inc., Campbell, CA, USA). Additionally, the patients’ eccentric and opening movements were acquired using a device that could record jaw motion (Ceramill Digital facebow; Amann Girrbach, Koblach, Austria) (Fig. 2). The acquired data were integrated using CAD software (Ceramill Mind; Amann Girrbach) to create a virtual patient (Fig. 3).
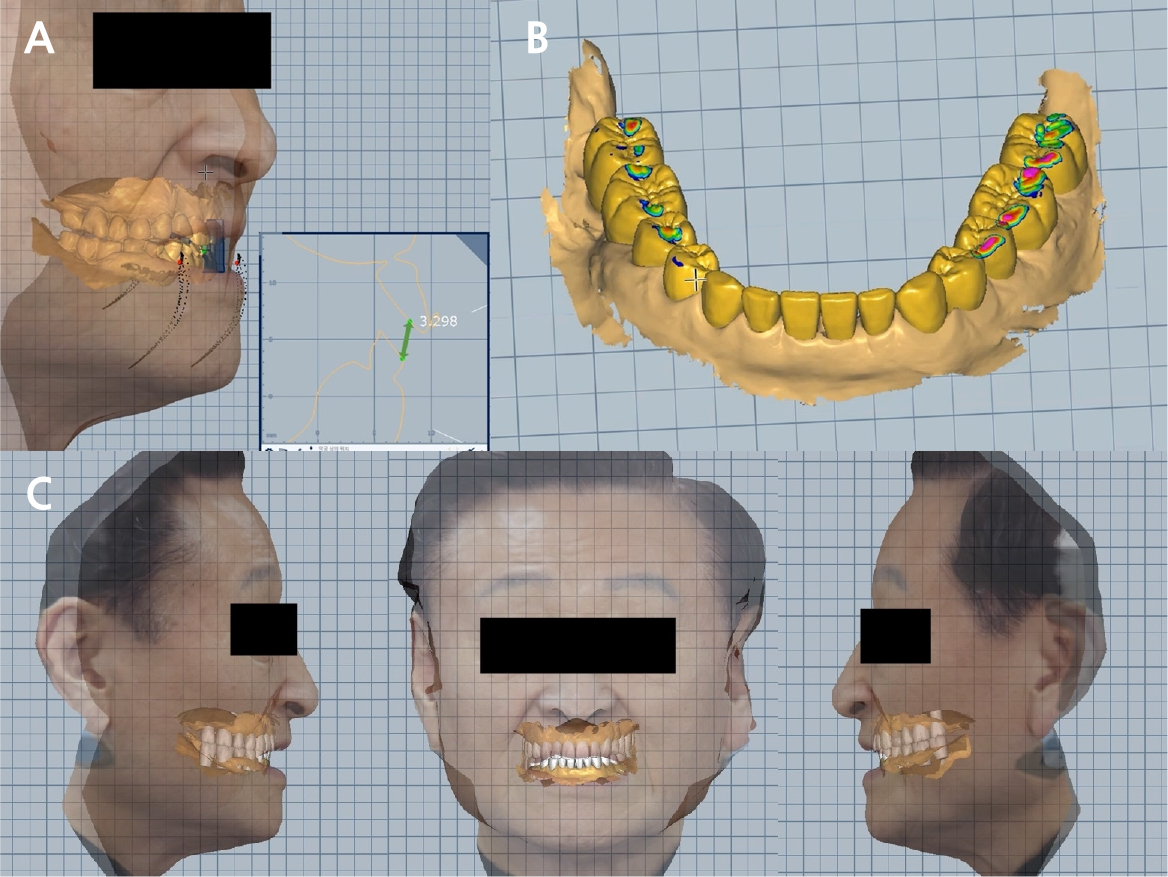
The patient had insufficient restoration space due to wear and fracture of multiple teeth, and reacquisition of the vertical dimension for esthetics of the anterior region was necessary. Using the CR path information already obtained from the Ceramill Digital facebow (Fig. 4A), 3D diagnostic tooth alignment was performed after vertical dimension elevation while considering the restoration space and anterior esthetics (Fig. 4B). The thickness of the zirconia crown (approximately 2 mm) and length of the abutment for maintenance (approximately 4 mm) were considered for the restoration space. The ideal crown aspect ratio, overjet, and overbite were considered for anterior esthetics. Simultaneously, facial scan data were used to determine the proper occlusal plane and anterior esthetics (Fig. 4C). For the occlusal plane and anterior esthetics, the ala-tragus, interpupillary, facial midline, and smile lines were used.
2. First provisional restoration
A temporary shell was created using 3D diagnostic tooth arrangement. A PMMA block (VIPI BLOCK TRILUX; VIPI, São Paulo, Brazil) was milled using a milling machine (RX5; MegaGen, Daegu, Korea). The temporary shell was not elaborately prepared based on the margin of the abutment, rather it was provisionally prepared based on the cervical line of the abutment; therefore, it was limited to precise positioning on the 3D diagnostic tooth arrangement. To resolve this, a positioning jig was printed and manufactured using a 3D printer (Form3; Formlabs, Somerville, MA, USA), and the temporary shell was precisely positioned at the planned position on the diagnostic tooth arrangement (Fig. 5).
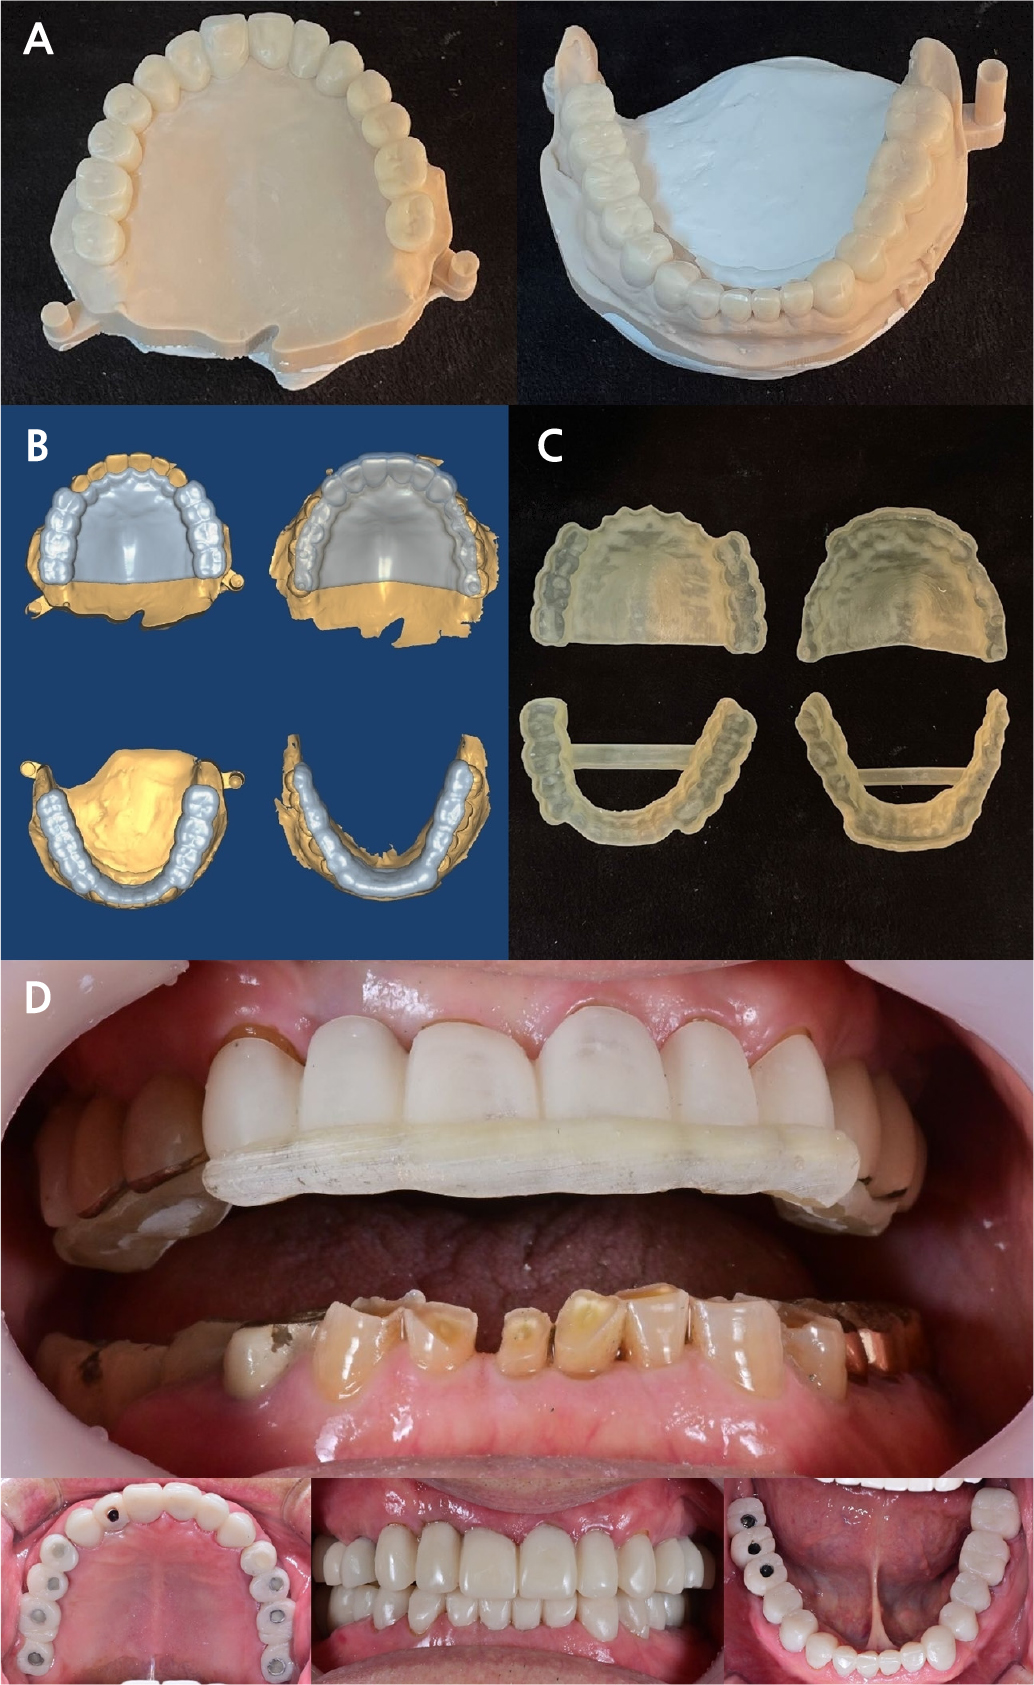
Fig. 5.
First provisional process. (A) Printing of a three-dimensional (3D) diagnostic tooth arrangement model, (B) The temporary shell location jig was designed using computer-aided design (CAD) software and 3D printed, (C) Fabricated temporary shell, (D) Use of a jig to accurately position the temporary shell in the patient’s mouth.
Tooth #12 was extracted and had a healing period of approximately 3 months. Subsequently, a guide was created using implant planning software (Implant Studio; 3Shape, Copenhagen, Denmark), and implants (TSIII SA; Osstem, Seoul, Korea) were placed via guided surgery. The abutment of the existing implant was removed, and a temporary abutment was placed. Subsequently, the temporary shell was connected and attached to the resin, similar to a natural tooth abutment. In this case, a positioning jig was used.
3. Second provisional restoration
A final impression of the maxilla and mandible was made. Impression copings were attached to the implant site, and cord packing was performed to retract the gingiva around the natural abutment. An open-type custom tray was fabricated, and impressions were made using a polyether impression material (Impregum Penta; 3M ESPE, St. Paul, MN, USA). To simulate the first provisional restoration in the second provisional restoration, we obtained maxillary and mandibular intraoral scan data in which only the posterior provisional crowns were placed, overlapped the anterior abutments, and aligned the master model in the first provisional occlusion state. In addition, jaw movements in the first provisional state were acquired using the Ceramill Digital facebow and simulated in the second provisional restoration. A custom abutment was manufactured and placed at the implant site, and a second provisional restoration was performed. A positioning jig was not used as the provisional crown prepared for the abutment impression was accurately positioned (Fig. 6).
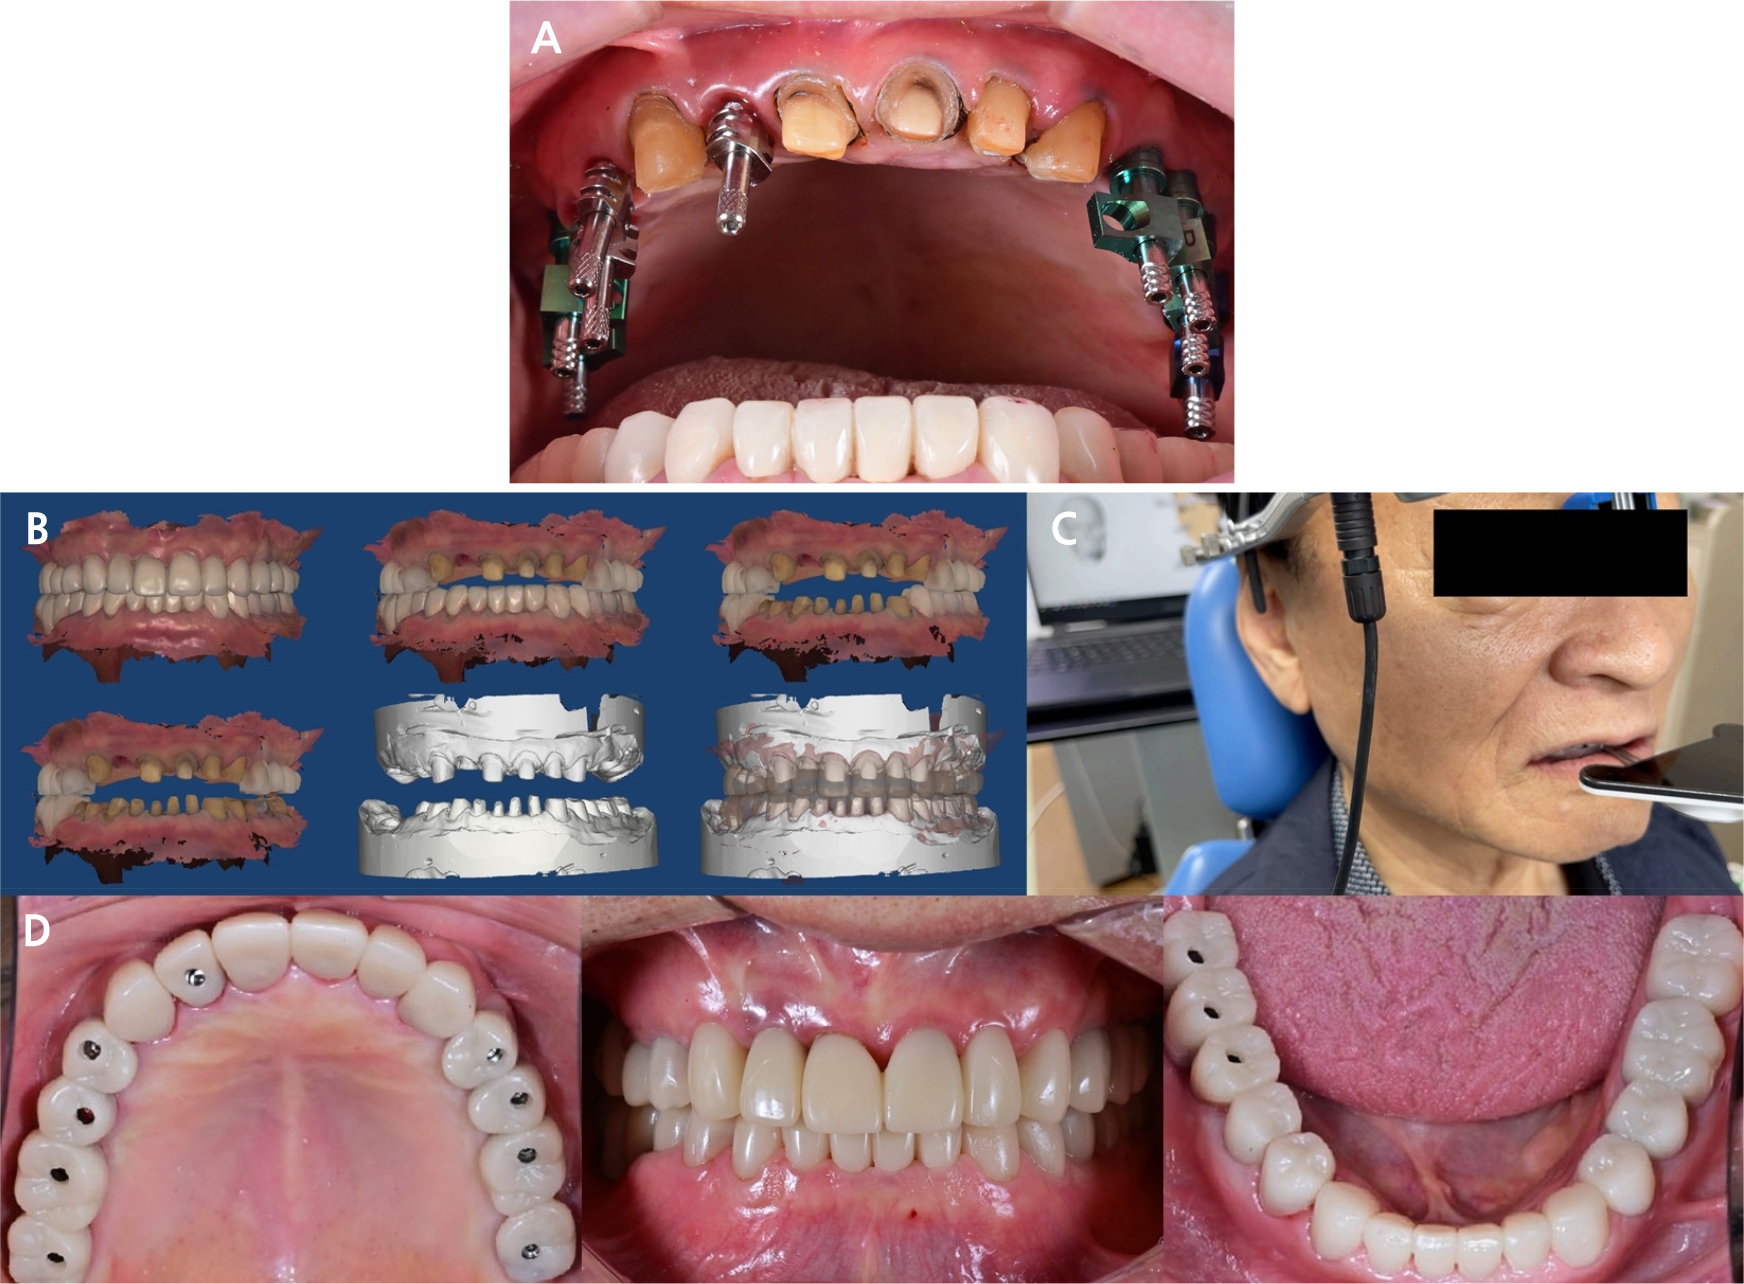
Fig. 6.
Second provisional restoration fabrication process. (A) Fabrication of the final impression using the traditional method, (B) Aligning process of the master model using intraoral scan occlusion data, (C) Acquisition of jaw movements in the first provisional state, which was adapted to simulate the second provisional restoration, (D) Delivery of the second provisional restoration.
4. Fabrication of the final prosthesis
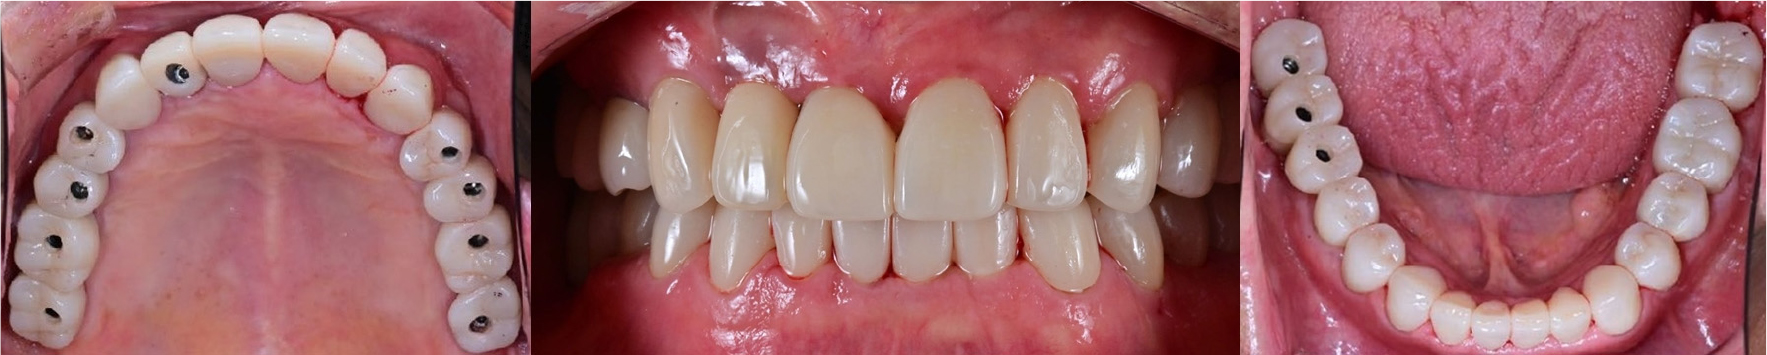
After a sufficient adaptation period of approximately 3 months in the second provisional state, the final prosthesis was fabricated. As the final prosthesis material, a single-structured zirconia block (Shofu, disk ZR lucent; Shofu Inc., Kyoto, Japan) was milled, and a crown was fabricated similar to the second provisional restoration that had undergone a sufficient verification process. After delivery, the final prosthesis was bonded using resin cement (RelyX U200; 3M ESPE). The patient was satisfied with the functional and esthetically improved prosthetic treatment (Fig. 7).
Ⅲ. Discussion
Digital workflow is widely used in dentistry. Full-mouth rehabilitation is a well-established procedure and one of the most challenging traditional treatments; however, using a digital method, it can be performed in a relatively easy and simple manner. Hassan et al. used facial scans and CAD-CAM information in 10 patients to fabricate temporary dentures immediately after tooth extraction and evaluated their fit, occlusion, and esthetics. No complications occurred when provisional dentures were placed for 3 months. A digital workflow has been reported to enable functional and esthetically predictable prosthetic restorations, from immediate temporary dentures to final implant-supported prostheses.2 Coachman et al. reported a case in which implant-fixed prostheses were used. Esthetic and functional digital data (CBCT, digital smile design, impressions of arches, and interocclusal registration) from a 73-year-old man were integrated into a CAD program. Successful full-mouth rehabilitation was reported by progressively proceeding with the diagnosis, treatment plan, guided implant surgery, and insertion of CAD-CAM temporary dentures.3 These cases suggest that rapid and effective treatment is possible by grafting a digital workflow for patients undergoing full-mouth rehabilitation.
An attempt to superimpose facial and intraoral scans was made by Rangel et al. in 2008.4 In 2015, Joda and Gallucci reported a case of implant placement and prosthetic restoration by integrating CBCT with intraoral and facial scans.5 However, only static patient information has been simulated to date. Treatments that incorporate dynamic information, such as the patient’s unique jaw movement, are limited. This is because special equipment, such as a system that records jaw movements, is required, and the format for integrating the information obtained through this into CAD is insufficient. In this case, jaw movement acquisition equipment, namely the Ceramill Digital facebow, was used, and the movement was converted into numbers and exported in XML file format. After being imported into the CAD system, the data were visualized, monitored, and simulated in the restoration design.6
In this case, various limitations and challenges of the traditional full-mouth rehabilitation method were overcome by integrating patient-related digital information into a full-jaw prosthetic restoration using CAD. First, it was possible to simultaneously perform vertical dimension elevation and CR acquisition. Regarding the CR path of the patient, which was acquired using the Ceramill Digital facebow, the vertical height could be raised sufficiently to obtain the minimum restoration space and esthetics of the anterior region. Moreover, procedures required in the traditional method, such as vertical height elevation on the articulator, anterior bite jig fabrication, acquisition of CR in the patient’s mouth, and verification of accurate CR acquisition, were not required.
Second, it was possible to minimize occlusal adjustments in the patient’s mouth. In the mechanical semi-adjustable articulator used in the traditional method, the patient’s jaw movement is linearly reproduced on a component that reproduces the human joint structure as an average value, which differs from the actual patient movement value. Therefore, there is a high possibility of occlusal adjustment of the prosthesis. In this case, occlusal adjustment was minimized because the interference was adjusted in advance on CAD using the patient’s eccentric movement data obtained from the Ceramill Digital facebow.
Third, facial scans can be used as reference points when designing prostheses. Traditionally, incorporating a patient’s facial information into a diagnostic wax-up for prosthesis fabrication is unfeasible. By integrating the patient’s facial scan data into CAD and utilizing the facial scan information in the diagnostic process, including the patient’s ala-tragus line, inter pupillary line, anterior esthetics (midline, smile line, and anterior exposure), and facial features (lip support and facial ratio), an exact diagnosis that can be simulated in the final prosthesis can be achieved.
Fourth, by utilizing the digital superposition function, the patient’s adapted second provisional design can be simulated in the final prosthesis.7, 8 In the traditional method, cross-mounting must be performed to simulate the design of a temporary prosthesis in the final prosthesis. For cross-mounting, an impression in the provisional state and facebow transfer are required in addition to the final impression, and a bite of the occlusal relationship between provisional-provisional, abutment-provisional, and abutment-abutment is required. In addition, several processes are required, such as creation of a customized anterior guidance table. In this case, a second provisional replication was used to reduce the burial and treatment times during fabrication of the final prosthesis, and this method was effective for patient adaptation during the final restoration.
In this case, the final impression was not made completely using digital methods because the intraoral scanner used could not record the deep margin of the natural tooth abutment, reflecting the technical limitations of inaccuracy for long-span scans of 6−8 units or more compared to the traditional method of making impressions.9, 10
A CAD-CAM milling machine was used in accordance with the digital workflow in the fabrication of the provisional and final prostheses. Commonly used monolithic zirconia was used as the final prosthesis material as it has better esthetics, biocompatibility, and thermal insulation properties, as well as higher flexural strength (800−1000 MPa) and toughness (6−8 MPa m½) than other ceramic prostheses.11 The 5-year cumulative survival rates were 95.9% and 97.1% for natural and implant abutments, respectively, indicating high success rates similar to those of conventional PFM crown.12 Monolithic zirconia does not require additional laboratory processes, such as layering of porcelain and casting for metal coping, and is more suitable for digital workflows.
Ⅳ. Conclusion
In this case, intraoral and facial scan information, CBCT information, and jaw movement data were integrated using a digital facebow, thereby enhancing the use of the digital method for the treatment of a patient with tooth wear. Vertical height was set on the CR path, which was acquired using a digital facebow. The patient’s facial scan information was used to arrange the diagnosed teeth. During delivery of the provisional crown, a positioning jig was 3D printed to accurately position the provisional crown at the location of the diagnostic tooth arrangement. While fabricating the second provisional restoration, the restoration was superimposed on the first provisional intraoral scan data to simulate the existing vertical height, occlusion, and prosthesis design. The patient’s unique jaw movement, acquired using a digital facebow, was simulated in the final prosthesis design to minimize the occlusal adjustment in the patient’s mouth.
