

Ⅰ. Introduction
Among various treatment methods restoring the missing tooth, implants are widely used in dentistry as treatments to restore the masticatory function and improve the quality of life while preserving adjacent teeth.1 Of these, in case that a single tooth or two to three consecutive teeth are missing, the implant-fixed prosthesis is typically used for treatments. When the implant-fixed prosthesis is fabricated, clinical and laboratory processes may be divided largely into the traditional process and the digital process. In the traditional process, an individual tray may be needed for impression taking, and time-consuming processes such as fabricating a master cast after impression taking are essential. In contrast, the digital process uses an intraoral scanner without an individual tray to minimize discomfort of patients, and make impression taking easy. Furthermore, unlike the cases of the natural tooth where the margin of the abutment should be recognized accurately, the digital process requires only the accurate position and direction of a scan body. Owing to such convenience, recently digital impression taking with an intraoral scanner is on an increasing trend. In addition, communication with the dental laboratory is effectively made by exchanging scan data, and communication between the practitioner and patients can also be made more smoothly.2
If optical impression is acquired using an intraoral scanner for the dental implant, a series of processes such as planning, design and fabrication of the prosthesis can be performed through a digital workflow. However, the implant prosthesis covered by the National Health Insurance is limited to porcelain-fused-to-metal crowns, which has led to limitations in the digital fabrication method. With the recent progress in 3D printing and material technology, now 3D printing of metal is possible. When the implant-fixed crown covered by health insurance was fabricated as porcelain-fused-to-metal crowns by the traditional method, fabrication errors were generated during casting after fabrication of the wax pattern, and a strenuous process to correct such errors was necessary. However, if a metal coping is fabricated through metal 3D printing, the fabrication of crowns on the digital workflow using an intraoral scanner is possible, which reduces engineering errors, leading to acquisition of passive fit between the abutment and the metal coping, and reduction in biomechanical problems such as screw loosening, screw fracture and fixture fracture.3, 4
Meanwhile, in case of the internal connection fixture among implant-fixed prostheses, abutment settling happens occasionally over time, and this increases the possibility of under-occlusion or screw loosening. Many ways to compensate this problem have been proposed. Among them, many literature sources recommend that a provisional crown is placed after installation of the abutment to assess and correct the change in occlusion, followed by abutment-level impression taking at a stable state without abutment settling, and the placement of the definitive crown.5, 6 In addition, in the case of immediate loading after the placement of the implant, the customized abutment and a provisional restoration are designed, fabricated and placed within a short period of time after surgery. If digital technology is used, the definitive prosthesis may be fabricated and placed without retrieving the customized abutment, so it may prevent loss of the epithelial attachment.
In this case study, when the definitive implant prosthesis was fabricated, digital impression was taken through the automatic abutment matching algorithm without retrieving the abutment outside of the oral cavity, and the implant prosthesis covered by insurance was made with metal using metal 3D printing technology, leading to predictable treatment outcomes. Thus, we report the effectiveness of the fabrication method of the implant-fixed prosthesis using digital technology.
Ⅱ. Case Study
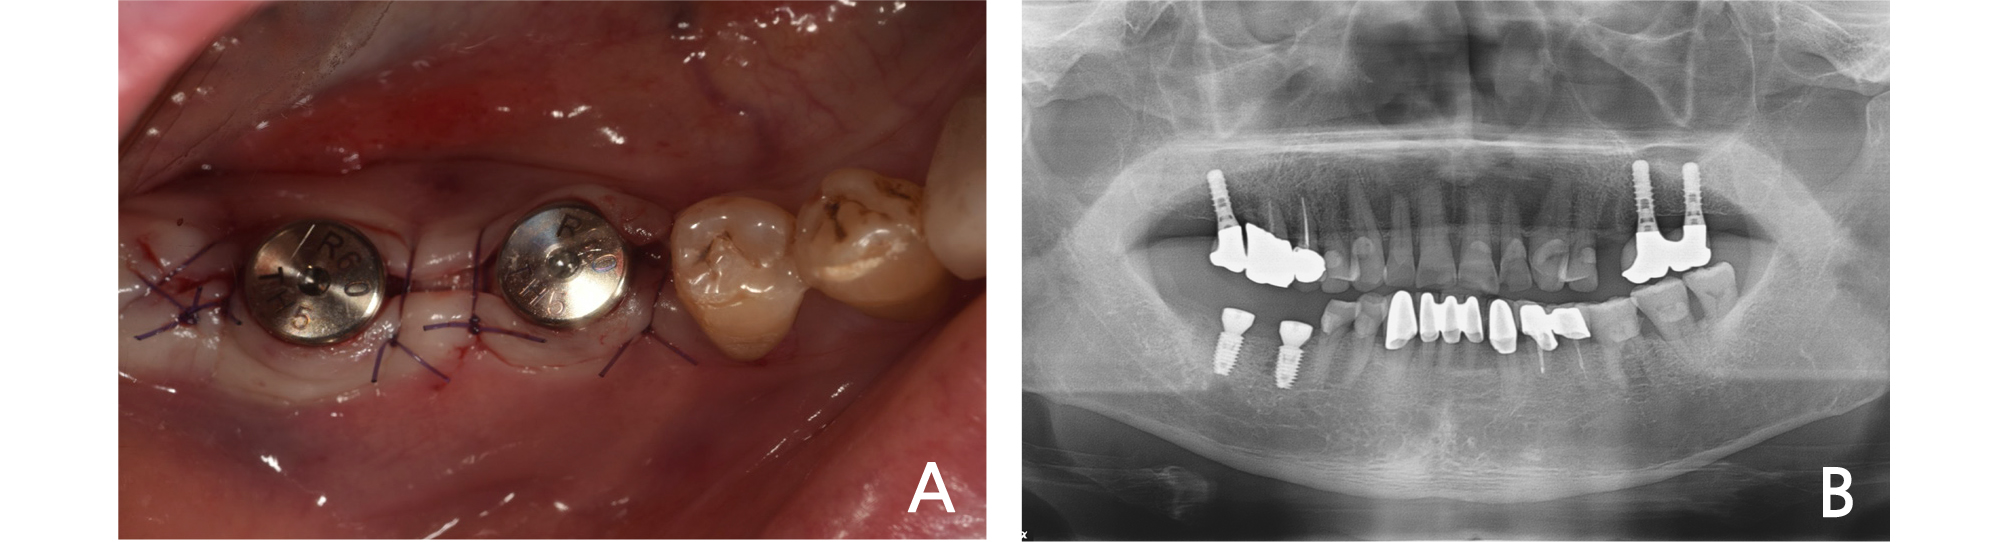
This case concerns a male patient aged 82 years who visited this department referred from the Department of Periodontics at this hospital for the implant planning in the site of missing teeth on the right mandible and the fabrication of a surgical guide. At the first examination, it was found that the second premolar on the left maxilla, and the first and second molars on the right mandible were missing, and a one degree of mobility was observed for the second molar on the left mandible (Fig. 1).

As for systemic medical history, he had been taking antiplatelet drugs and anticoagulants prescribed at the Department of Cardiology in this hospital for coronary stenosis and unstable angina. Thus, after consulting with his physician at the Department of Cardiology, restoration using fixed crowns on the areas of the missing first and second molars on the right mandible and the missing second premolar on the left maxilla was planned. According to the plan, treatments would start with the molar implants on the right mandible, which would be followed later by the left maxillary premolar implant.
Firstly, preliminary impression was taken, and then a model was scanned using a desktop scanner (T500, Medit, Seoul, Korea). Based on this, a surgical guide was designed by using a computer-aided design (CAD) program (ExoCAD, ExoCAD GmbH, Darmstadt, Germany) after superimposing the cone-beam computerized tomography (CBCT) and preliminary cast. In this process, the axis of antagonist, adjacent teeth and the volume of alveolar bone were considered, and the surgical guide was fabricated using a stereo lithography apparatus (SLA) 3D printer (Zenith U, Dentis, Daegu, Korea). Implants (#46:5.0X8.5mm, #47:5.0X8.5mm, LUNA, Shinhung, Seoul, Korea) were placed on the planned position, and the healing abutment was connected (Fig. 2). Immediately after the implant placement, a digital impression was made with an intraoral scanner (Trios 3, 3shape, Copenhagen, Denmark) while the scan bodies (Geo Scanbody, GeoDent, Uiwang, Korea) were connected to the implant. The impression data were transferred to the Osstem design center. Five days after the surgery, customized abutments and PMMA milled restorations were delivered.
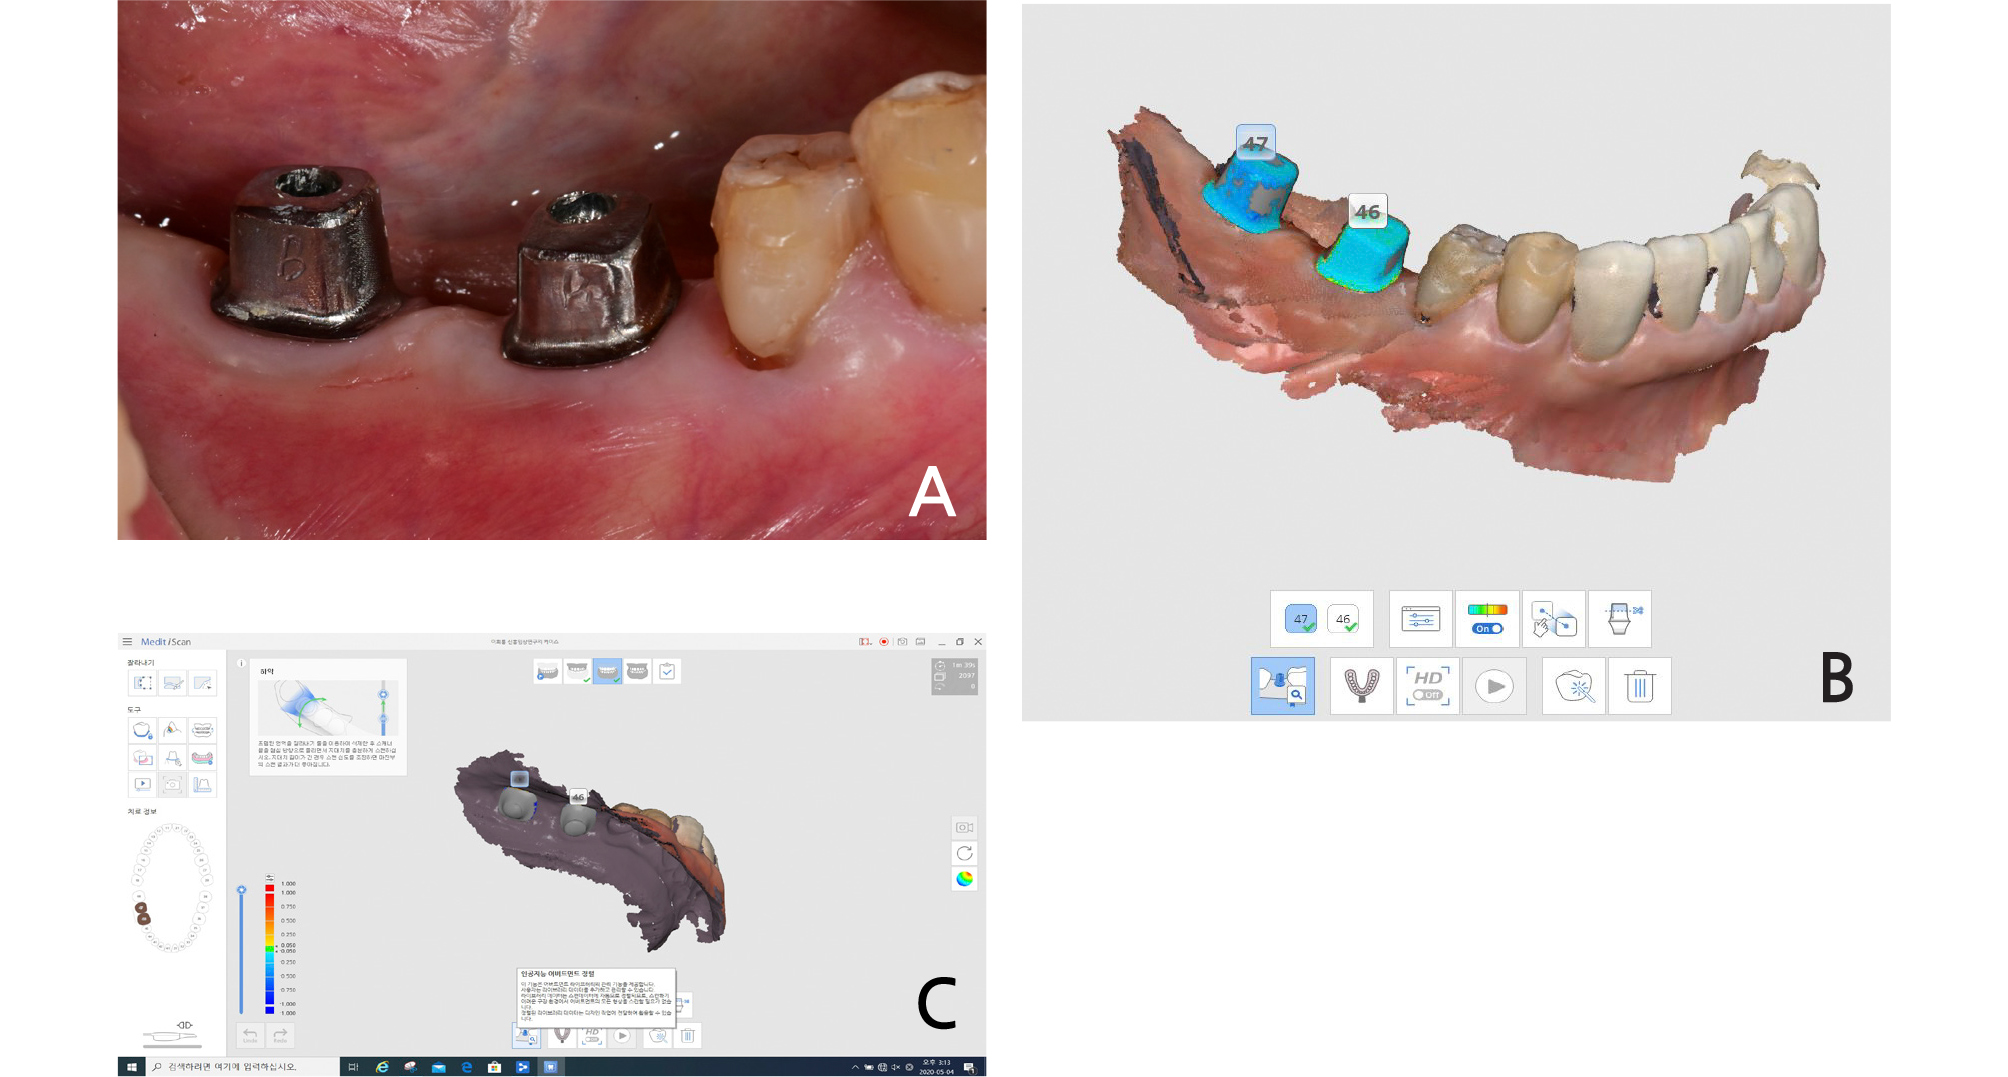
The fabricated customized abutment was scanned in advance using a desktop scanner (T500, Medit) so that abutment-level impression taking could be performed conveniently with intraoral scanning when the definitive prosthesis was fabricated later. (Fig. 3).

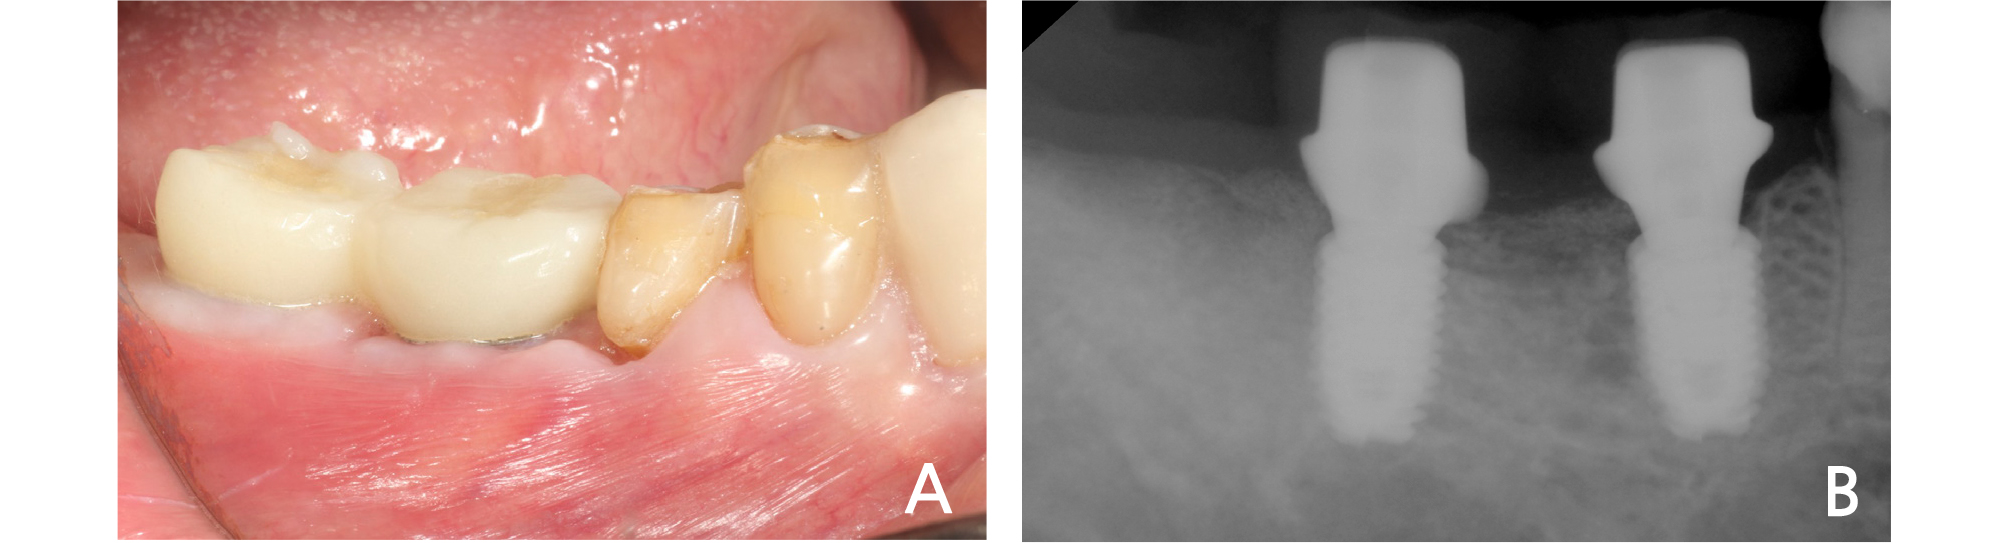
The fabricated customized abutments and crowns were delivered on the patient 5 days after implant surgery. It was confirmed that the crown was checked in the patient's mouth with only minimal adjustments, and placed after some occlusal adjustments (Fig. 4). The occlusion of the provisional crown was formed similar to the adjacent teeth by checking with the Shimstock.
From then on, progress was monitored regularly to assess the occlusion and adaptation of the patient. It was confirmed that there was no interference during lateral excursion while conducting an occlusal evaluation. Later, as the osseointegration of the implant was confirmed and it was considered that occlusion, adjacent teeth and antagonistic teeth were in harmony, it was decided to fabricate the definitive crown.
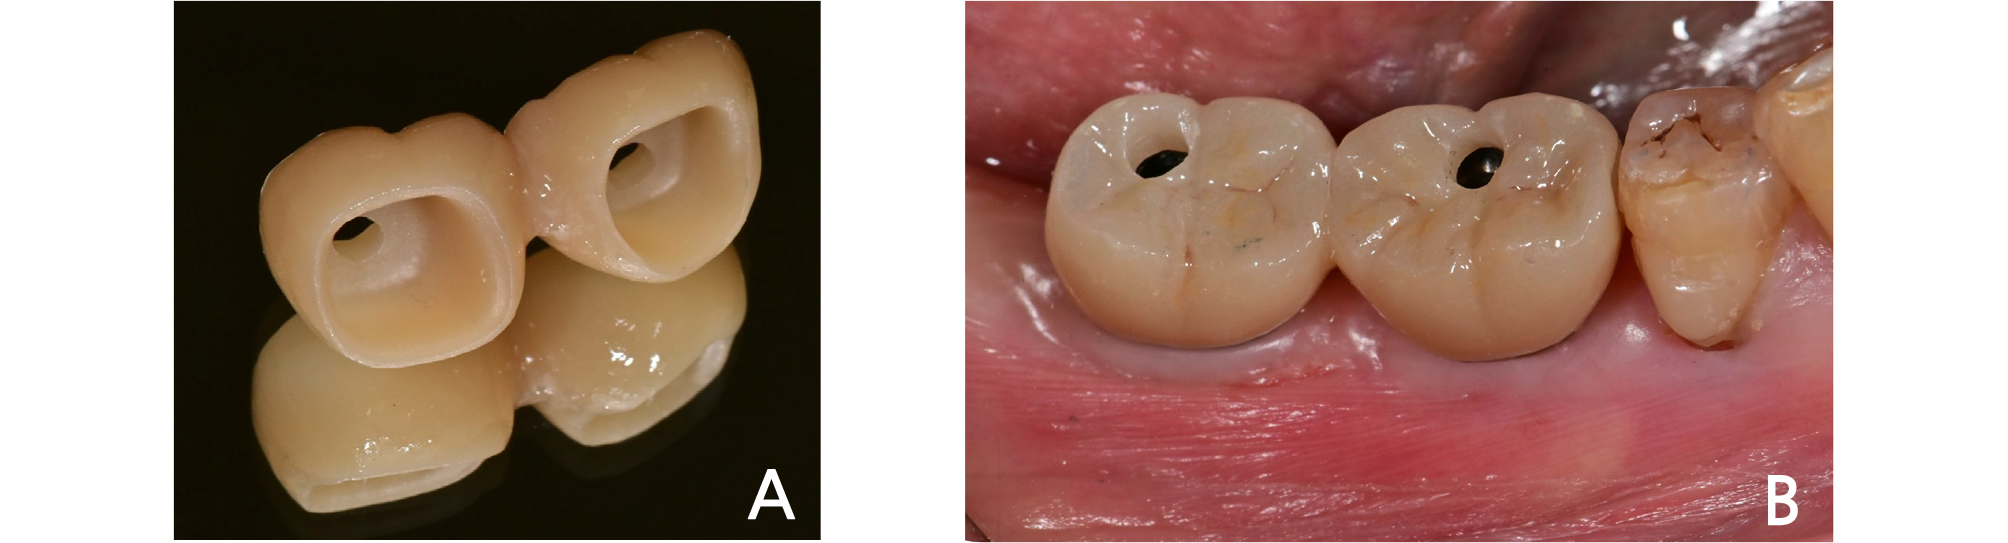
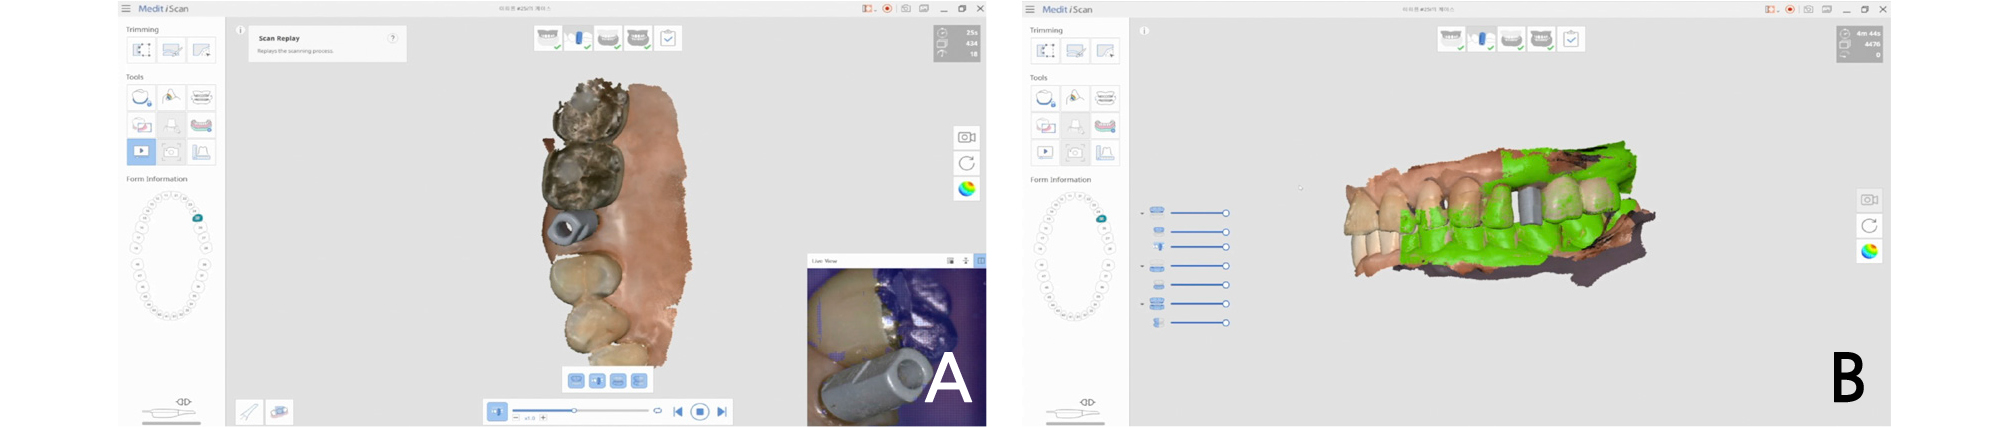
The definitive impression was taken using an intraoral scanner (i500, Medit, Seoul, Korea). First of all, the adapted provisional crown of the patient was scanned using the pre-op scan function of the intraoral scanner, and after the provisional crown was removed, the installed customized abutment was scanned again. Then, the A.I. abutment matching function in the software (Link, Medit, Seoul, Korea) provided by the manufacturer of the intraoral scanner was utilized (Fig. 5). Abutment matching is a function that automatically aligns pre-registered abutment data to locations with the same shape through a feature detection algorithm. The customized abutment data, which was acquired at the time of provisional restoration installation, was loaded into the library immediately after surgery, and superimposed on the abutment area in the oral cavity of the patient in real time, by which the definitive digital impression was taken. Subsequently, after bite scanning in the oral cavity, the data were transmitted to the design center. By reflecting the morphology of the provisional crown adapted in the oral cavity of the patient into the design of the definitive crown, which had been acquired in the pre-op scanning, the definitive monolithic zirconia crown was fabricated. The restoration type was a screw-retained after cementation (Fig. 6). When it was tried in the oral cavity, contact points did not need adjustments, and its passive fit was confirmed. After slight occlusal adjustment was performed, the crown was cemented using a resin cement (Rely-X Unicem, 3M ESPE, St. Paul, MN, USA). In the examination after 1 month from the placement of the definitive crown, the patient did not feel any discomfort, and occlusion and contact points were all stable without any alteration.
In this patient, single implant treatment was performed simultaneously on the second premolar missing site of the leftmaxilla, which was covered by the National Health Insurance. The implant (#25:4.0X10mm, Superline, Dentium, Seoul, Korea) was placed at the optimal position in consideration of the antagonist and adjacent teeth without a surgical guide, and the healing abutment was connected on the day of the implantation (Fig. 7).
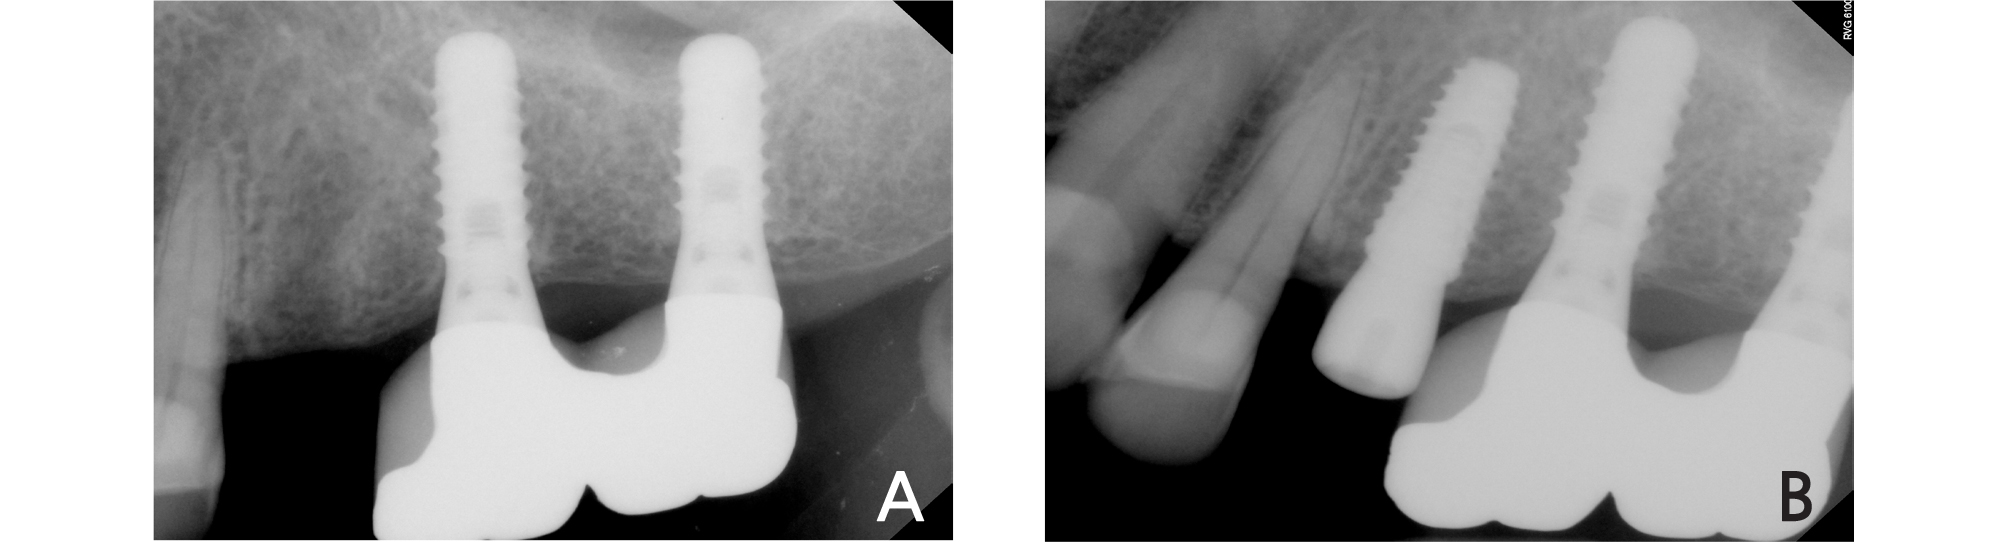
Then, after approximately 3 months of a healing period, sufficient osseointegration was observed, and as it was a National Health Insurance case for a single implant, the definitive prosthesis was fabricated without the process of provisional prosthesis. For this, the definitive impression was obtained using an intraoral scanner (i500, Medit) and a scan body (Geo Scanbody, GeoDent) (Fig. 8).
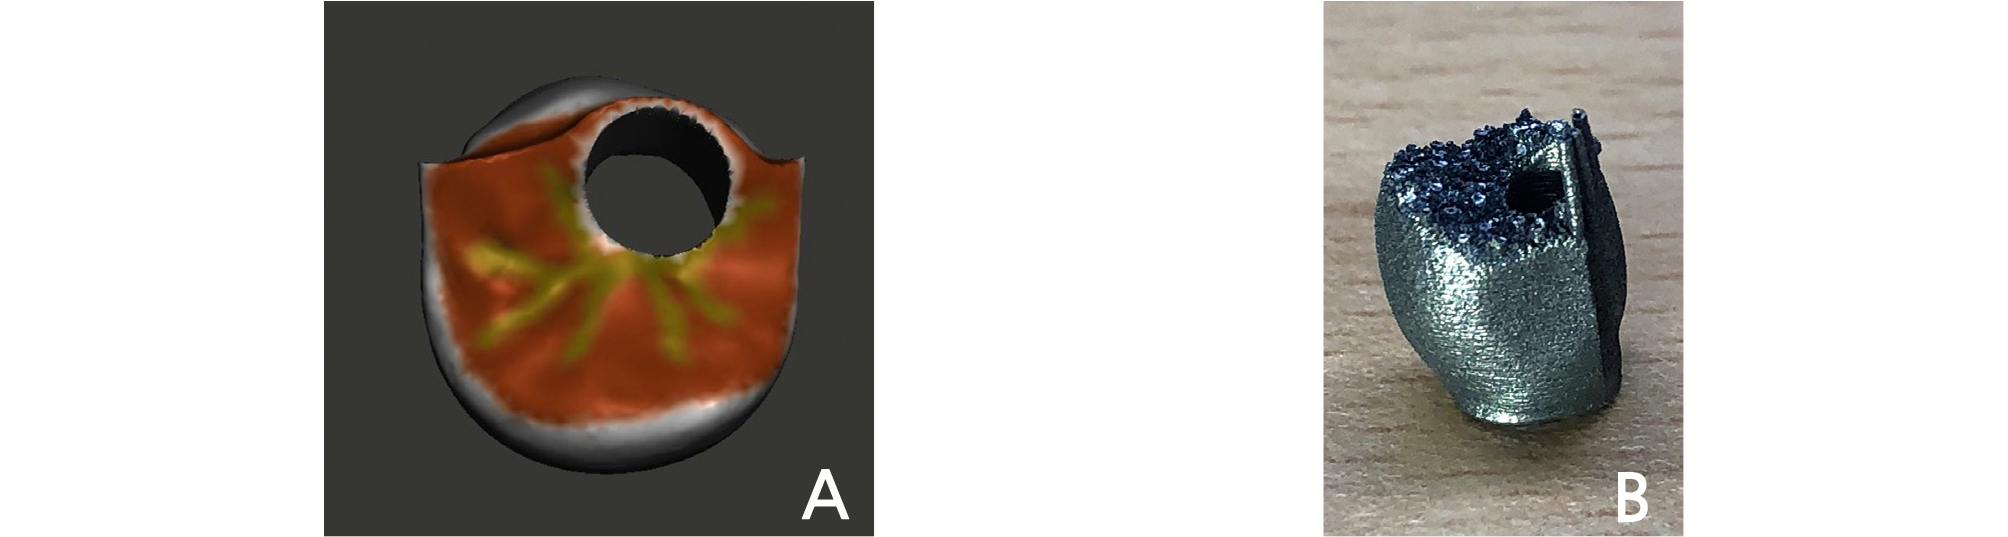
The porcelain-fused-to-metal crown set out by the National Health Insurance was fabricated as the definitive prosthesis. For this purpose, the customized abutment and the coping to be made of metal were designed using CAD software (ExoCAD, ExoCAD GmbH). Then the model was fabricated with Polyjet photopolymer material (VeroGlaze MED620, Stratasys, Eden Prairie, MN, USA) using a 3D
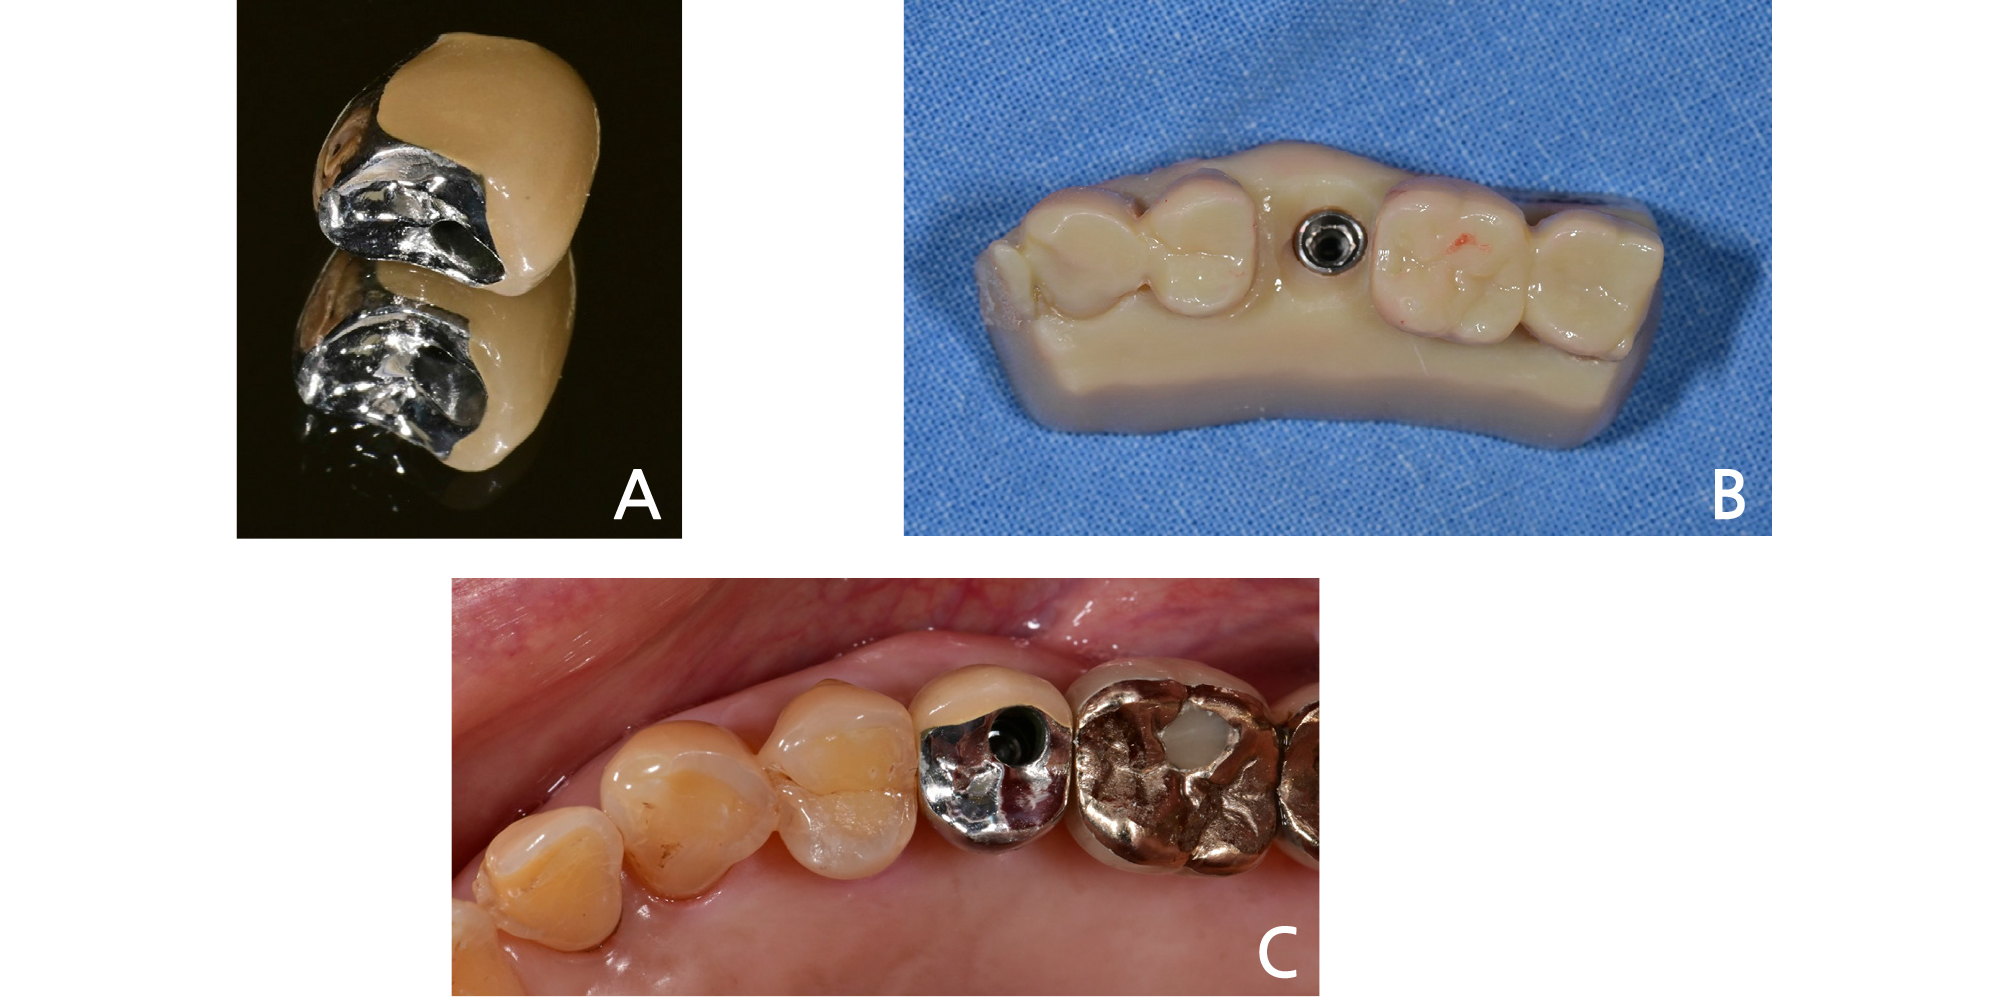
printer for polymer (Eden 260V, Stratasys, Eden Prairie, MN, USA), and the metal-coping was printed out with SLM (Selective Laser Melting) powder, Co-Cr alloy material, using a metal 3D printer (EP-M150, Shining3D, Hangzhou, China) (Fig. 9). Porcelain build-up on the metal copping was completed in a traditional way. The fit of the customized abutment and the porcelain-fused-to-metal crown was good, and they were cemented using a resin cement (Rely-X Unicem, 3M ESPE) after minimal occlusal adjustment (Fig. 10). The patient was satisfied with the aesthetics and function, and he also did not feel any discomfort. The occlusion and contact points were all stable without any alteration at the examination conducted at one month after the definitive prosthesis had been delivered.
Ⅲ. Discussion
Several steps are needed to fabricate an implant-fixed prosthesis with a traditional method. Among them, many time-consuming processes such as preliminary impression taking, cast fabrication, individual tray fabrication were required for definitive impression taking of the implant with traditional methods.7 Intraoral scanning can eliminate these cumbersome processes, and as the accuracy of scanning and the fit of fabricated implant prostheses have improved to the clinically acceptable level, the clinical use of intraoral scanning has been increased recently.2
In this case study, an intraoral scanner was used when the definitive impression of the implant was taken, which resulted in the elimination of the time-consuming part of the traditional impression taking process. This saved the time for treatment and laboratory procedures, and reduced the possibility of errors at various steps in fabrication processes, enabling fabrication of predictable prosthesis.
In addition, after the implant fixture was placed, the customized abutment had been scanned in advance with a desktop scanner before its installation in the oral cavity. Using this scan data, it was possible to clearly record even the margin of the subgingival area just by simple intraoral scanning without removal of the installed abutment when the definitive crown was fabricated. For this, the A.I. abutment matching function of the software provided by the manufacturer of the intraoral scanner allowed monitoring abutment matching during treatment, thus reducing the hassles and the possibility of errors during manual matching, and the impression taking became faster and more convenient. The abutment settling in the implant mainly occurs in the early phase when it begins to take the occlusal force in the internal connection fixture, which causes a reduction in torque, screw loosening and underocclusion.6 Recently, the internal connection implant is used widely for implant treatment,8 and to avoid the abutment settling, a method to observe the occlusion after installation of the provisional prosthesis and then to fabricate the definitive crown when the occlusion becomes stable has been recommended in many literature.6, 9 Thus, also in this case study, the provisional crown was first delivered and then the progress was observed. If the abutment is scanned in advance and the data are stored in the computer, it is not necessary to retrieve the abutment during the definitive impression taking, and thus the compensation process due to the abutment settling is easily resolved. In addition, in case that it is necessary to re-fabricate the prosthesis due to fracture or abrasion, the abutment is re-used as it is without removal, and only the crown needs to be re-fabricated if the advance scan data of the abutment exist. As such, it may be useful in various cases, and thus is considered to have high clinical applicability.
Digital impression was taken by connecting a scan body to the implant placed on the day of surgery to fabricate a provisional restoration, and a customized abutment and the provisional restoration were installed after 5 days post-surgery. The method of impression taking during implant surgery involves the process of pick-up using traditional rubber impression material or a resin, which has had limitations such as a part of the material contacting the surgical site. Although it is to take impression once more before the definitive impression, digital impression was able to overcome the limitations of the traditional method. In this case study, during assessment at the definitive crown fabrication stage, the gingival height was maintained in harmony with the margin of the customized abutment, and rather a form of sub gingival margin was observed as the gingiva was covered. Furthermore, the pre-acquired library could be utilized without the need to insert the gingival retraction cord. If the margin of the customized abutment needs to be lowered through further processing due to gingival recession, the protocol used in this case could not have been implemented, and this is considered a limitation of the method reported in this case study.
In this case study, the treatment of the missing second premolar on the left maxilla was also performed with an implant-fixed prosthesis, and since this site was covered by the national Health Insurance, the upper prosthesis was decided to be a porcelain-fused-to-metal crown. If the metal coping of a porcelain-fused-to-metal crown was to be fabricated with the existing method, strenuous processes of forming and casting a wax pattern on an abutment model was required, and errors might occur in each process. With the recent advancement of 3D printing and materials, a crown or an abutment made by metal 3D printing have been developed to a clinically acceptable level.10 Therefore, in this case study, the metal coping was designed using a CAD program and subsequently fabricated with a metal 3D printer. Consequently, more convenient and predictable prosthesis could be fabricated while eliminating the cumbersome laboratory procedures mentioned earlier.
However, due to the nature of 3D printing, a support needed to be connected to the printed output, and in this case, support connections were set on the occlusal surface. In the process of cutting the support and polishing the occlusal surface after 3D printing was completed, a problem that the occlusion could be slightly lower than that of the prosthesis that had been initially set might arise. To prevent this problem as much as possible, the occlusal surface was designed to be uniformly slightly thicker as a whole when the occlusal surface of the metal coping was designed in the CAD program, and efforts were made to minimize the error from the set occlusion by carefully removing the support and polishing the surface.
As a result, after the definitive crown was fabricated, the treatment could be completed only with minimal occlusal adjustments when it was installed to the patient.
The actual cost for model and metal crown fabrication with a 3D printer, including materials used, is not expensive. However, the laboratory fee is similar to conventional production, considering the depreciation cost of the equipment.
Ⅳ. Conclusion
In this case study, by using various functions of an intraoral scanner and a metal 3D printer, the treatment time and laboratory procedure were shortened during the restoration using the implant-fixed prosthesis, allowing convenient treatment for both the patient and the practitioner, and predictable fabrication of the prosthesis was possible. However, the accuracy of the definitive impression scanned with an intraoral scanner and the clinical suitability of the prosthesis fabricated with a metal 3D printer should be assessed through a further long-term clinical study.
