

Ⅰ. Introduction
Ⅱ. Materials and Methods
1. Probing with metal and plastic probes
2. Confocal microscopy
3. Scanning electronic microscopy
Ⅲ. Results
Ⅳ. Discussion
Ⅴ. Conclusion
Ⅰ. Introduction
Peri-implantitis is an inflammatory reaction associated with the loss of the supporting bone around an implant during function.1 The onset of peri-implant disease is caused by an imbalance between the bacterial load and the host defense.2,3 Thus, peri-implantitis treatment aims to reduce the bacterial load within the peri-implant pockets and decontaminate implant surfaces.4,5
Decontamination requires the use of mainly metal or plastic instruments. The use of metal instruments alters the titanium surface during professional cleaning.6 Thus, non-metal instrument use has been recommended to prevent damage to the implant surfaces.7 However, an instrument that is softer than titanium may leave remnants on the implant surfaces.7, 8, 9 The composite effect of surface energy, composition, roughness, and topography plays a significant role in the biological response of the implant.10 Thus, many studies have reported the possibility of the instrumentation process to reduce the biocompatibility of implant surfaces.11, 12, 13, 14
A periodontal probe is an instrument that can affect the implant surface. Peri-implant probing is an essential process for the diagnosis of peri-implant diseases.14 However, some authors have raised concerns about the possibility of damaging the implant surface with a metallic periodontal probe.15, 16, 17, 18 Since the probe cannot penetrate the bone, under healthy conditions, the surface of the fully osseointegrated implant is not affected by probing. In this case, probing may only affect the abutment of the implant. When bone loss occurs due to peri-implantitis, the implant surface is exposed outside the bone. Results from a histological study in dogs showed that probes penetrated close to the bone level (0.25 mm from the alveolar bone to the probe tip) at sites with peri-implantitis 19 In this case, the periodontal probe can affect the surface of the implant.
Fakhravar et al. reported on the impact of probing on the implant abutment.20Probing around implant abutments with a metal probe seems not to affect the abutment surfaces, but plastic probes induce roughness on the abutment surfaces, as seen with a surface contact profilometer.20
This study aimed to discover how probing around implant threads may affect the implant surface and to show the different effects of metal and plastic probes using confocal and scanning electronic microscopy. Confocal microscopy may be used to visualize plastic remnants as these show autofluorescence.8
Ⅱ. Materials and Methods
1. Probing with metal and plastic probes
Two rough-surface, wide-diameter implants (Dentium Implantium D: 5.0 L:10.0; Dentium, Gyeonggi-do, Republic of Korea; Fig. 1A) were placed in succession in a single prepared site in a pig mandible acquired from a meat market. An edentulous site with thick, soft tissue was chosen to simulate an area of deep probing depth (Fig. 1B).
Installation of the implant was performed in a flapless manner. The implant was inserted to a level contiguous with the soft tissue, and 2 mm of the implant was engaged in bone. The implant was reversed out, and 1 mm of surrounding soft tissue was removed with an internal bevel incision using a No. 15 surgical blade for ease of probing. The probing force was not measured, but the removal of the surrounding soft tissue enabled the placement of the probe with a slight force.
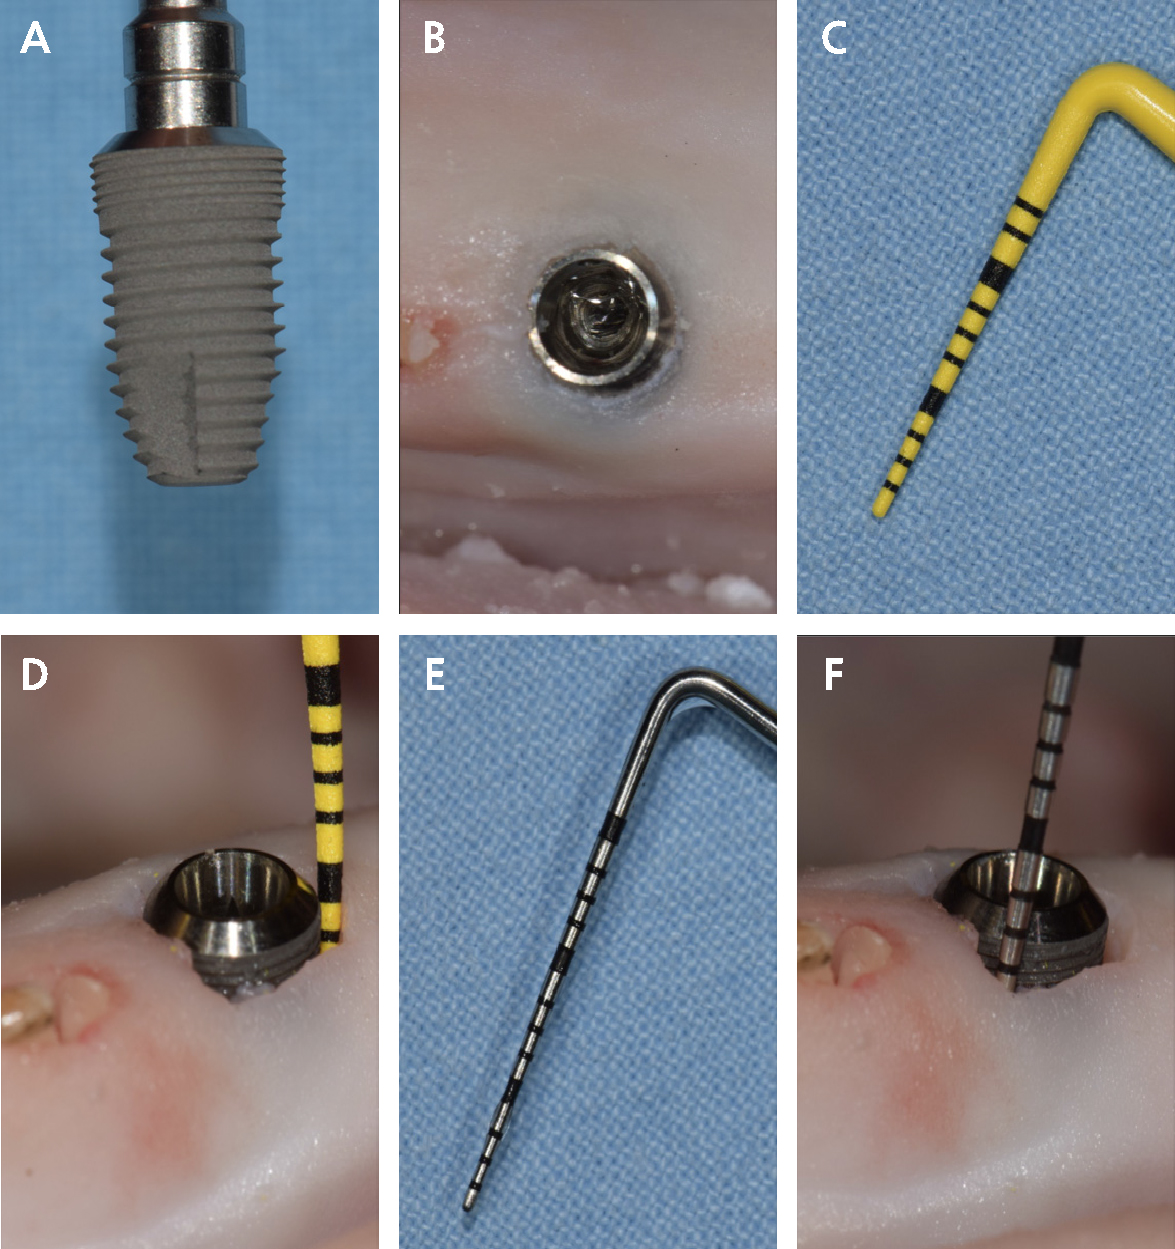
The implant was placed again in the prepared site, and a plastic probe (UNC 12 ColorvueTM probe; Hu-Friedy, Chicago, IL, USA; Fig. 1C) was used to probe around the entire circumference of the implant (implant-P; Fig. 1D). This implant was reversed out from the mandible, air-water sprayed to remove tissue debris, and carefully replaced in the original packaging to await microscopy analysis.
Another implant was placed in the site in the same manner, and a metal probe (UNC15 probe; Hu-Friedy; Fig. 1E) was used to probe around the circumference of the implant (implant-M; Fig. 1F). This implant was also removed from the mandible and debris was cleaned with air-water spray and saved for microscopy analysis.
2. Confocal microscopy
Images were captured from the microthread area with a confocal microscope (Zeiss LSM5 Pascal; Carl Zeiss, Jena, Germany) equipped with a 543-nm helium/neon laser using a ×10 Plan-Neofluar objective lens. As the microthreads could not be oriented in the same horizontal plane due to the macrostructure of the implant, z-stack images were obtained (200.0 μm stack size in 5.13 μm sections) and projected into a single image. The implant threads were not flat; thus, it was necessary to take multiple images at different focal distances and combine these images to provide a composite image.
3. Scanning electronic microscopy
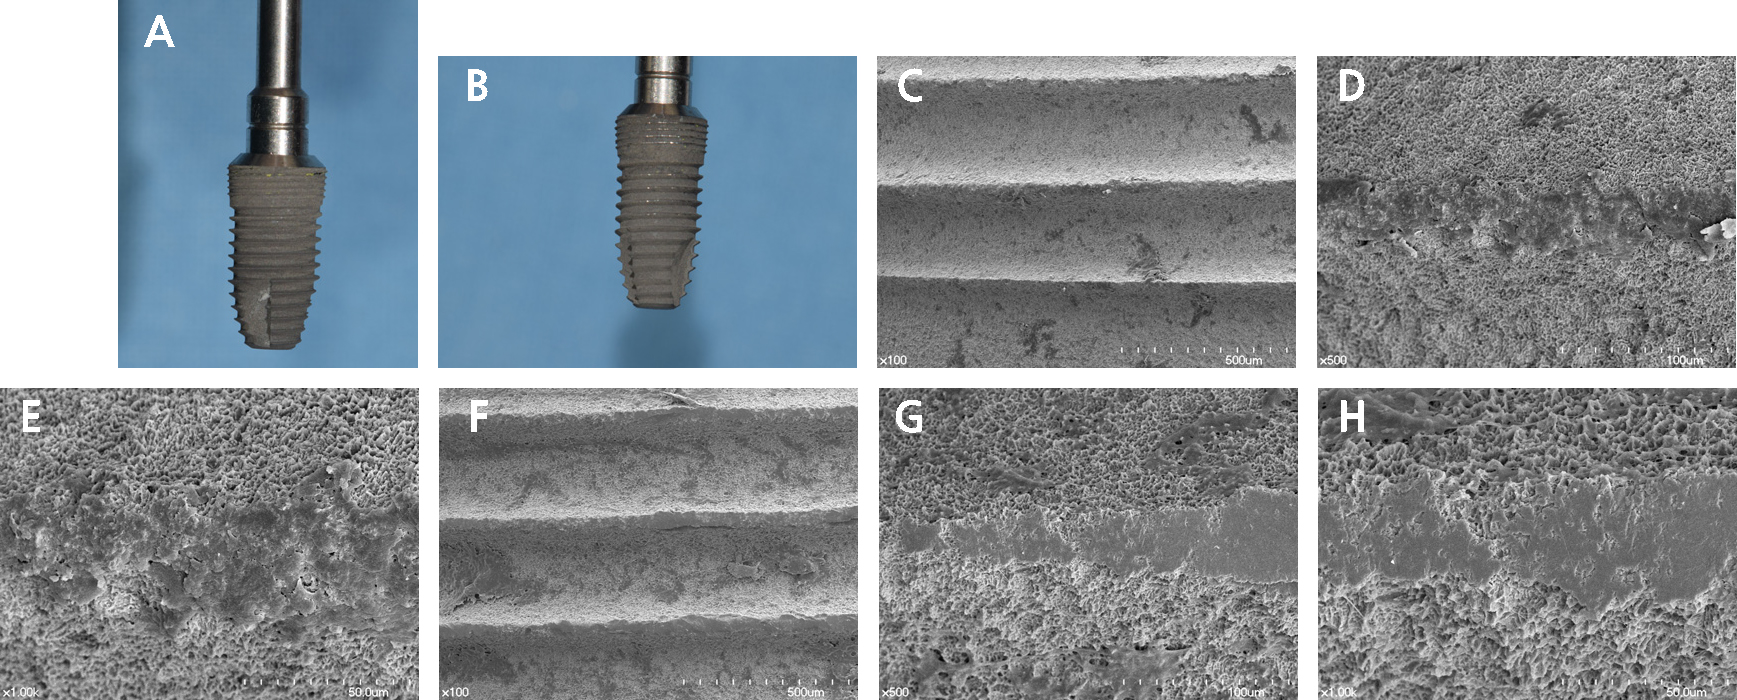
The two implants were mounted on stubs and air-dried by the evaporation of hexamethyldisilazane on a clean bench. They were then sputter-coated with gold-palladium and observed using a scanning electron microscope (S-4700; Hitachi, Tokyo, Japan) at 15 kV at a magnification of 100×, 500×, and 1,000×. The resulting images were saved digitally. The images were captured at the microthread area.
Ⅲ. Results
Close-up images of both implants are shown in Fig. 2. No scratches were observed on the implant probed with the plastic probe (Fig. 2A), but some yellow material was seen between the microthreads. On the implant probed with the metal probe (Fig. 2B), some peaks showed color changes from the dull grey color of the original surface to a bright silver color resulting from contact with the metal probe. The scanning electron microscopy results are shown in Fig. 2C to 2H. The microthread area is shown at increasing magnification, and in 500× and 1,000× views, both implants showed definite changes on their surface compared to the surrounding area. The flattened surface of the implant probed with a plastic probe (Fig. 2C to 2E) and a metal probe (Fig. 2F to 2H) can be seen.
The confocal microscopy results are shown in Fig. 3. Individual z-stack images of implants probed with plastic (Fig. 3A) and metal probes (Fig. 3B), taken 5.13 μm apart, are shown. No red fluorescence could be seen on any z-stack image when the metal probe was used. However, when the plastic probe was used, some fluorescence was observed. A three-dimensional (3-D) composite image of the z-stack images of the implant probed with a plastic probe (Fig. 3C) showed red lines, which were the autofluorescent remnants of the plastic probe on the first three microthread peaks. The 3-D projection of the implant probed with a metal probe (Fig. 3D) showed no autofluorescence.
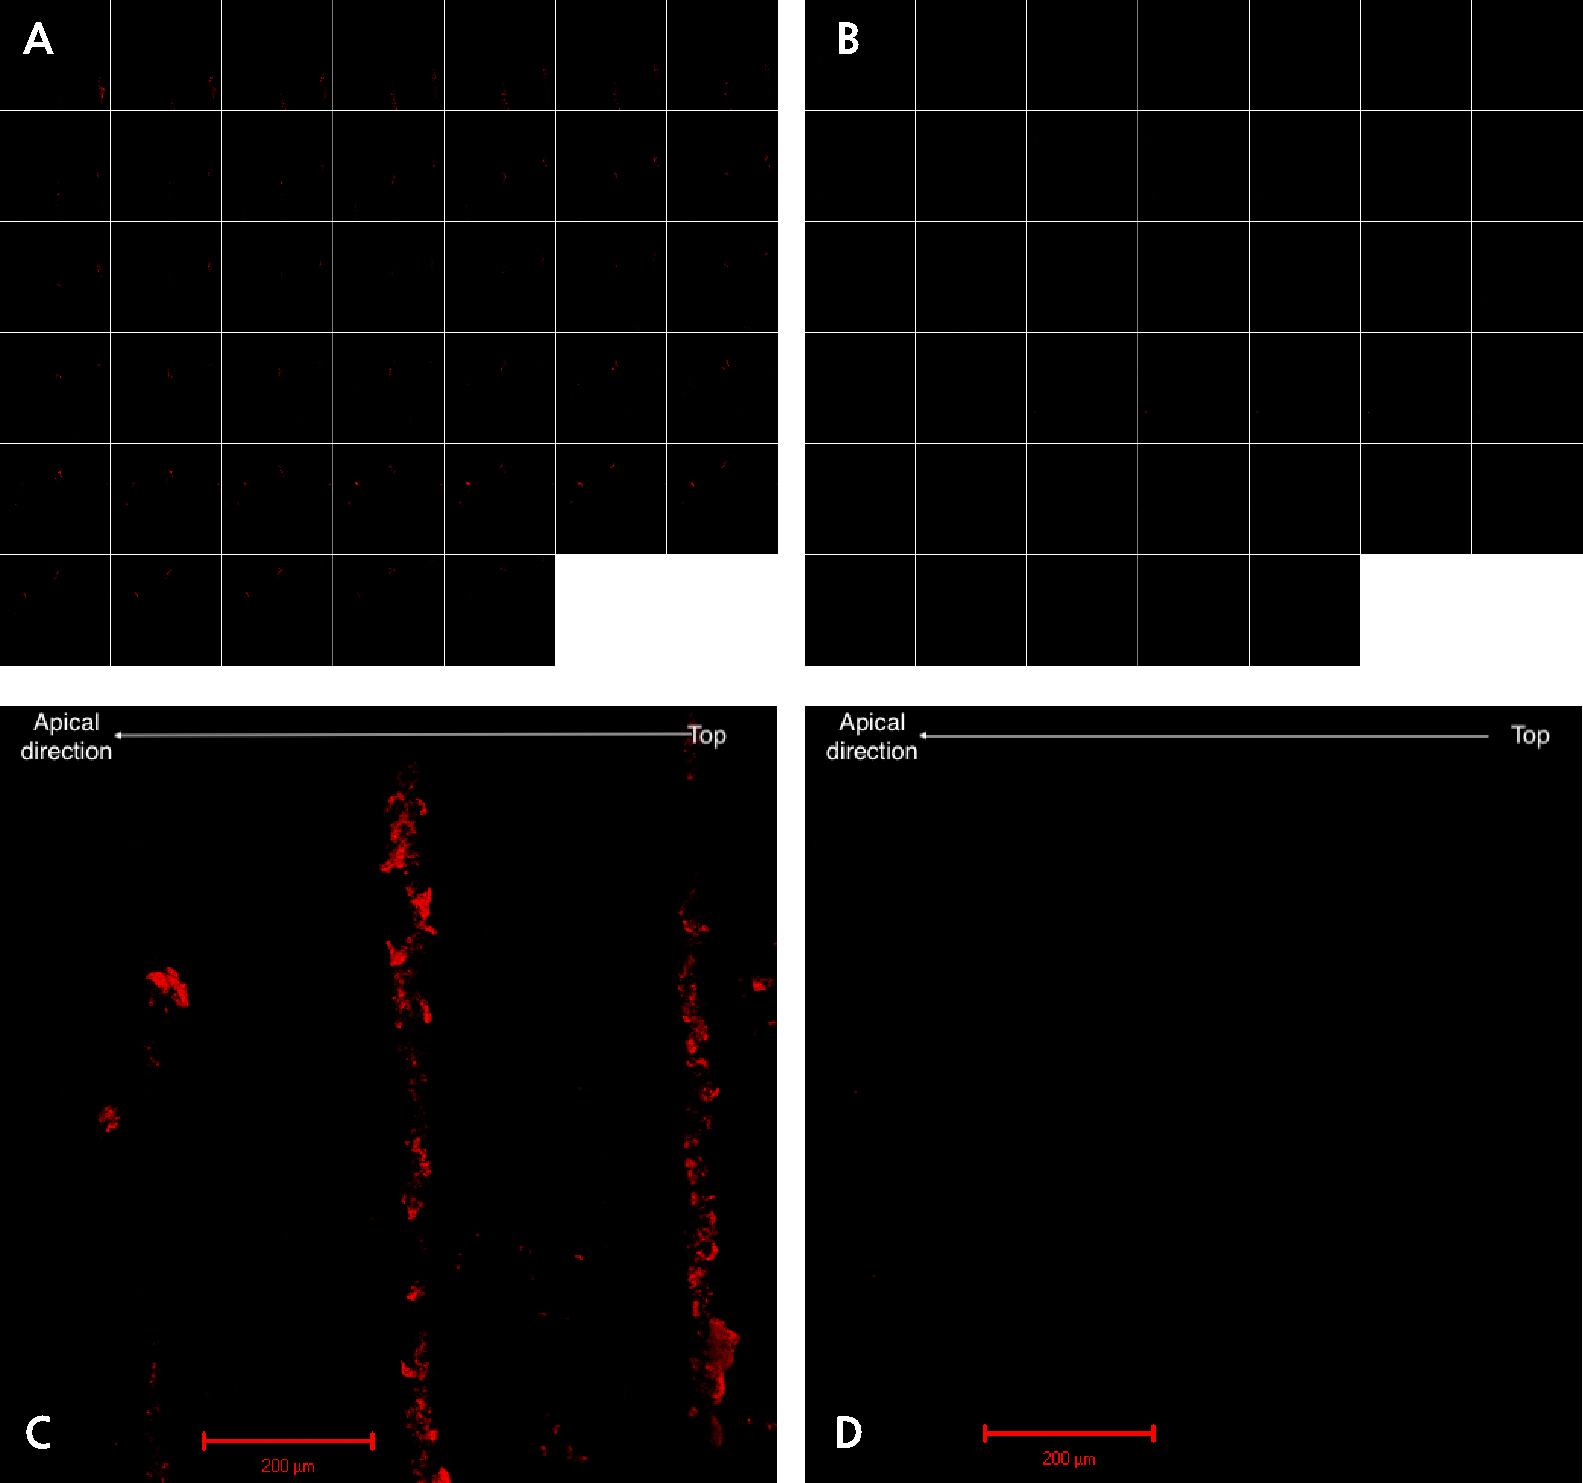
Fig. 3.
Confocal microscopy. Collection of 40 z-stack images taken 5.13 μm apart for a focal distance of 200.0 μm for the implant probed with a plastic probe (A) and the implant probed with a metal probe (B). Three-dimensional composite images of the corresponding z-stack images of implants probed with plastic (C) and metal (D) probes.
Ⅳ. Discussion
Probing may be awkward around screw-type implants when marginal bone loss results in a supraosseous location of the most occlusal threads.21 The connective tissue that forms around the threads tends to direct the probe tip into the upper surface of each thread, making apical passage of the probe tip extremely difficult.21 To accurately assess peri-implant bone loss, these threads must be passed with the probe. During this procedure, it is impossible to avoid contact between the probe and the threads.
One limitation of this study was that force-standardized probes were not used, and the force used to probe was not measured. Therefore, any lateral force that was applied during probing could not be determined. We aimed to determine whether plastic debris remained on the implant surface. Future studies should aim to determine the amount of plastic debris depending on the force and direction of probing. Moreover, only one sample was used for each situation; therefore, quantitative analysis could not be performed. Quantitative research employing more samples and measuring 2-D and 3-D roughness values and energy-dispersive X-ray spectroscopy analysis should provide more insights into this problem.
Folwaczny et al. reported ultrastructural changes in smooth and rough titanium implant surfaces after probing with metal and plastic periodontal probes. Surface roughness parameters were measured by laser scanning microscopy. The areal surface roughness (3-D roughness parameters) of the rough titanium implants showed no significant changes after the use of metal or plastic periodontal probes. Microscopic images showed gutters formed after probing, but the quantified measurements did not show significant changes.22
They concluded that, as the ultrastructural changes to the implant surfaces following contact with metal probes were slight, but partially greater than the changes caused by plastic probes, the use of plastic probes for implants is preferred.22
Uneventful healing of the soft tissue seal after probing of the peri-implant tissues is possible,23 but this study showed that contact between the metal or plastic probe and the rough-surface implant smoothened the surface of the implant and that using plastic probes may leave debris on implants. Plastic debris left on the implant surface would be difficult to remove without further damaging the implant surface.6
Greater cell proliferation after treatment with plastic ultrasonic instruments compared to that after treatment with metal ultrasonic instruments has been reported, but it is difficult to determine whether plastic debris remaining on implant surfaces would be disadvantageous.24 Further research is needed to quantify the plastic debris depending on the probing force and the direction and to determine whether these remnants have clinical relevance.
Ⅴ. Conclusion
To accurately assess peri-implant bone loss, it is necessary to probe around the entire implant, as peri-apical radiographs only show bone loss on the mesial or distal side of the implant, but there is no better diagnostic method. Moreover, the probing depth, especially with a prosthesis removed, shows a high correlation with the amount of underlying bone loss.25 Probing the peri-implant sulcus allows the assessment of factors such as peri-implant probing depth, bleeding after probing, exudation and suppuration from the peri-implant pocket, and the distance between the soft tissue margin and a reference point on the implant.26
As probing with both metal and plastic probes may affect the implant thread surface, it would be prudent to probe only when deemed necessary and to use metal periodontal probes instead of plastic probes, which may leave debris on the rough-surface implants.
